
How to Add a Watermark to a Photo (Free, No Sign-Up)
To add a watermark to a photo, open the free Watermark Tool, drop in the photo and type your name or site. For credit, put a small mark in a corner at angle 0; for protection, tick Tile across the whole image at about 35 % opacity. Download it as JPG, PNG or WebP. There is no sign-up, and the photo never leaves your device. Below are the settings that stay visible, the mistakes that make a mark easy to remove, and what a watermark does and does not do for your copyright.
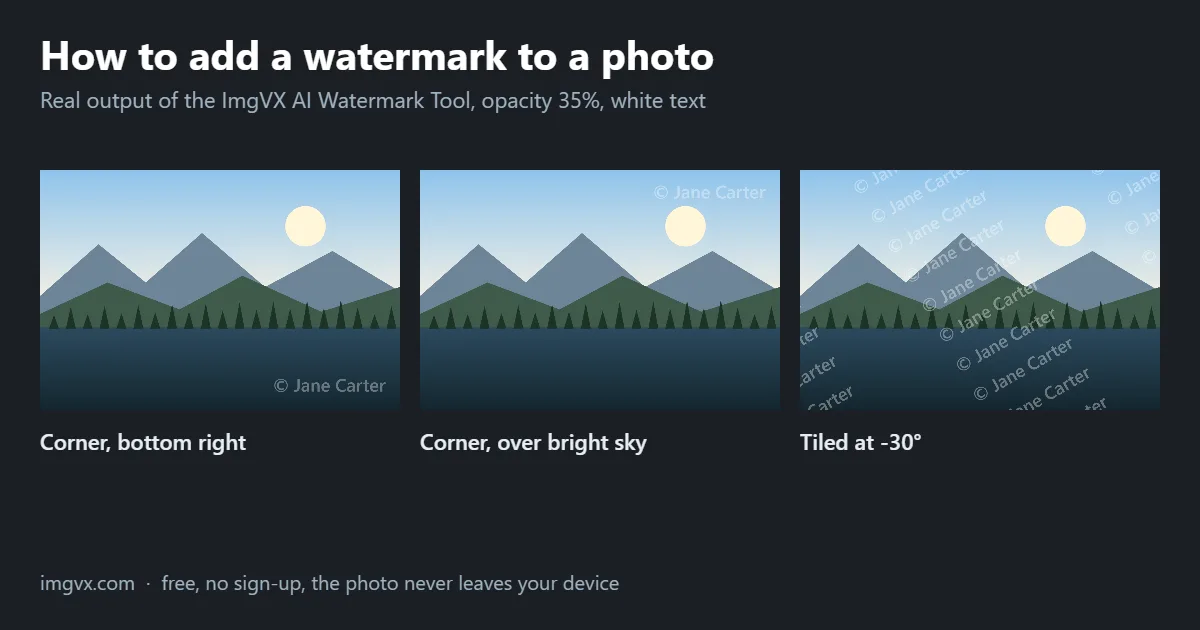
The short answer
- Tool: Watermark Tool. Text only, one photo at a time, full resolution, free.
- Defaults: white text, Size 5 % of the photo’s width, Opacity 35, Angle -30°, bottom right, saved as JPG.
- Corner mark: set Angle to 0, or the tilted text can run off the edge.
- Tiled mark: lower Tile spacing from 190 towards 100 for a mark with no clean gaps.
How to add a watermark to a photo in five steps
- Open the Watermark Tool and drop in the photo. JPG, PNG, WebP and iPhone HEIC photos all open. Nothing is uploaded: the mark is drawn by your browser.
- Type the text. Your name, your website or a line such as © 2026 Jane Carter. Short text works best: it stays readable when the photo is shown small.
- Choose corner or tiled. Leave Tile across the whole image off for one mark, and pick one of nine positions. Tick it to repeat the mark across the whole picture.
- Set size, opacity and angle. For a corner mark, set Angle to 0. For a tiled mark, keep a slant (the default -30° is fine) and choose the spacing. The next section gives values.
- Choose the format and download. JPG for photos, PNG or WebP if the image has a transparent background. The download keeps the photo’s full size and carries no mark except yours.
The tool marks one photo per run. To mark a set of photos the same way, run each one in turn with the same settings.
What each setting does
These are the tool’s actual controls and ranges, read from its code.
| Setting | Range (default) | What to know |
|---|---|---|
| Size | 2–20 % of the width (5 %) | Measured against the photo, so the mark looks the same on a 1000 px and a 6000 px photo. 3–5 % suits a corner credit. |
| Colour | any (white) | White suits dark and mid-tone areas; use a dark grey over sky, snow or a white background. |
| Opacity | 5–100 (35) | Low values can vanish on busy or bright areas; high values compete with the photo. Judge it where the mark sits. |
| Angle | -60° to 60° (-30°) | The slant applies to corner marks too. Set 0 for a corner, or the text can be clipped by the edge. |
| Tile across the whole image | on / off (off) | Repeats the mark in rows over the whole picture, at the chosen angle. |
| Tile spacing | 100–400 (190) | Gap between repeats, as a percentage of the text’s own width and height. Lower is denser. |
| Position | nine anchors (bottom right) | Used only when tiling is off. |
| Save as | JPG (default), PNG, WebP | JPG has no transparency, so a transparent PNG saved as JPG gets a white background. |
Corner or tiled: which watermark you need
The two styles do different jobs, and the test image shows why. With a corner mark at angle 0, the text on our 1600 × 1067 picture sat in rows 928 to 986, inside the bottom 13 % of the frame. Cropping that strip off removes the mark completely and keeps 87 % of the picture, which is often a better-looking crop anyway.
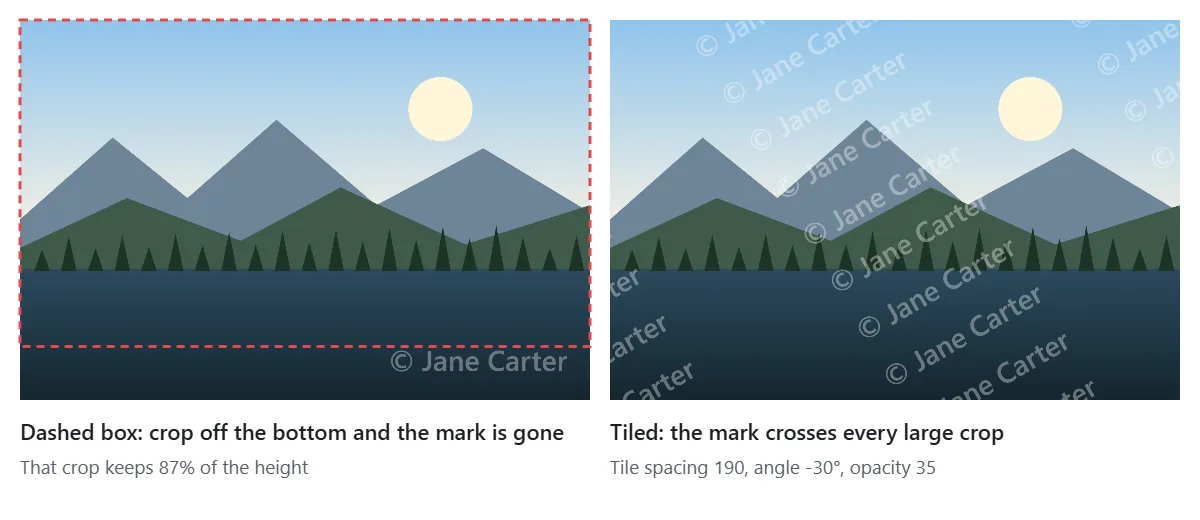
The tiled mark behaves differently. At the default spacing of 190, the rows of text leave some gaps: 27.5 % of the 200 × 200 px squares in our picture had no mark in them. But not one 400 × 400 px square was clean, so there is no useful part of the photo that can be cut out unmarked. At spacing 140 only 2.5 % of the 200 px squares were clean, and at 100 none were. The price is coverage: spacing 100 touched 25 % of the pixels, spacing 190 only 6 %.
| You want to… | Use | Settings to start from |
|---|---|---|
| Credit your work on social media or a portfolio | Corner | Size 4–5, Opacity 35–50, Angle 0, bottom right or bottom left |
| Send proofs to a client before they pay | Tiled | Size 5, Opacity 30–40, Angle -30, spacing 120–140 |
| Post a preview of a print or design you sell | Tiled | Size 4, Opacity 20–30, spacing 150–190 |
| Mark a document scan or ID copy you send to one company | Tiled | Text such as “For Acme rental only, 7 Nov 2026”, Opacity 40 |
The last row is a common, useful case: a copy of a passport or a bill marked with who it is for and the date is far less useful to anyone who intercepts it. Scan it straight first with the Document Scanner, and for parts you do not want to share at all, use a solid box rather than a watermark, as the guide to hiding personal information explains.
Making the mark visible without spoiling the photo
Opacity is not the only thing that decides whether a watermark shows. What lies under it matters as much. On the test picture, the same white mark at opacity 35 changed the dark lake by up to 73 brightness levels (out of 255) and the bright sky by only 19. In the corner over the water it is clearly readable; in the corner over the sky it nearly disappears. That is the middle panel at the top of this article.
- Put the mark on a darker, plainer area if it is white, or switch the colour to a dark grey for snow, sky, beaches and white product backgrounds.
- Check it at the size people will see it. A mark that is fine at full size may be a smudge on a phone. Size is a percentage of the width, so it scales with the picture.
- Avoid the subject. A corner mark over a face or a product is the most annoying kind; place it where the photo is quiet.
- Resize after, not before, if you are posting online. Mark the full photo, then make a smaller copy with the Image Resizer. A 1600 px photo is enough for the web and much less useful to someone who wants to print it.
A watermark also changes nothing else in the photo: the camera details and possibly the GPS location are still inside the file. If that matters, remove them with the Metadata Remover; the EXIF privacy guide lists what a photo can reveal.
What a watermark does for your copyright
A watermark is a notice, not a right. The U.S. Copyright Office says a work is protected by copyright from the moment it is created and fixed in a tangible form, such as a saved photo, so you own the copyright in your pictures whether or not they carry a mark. Most other countries that signed the Berne Convention work the same way.
What a mark adds is practical. It tells people whose photo it is and how to credit you, it makes casual reuse less tempting, and in the United States the law on copyright management information (17 U.S.C. § 1202) makes it unlawful to remove a name or copyright notice knowingly in order to hide or enable an infringement. It is not a lock. Any watermark can be cropped, painted over or removed with effort, so keep your unmarked originals safe and share smaller copies.
The same rule applies in reverse: only remove text or marks from pictures that are yours. Our Text Remover is for date stamps, captions and signs in your own photos, not for other people’s watermarks.
For more ways to put words on a picture, Add Text to Image places a single caption in any style, and the free AI image editing guide lists every other free tool on the site.