
Vintage Photo Restoration Guide
Vintage photographs are irreplaceable cultural and familial time capsules, yet every physical print is locked in an unrelenting chemical race against decay. Over decades of exposure to ambient humidity, ultraviolet light, acidic paper albums, and atmospheric pollutants, silver halides oxidize, chromogenic dyes break down into muddy magenta casts, and brittle cellulose paper cracks into deep tears. This guide is a practical workflow for scanning, repairing, colorizing, and archiving historic prints using the client-side tools and neural restoration models on ImgVX.
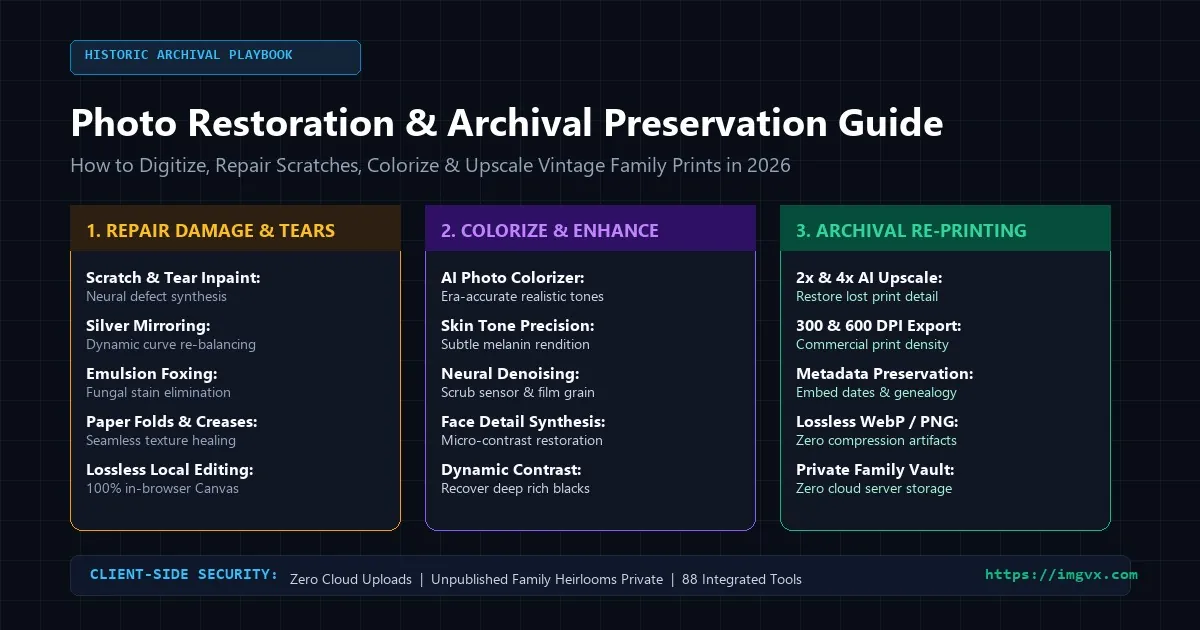
Archival Photo Restoration at a Glance
- Chemical Decay Mechanisms: Silver mirroring, cyan dye fading (1970s red shift), and biological foxing degrade physical prints over time. Digital scanning freezes decay permanently.
- Archival Digitization Benchmark: 600 DPI is the archival standard for 4×6 and 5×7 inch prints, providing 8.6+ megapixels of true grain detail for 2× reprint enlargements.
- AI Clean-up and Repair: the AI Photo Restorer removes grain, softness and fading; distinct scratches, creases and tears are then painted out with the AI Object Eraser.
- Believable AI Colorization: the DDColor model predicts natural colour for skin, sky, foliage and fabric. It is a plausible reconstruction, not a record of the real colours, so label colorized photos when you share them.
- Private by design: every tool, including the AI ones, runs in your browser. Your scans are not uploaded.
The fragile chemistry of vintage photography: why physical prints decay
To successfully restore a vintage photograph, you must understand what you are looking at physically. A photographic print is not merely ink on paper; it is a multi-layered chemical laminate consisting of a paper base, a baryta coating (barium sulfate), and an organic binder emulsion (albumen, collodion, or gelatin) suspending light-sensitive metallic silver particles or organic synthetic dye molecules.
Depending on the era your family photograph originated from, it faces specific degradation pathways:
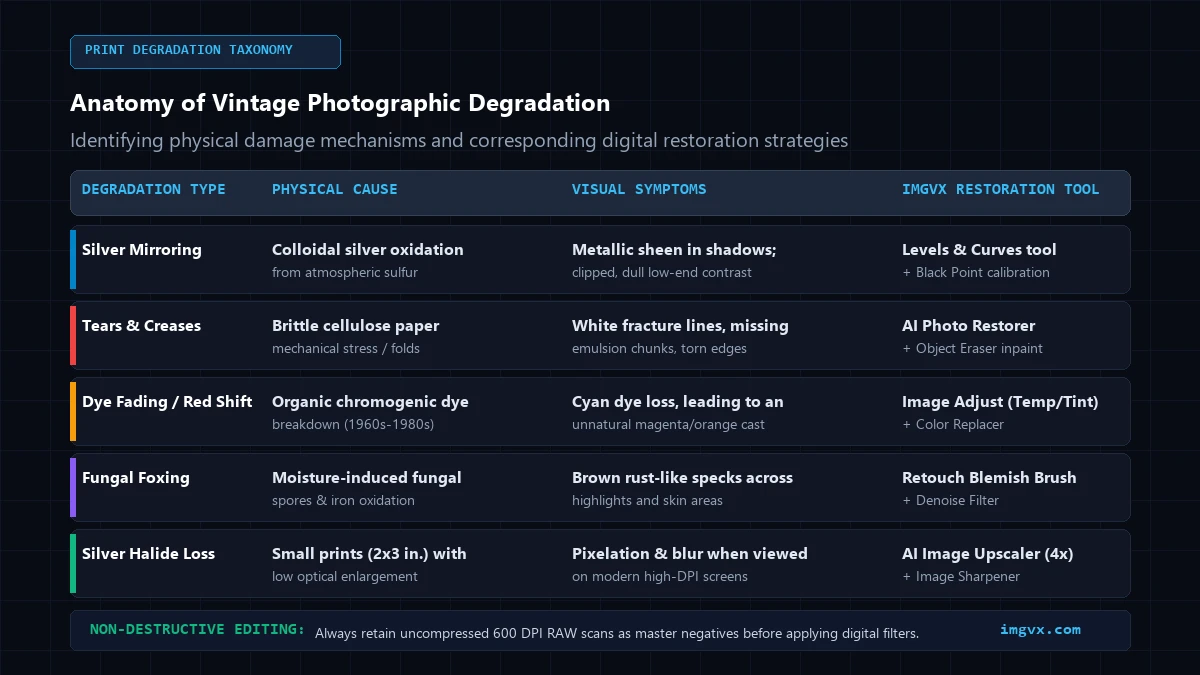
1. Gelatin silver prints and silver mirroring (1880s–present)
The vast majority of 20th-century black-and-white family portraits are gelatin silver prints. Over decades, atmospheric sulfur dioxide and airborne peroxides oxidize metallic silver grains within the gelatin emulsion into mobile silver ions. These ions migrate to the surface of the print, where they reduce back into metallic colloidal silver. Visually, this produces silver mirroring: an iridescent, metallic, bluish-bronze sheen visible in the darkest shadow areas when viewed at an angle. In a digital scan, silver mirroring appears as foggy, clipped, low-contrast shadows that obscure facial details in dark suits, hair, and backgrounds.
2. Chromogenic color prints and the "1970s red shift" (1940s–2000s)
If you examine family photo albums from the late 1960s through the early 1980s, you will notice that almost all color snapshots (such as Kodacolor and Ektacolor prints) have developed a severe, sickly reddish-orange tint. This is known as chromogenic dye fading. Color prints contain three distinct dye layers: cyan, magenta, and yellow. Chemically, cyan dye-couplers are the least stable when exposed to room temperatures and ambient humidity. As the cyan layer degrades, the surviving magenta and yellow layers dominate the visual spectrum, stripping the photo of cool blues, natural greens, and balanced skin tones.
3. Foxing and biological fungal decay
Vintage prints stored in basements, attics, or non-climate-controlled photo albums frequently exhibit foxing: reddish-brown, rust-colored spots scattered across highlights and borders. Foxing is caused by microscopic fungal spores reacting with trace amounts of iron and copper impurities embedded in antique paper pulp during manufacturing. Left unchecked, fungal enzymes digest the gelatin binder, leaving permanent pits and emulsion loss.
4. Mechanical fractures, creases, and acid burn
Before the mid-20th century, paper was manufactured using unrefined wood pulp treated with alum-rosin sizing, creating acidic paper fibers. Over time, acid hydrolysis causes the paper support to become brittle, dry, and fragile. Handling these prints causes structural fractures: dog-eared corners, spiderweb emulsion cracking, and deep white fold lines where the photographic emulsion has completely snapped away from the paper backing.
Digitization protocols: capturing master scans without damaging physical prints
Digital restoration cannot fix information that was never captured in the first place. Capturing a master digital file with optimal optical density, accurate focus, and zero glare is the critical foundation of the entire restoration workflow.
Flatbed scanning: the archival standard
A high-quality flatbed photo scanner remains the gold standard for digitizing flat photographic prints. Follow these strict archival scanning rules:
- Clean the Platen Glass: Clean the scanner glass with optical lens cleaner and a lint-free microfiber cloth. Dust specks on the scanner glass will be rendered as razor-sharp white artifacts across every scan.
- Never Slide Prints Across Glass: Place fragile, curling, or flaking prints onto the glass vertically. Sliding a brittle antique print across glass can shear off delicate emulsion chips.
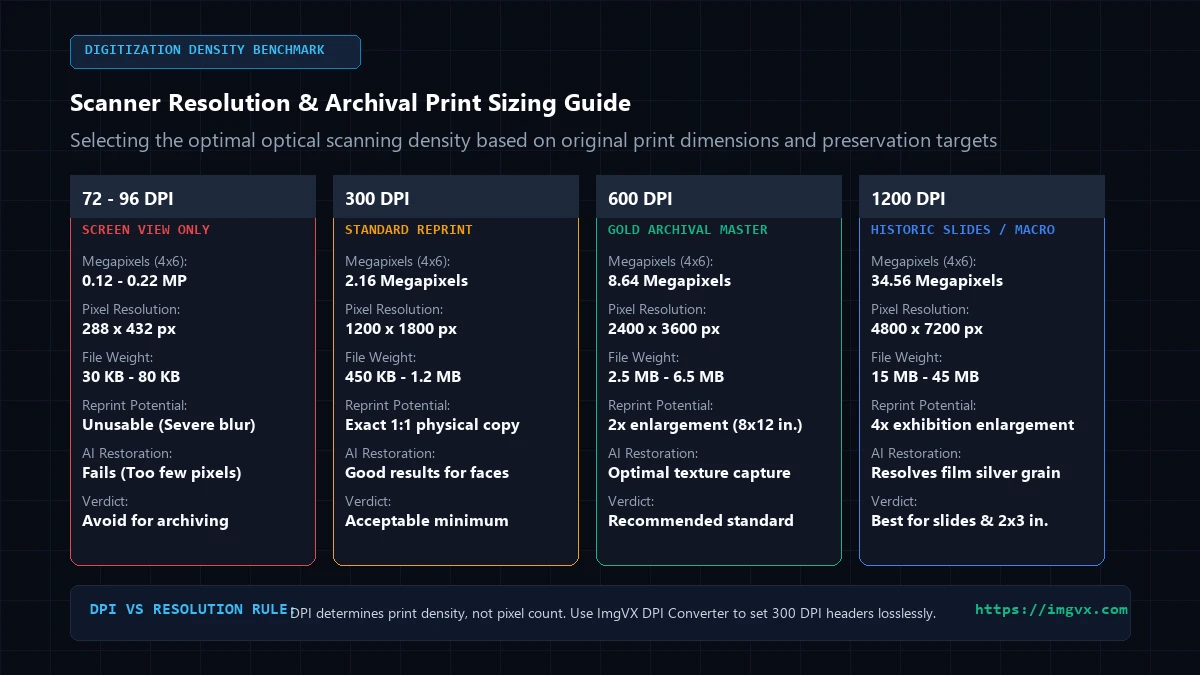
- Select the Optimal DPI (Dots Per Inch):
- Standard Prints (4×6 in. to 5×7 in.): Scan at 600 DPI. A 4×6 print scanned at 600 DPI generates a 2400×3600 pixel image (8.64 megapixels)—capturing the genuine grain structure and allowing a 2× enlargement reprint at 300 DPI.
- Small Prints (2×3 in. wallet, carte-de-visite): Scan at 1200 DPI. Small prints require higher optical magnification so that neural restoration models have sufficient pixel density to detect facial expressions and fabric weaves.
- Large Prints (8×10 in. or larger): Scan at 300 to 400 DPI. Scanning an 8×10 print at 1200 DPI generates a bloated 150 MB file that contains no additional optical resolution beyond the grain limit of the original print. Read our in-depth explainer on DPI and print size.
- Capture in 24-Bit Color (Even for Black-and-White Prints): Always scan black-and-white photographs in full 24-bit RGB color mode, never in 8-bit greyscale. Capturing in color records the subtle differences between the print's silver tones and the yellowed paper base, stains, or foxing spots, making digital separation much easier.
- Save as Lossless Master: Save your initial scan as an uncompressed TIFF or lossless PNG. Avoid lossy JPEG at this stage to prevent compression block artifacts. Every tool here opens the TIFF in any current browser, and the image converter makes a PNG working copy so the master stays untouched.
Smartphone digitization: the copy stand technique
Many family treasures are glued into fragile, bound photo albums that cannot be inverted onto a flatbed scanner without breaking the binding. In these situations, digitizing with a modern smartphone is safer than risking physical damage.
However, handheld smartphone snapshots almost always suffer from geometric distortion and flash hotspots. Follow this method:
- Mount on a Tripod: Mount your phone on a small tripod or copy stand positioned directly above the album, pointing straight down at a 90-degree angle. Use a bubble level app to ensure the phone sensor is perfectly parallel to the print.
- Step Back and Zoom to 2× or 3×: Do not shoot with the default 1× wide-angle smartphone lens close up. 1× lenses introduce severe barrel distortion that curves the straight edges of vintage portraits. Step back 3 to 4 feet and switch to your phone's 2× or 3× optical telephoto lens to compress perspective and maintain geometric accuracy.
- Bilateral 45-Degree Diffused Lighting: Never use direct on-camera flash, which reflects off glossy photo surfaces as a blinding white glare. Place two desk lamps fitted with diffused 5000K daylight LED bulbs at 45-degree angles on opposite sides of the photo. The twin 45-degree beams cancel out surface reflections and illuminate the paper grain evenly.
- Lock AE/AF and Shoot RAW: Lock focus and exposure on the center of the print. If supported, capture in RAW or ProRAW to capture the full uncompressed dynamic range of the camera sensor. If your phone saves in HEIC, convert them in seconds with our HEIC to JPG converter. Read our guide on how to scan documents and prints with your phone.
Pre-processing & geometry alignment: straightening and perspective correction
Before repairing tears or applying color, your digital scan must be geometrically squared and oriented. Skewed angles make digital brush strokes awkward and distort facial proportions.
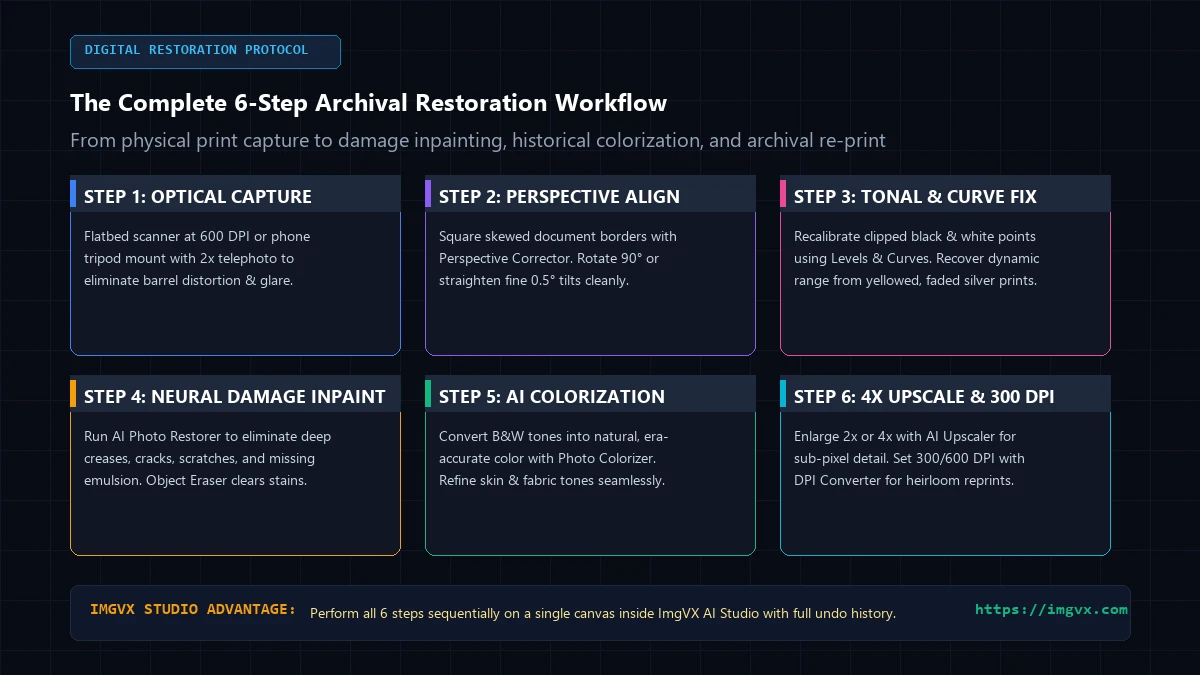
1. Perspective correction for smartphone captures
If you captured the photograph with a smartphone, slight misalignment between the phone lens and the print creates keystone perspective distortion (where the top edge of the photo is wider than the bottom edge). Open the Perspective Corrector. Drag the four corner pins to the physical corners of the original photographic print. Press Straighten and the print is squared up into a true rectangle.
2. Sub-degree rotation and straightening
Even on a flatbed scanner, prints often sit rotated by 0.5 to 2 degrees against the platen guide. Open the Image Rotator. If the photo was scanned sideways or upside down, use the rotate 90° preset. Then use the Fine angle slider to line up something that should be straight, such as a door frame, a pillar or the horizon.
3. Cropping vs. preserving historical borders
Should you crop right up to the image edge, or preserve the vintage paper borders? In archival practice:
- Preserve Borders: If the print features decorative deckled (scalloped) edges, a photographer's embossed studio stamp, or handwritten genealogical inscriptions ("Grandmother Mary, summer 1923"), keep them. These elements provide vital historical provenance and emotional authenticity.
- Crop Cleanly: If the white border is severely discolored, water-logged, or torn without historical markings, use the Image Cropper to crop into the clean photographic frame. If you want to add an authentic vintage frame back onto your clean restoration later, you can use the free Photo Frames tool.
Tonal range & density recovery: reclaiming lost shadows and highlights
Decades of chemical fading flatten the dynamic range of an antique photograph: blacks turn into milky grey, whites turn into dingy yellow, and midtone contrast dissolves. Correcting tonal density before touching up scratches is essential because it reveals hidden structural details within the shadows.
1. Reading the histogram
Open the Histogram Viewer. On a faded vintage print, you will typically observe that the pixel distribution is bunched into a narrow hill in the center of the graph, with completely empty space on the far left (deep black, values 0–20) and far right (pure white, values 235–255). This gap represents lost contrast.
2. Setting black and white points with Levels & Curves
Open Levels & Curves:
- Establish the True Black Point: Drag the left black point slider inward until it touches the beginning of the histogram's shadow data. Instantly, faded grey coats, dark hair, and shadow backgrounds snap into rich, deep charcoal and black. This immediately counteracts the milky veil of silver mirroring.
- Set the White Point Carefully: Drag the right white point slider inward toward the highlight edge. Watch the image closely: do not pull it so far that delicate highlight details in white dresses, sky clouds, or light hair blow out into solid blank white.
- Adjust the Midtone Gamma: Move the center gamma slider slightly left or right to reveal subtle facial contours and eye expressions without washing out the newly restored shadows.
- S-Curve for Contrast: Choose the Soft S curve preset, or lower Curve shadows and raise Curve highlights a little. This adds back some of the depth a fresh print had.
3. Neutralizing yellow acid casts and color balancing
If you are restoring a black-and-white print that was scanned in color, the paper base will likely look yellowed or brown from cellulose acid breakdown. Open Image Adjustments:
- Temperature & Tint: Slide the temperature slider toward cool (blue) and tint toward green to neutralize the sickly amber cast. The goal is to bring the paper tone to a clean, warm vintage ivory rather than harsh yellow.
- Convert to Monochrome (If Appropriate): If the original print was pure silver black-and-white (not a sepia-toned print), open Image Filters and apply the black and white filter. This strips away uneven color staining, blotchy paper yellowing, and chromogenic color noise in one clean pass, leaving a pure silver tonal scale.
Structural damage repair: eliminating scratches, creases, and tears
Physical trauma—creases from folded letters, scratches from fingernails, emulsion chips, and water droplets—is the most visually disruptive defect on antique photographs. In the past, retouching these required hundreds of tedious clicks with a manual clone stamp tool, which frequently resulted in blurry, smudged patches. Today, AI inpainting can fill small damaged areas from the surrounding detail, which is much quicker for most scratches and creases.
1. All-over clean-up with Photo Restorer
For all-over grain, softness and fading, run the AI Photo Restorer. It passes the whole scan through Real-ESRGAN, an open-source restoration network, which removes noise, dust speckle and JPEG damage while keeping edges crisp, then stretches faded contrast and neutralises the yellow or magenta cast of an aged print. It all runs in your browser, so a precious family scan never leaves your computer. Distinct scratches and creases are best handled next, with the Object Eraser.
2. Surgical repair of large tears and ink marks with Object Eraser
If your photo has a large, localized defect—such as a deep diagonal fold line across a face, an ink stamp, or a ripped corner with missing paper—use the Object Eraser:
- Set the brush radius slightly wider than the defect.
- Paint smoothly along the crease or tear.
- Press Erase painted area. The painted part is filled in from the surrounding detail; check it closely, and repeat on smaller sections if a patch looks smeared.
3. Fine-tuning with Retouch Tools and Spot Healing
For small, isolated pinhole blemishes or tiny dust flecks, open the free client-side Retouch Tools. The spot healing brush samples immediate neighboring pixels to blend away minor imperfections instantly in your browser tab.
4. Controlling film grain and scanner noise
Vintage photographs contain natural photographic grain formed by microscopic silver halide crystals. Authentic grain gives a vintage photo its character and sharpness. However, scanning at high DPI can exaggerate grain, and electronic scanners introduce ugly, sharp CCD sensor noise. Open the free Noise Reducer. Use a Radius of 1 with a single pass, and lower Blend with original if the result looks too smooth, so genuine photographic grain survives. Follow up with the Image Sharpener to restore crispness to the eyes, eyelashes, and jewelry.
Historical AI colorization: bringing monochrome memories to life
Black-and-white photography was an optical necessity of its era, not an artistic preference. Colour can make an old portrait feel much closer to the present, which is why colorizing is popular with families. It is also a guess, so keep the original black and white version alongside it.
1. How neural colorization works
Open the Photo Colorizer. It runs DDColor, an open-source colorization model, on your device. The model recognises what is in the picture, such as skin, hair, sky, brick, grass and fabric, and predicts plausible colours for each, with natural variation rather than flat fills. Only the colour comes from the model: the lightness and every detail come from your original scan at full resolution. Remember that the colours are a believable reconstruction, not a historical record.
2. Era-accurate color palettes and historical research
AI models do not know your family history. To make your colorization historically authentic, consider these historical standards:
- Victorian & Edwardian Eras (1860s–1910s): Clothing dyes were primarily natural: indigo blues, rich wool crimsons, charcoal blacks, and muted olive greens. Synthetic neon colors did not exist.
- Military Uniforms: Research the specific branch, division, and rank of the service member. A WWII US Army olive-drab jacket looks very different from a US Navy dress blue uniform or a British RAF slate-blue tunic.
- Wedding Dresses: Prior to Queen Victoria popularizing white bridal gowns in 1840, brides frequently wore their finest dresses in deep blue, emerald green, or burgundy.
3. Fine-tuning specific hues with Color Replacer
If the automated colorizer guesses a sweater color as brown when family records prove it was navy blue, you can adjust it easily without re-running the AI. Open the free Color Replacer. Pick the brown of the sweater as the colour to replace and navy blue as the new colour, with Keep the original shading ticked, so the folds and highlights stay.
Archival super-resolution: neural upscaling for large-format reprints
One of the most common challenges in family archiving is discovering a tiny, postage-stamp-sized portrait (such as a 1.5×2-inch lock-box photograph or passport snapshot) of a great-grandparent. Displaying that image on a modern 4K monitor or printing it as an 8×10-inch framed gift results in severe pixelation, blurry edges, and loss of facial definition.
1. Why traditional resizing fails
Standard resizing algorithms (such as nearest-neighbor, bilinear, or bicubic interpolation) can only stretch the existing pixels across a larger grid. A small 600×800 pixel scan simply becomes a larger, fuzzier 2400×3200 pixel blur. No new detail is created.
2. Neural super-resolution with AI Image Upscaler
Open the AI Image Upscaler. Drop in your restored photograph and select 2×, 4× or 8×:
- Generative Detail Synthesis: The neural super-resolution model analyzes the degraded pixels and predicts plausible fine detail and sharp edges instead of enlarging the pixel blocks. The added detail is a prediction, not recovered information, so very small or blurred faces won't match the real person exactly.
- Cleaner Output: The model also reduces pixelation and JPEG blockiness. Very large results are refused rather than crashing the browser, so upscale small scans, not ones that are already big. Read our technical explainer on how to resize images without losing quality.
3. Setting physical print density with DPI Converter
Once your image has been upscaled to high pixel dimensions (e.g. 2400×3600 pixels), open the DPI Converter and select the 300 DPI preset or 600 DPI preset. The tool writes the DPI into the file without changing its pixel dimensions, and shows the print size it gives (for example 8×12 inches at 300 DPI). Print labs use that to print at the intended size.
Digital archiving best practices: preservation, metadata & file formats
Restoring a photo is only half the job; the files also need to survive. Without structured archival discipline, digital files are easily lost to hardware failure, file corruption, or accidental deletion.
1. The 3-2-1 backup strategy for family heirlooms
Archivists worldwide adhere to the 3-2-1 Backup Rule:
- Three Copies: Maintain three copies of every family photograph (one original master scan, one restored master, and one working copy).
- Two Different Media Types: Store copies on at least two distinct storage formats (e.g. internal computer SSD and an external archival hard drive or M-DISC optical media).
- One Offsite Location: Keep one copy in a geographically separate location (such as a secure cloud backup or a drive kept at a relative's house) to protect against fire, flood, or hardware theft.
2. Embedding genealogical metadata into IPTC/EXIF headers
The greatest tragedy in family photo archives is a stunning photograph of an ancestor with nobody left alive who knows who they were, where they lived, or when the photo was taken. Physical notes written in pencil on the back of prints are frequently separated during digitization.
Write it into the file itself. Open the free Metadata Editor with a JPG copy of the scan and fill in:
- Description: who is pictured, from left to right, with maiden names and relationships, plus where it was taken and the original print type.
- Date taken: the known or estimated date.
- Artist: the photographer or studio, if known.
These fields travel with the file when it is copied, although some websites strip them on upload, so keep a written list alongside your archive too. You can verify existing tags with the EXIF viewer. Read our complete guide to EXIF metadata and digital privacy.
3. Master files vs. distribution copies
Maintain two tiers of digital assets:
- Archival Master: Saved in uncompressed TIFF or lossless PNG/WebP format at full resolution. These files are never edited directly; they serve as permanent digital negatives.
- Web & Sharing Copies: When emailing photos to relatives or uploading to ancestry trees (such as FamilySearch or Ancestry.com), use the image compressor to create lightweight, fast-loading WebP or JPEG copies under 200 KB. For multiple prints, compile them into an elegant archival PDF using the image to PDF converter.
Production recipes for common vintage restoration challenges
Here are step-by-step walkthroughs for the most common real-world photo restoration scenarios.
Recipe 1: Restoring a creased, silver-mirrored 1940s WWII military portrait
- Digitize: Scan the 4×6 print at 600 DPI in 24-bit color on a flatbed scanner.
- Straighten & Align: Open Image Rotator and straighten the frame against the uniform buttons.
- Recover Shadows: Open Levels & Curves. Pull the black point slider inward to eliminate the milky veil of silver mirroring, deepening the dark uniform fabric.
- Repair Creases: Open AI Photo Restorer. Run it to clean up grain and fading, then paint out the horizontal fold line across the subject's chest with the Object Eraser.
- Sharpen & Export: Apply a light pass with Image Sharpener and export as a 600 DPI lossless master.
Recipe 2: Rescuing a faded, orange-shifted 1978 family snapshot
- Capture Scan: Scan the color snapshot at 600 DPI. Notice the heavy orange/red color cast caused by cyan dye fading.
- Neutralize White Balance: Open Image Adjustments. Shift temperature toward cool blue (-25) and tint toward green (-15) until whites and neutral backgrounds neutralize.
- Boost Dynamic Range: In Levels & Curves, lift Curve shadows slightly to reveal shadow detail. Back in Image Adjustments, raise Vibrance (about +20) to bring back faded blues and greens.
- Surgical Clean-up: Use Object Eraser to remove dust spots, scratches, and album adhesive residue from the perimeter.
- Compress for Sharing: Use Compress to 100 KB to generate a lightweight version for sharing with family on WhatsApp or email.
Recipe 3: Colorizing and enlarging a 1912 Victorian wedding portrait
- Pre-clean: Digitize the monochrome print at 600 DPI. Clean dust with Photo Restorer and paint out tears with the Object Eraser.
- Normalize Contrast: Ensure shadows and highlights are balanced in Levels & Curves so the colorizer has accurate tonal data to work with.
- Run Colorizer: Open Photo Colorizer. Check skin, the gown and the suit: fabric colours are the model’s guess, and a white gown can come out tinted. Correct anything wrong with the Color Replacer.
- Enlarge: The scan is 1800×2400 px. Open AI Image Upscaler and choose 2×, which gives 3600×4800 px. 4× would be more than a browser can hold, and the tool will say so.
- Set Print Density: Use DPI Converter to set 300 DPI: 3600×4800 px prints at 12×16 inches.
Unified heirloom restoration in ImgVX AI Studio
Real restoration projects involve multiple iterative adjustments: crop, straighten, curve adjustment, neural scratch repair, colorization, spot healing, and upscale. Jumping between separate tabs and downloading intermediate files wastes time.
In ImgVX AI Studio, the tools share one canvas:
- Iterative Multi-Tool Editing: Drop your raw heirloom scan onto the canvas. Adjust Levels & Curves, run the AI Photo Restorer, colorize the monochrome tones, touch up minor spots with the retouch brush, and upscale—all within a unified, uninterrupted workflow.
- Undo and redo: Every step you apply can be undone, so a colour tweak or repair that looks wrong can be taken back.
- Before and after: Hold the compare button to see the original scan, so you can check the restoration still looks natural.
- Mobile Heirloom Restoration: If you are visiting older relatives and photographing album pages with your smartphone, open ImgVX AI Studio directly in your mobile browser. It works on a phone, although large scans and the AI tools are slower there than on a computer. Learn more in our ImgVX AI complete overview guide.
Seven common mistakes in digital photo restoration
- Physically Damaging the Original Print: Never apply Scotch tape, household glue, or commercial glass cleaners directly to an antique photo. Physical repairs are a job for a trained conservator. Perform all cosmetic repairs digitally.
- The "Plastic Mannequin" Over-Smoothing Trap: Aggressive facial retouching and excessive noise reduction can erase authentic skin pores, fine wrinkles, and eye textures, making people look artificial. Always prioritize structural fidelity over artificial smoothness.
- Discarding the Raw Master Scan: Never overwrite your original, unretouched 600 DPI scan. As neural restoration algorithms continue to advance, having pristine, uncompressed master scans ensures you can re-restore files in the future with even higher fidelity.
- Over-Sharpening Film Grain: Applying heavy digital unsharp masking to high-DPI scans turns natural, pleasant photographic grain into harsh, digital noise with white halo artifacts along edges. Use the Noise Reducer before gentle sharpening.
- Scanning at 72 or 96 DPI: Scanning at screen resolution throws away most of the fine detail in the print, preventing future enlargements or detailed AI analysis. Always scan at 600 DPI for standard prints.
- Ignoring Color Fading Prior to Colorization: Feeding a heavily yellowed or orange-shifted print directly into an AI colorizer creates muddy, conflicting hues. Always neutralize paper yellowing and balance monochrome contrast in Levels & Curves first.
- Keeping only compressed copies: Many free photo-sharing services recompress uploads. Keep your full-quality master files on your own drives as well, following the 3-2-1 rule above.
Frequently asked questions
Can AI photo restoration fix deep tears and missing parts of an old photograph?
Partly. The ImgVX AI Photo Restorer cleans up grain, dust speckle, softness and faded contrast across the whole scan. Tears, creases and small missing areas are then painted out with the AI Object Eraser, which fills them from the surrounding detail. Large missing areas, especially parts of faces, cannot be rebuilt accurately by any tool; the result is a guess, so keep the original scan.
What scanner DPI should I use when digitizing vintage family photos?
For standard photographic prints (such as 3x5, 4x6, or 5x7 inches), 600 DPI is the archival gold standard. It captures genuine silver halide grain and allows you to reprint the photo at twice its original physical size at commercial 300 DPI print quality. For very small prints (like 2x3 inch wallet photos) or 35mm film slides, scan at 1200 DPI. For large 8x10 prints, 300 to 400 DPI is sufficient.
How does AI colorize black-and-white photos?
The ImgVX Photo Colorizer runs DDColor, an open-source model that has learned what colours things usually are. It recognises skin, hair, foliage, brickwork, sky and fabric and predicts natural colour for each, while the detail comes from your scan. The colours are plausible, not a historical record; if you know an item's real colour, change it with the free Color Replacer.
Why do old color photos from the 1970s and 1980s turn red or orange?
Color photographs from that era were produced using chromogenic dye-coupler processes (such as Kodacolor and Ektacolor). The cyan dye layer in these prints is chemically the least stable and degrades fastest when exposed to ambient heat and ultraviolet light. As cyan fades, the surviving magenta and yellow dye layers dominate, causing the characteristic reddish-orange color cast. This can be corrected using digital temperature and color curve adjustments.
What is silver mirroring on antique black-and-white photographs?
Silver mirroring is a chemical oxidation process that affects historic gelatin silver and albumen prints. Atmospheric pollutants (particularly sulfur dioxide) react with the metallic silver particles in the emulsion, causing colloidal silver to migrate to the surface and form a shiny, iridescent bluish-metallic sheen in dark shadow areas. Digitally, this causes washed-out, clipped shadows that can be restored using Levels & Curves.
Can I digitize old family photos using my smartphone instead of a scanner?
Yes, if you follow strict optical guidelines. Mount your smartphone on a tripod or copy stand perpendicular to the print, use the 2x or 3x telephoto optical lens (stepping back 4 to 5 feet to eliminate wide-angle barrel distortion), and light the photo from both sides at 45-degree angles with diffused light to eliminate surface glare. Square any slight keystone distortion afterwards using the ImgVX Perspective Corrector.
Is it safe to upload private vintage family heirlooms to an online photo editor?
With ImgVX, yes. Every tool, including the AI Photo Restorer and Colorizer, runs inside your web browser. The AI models are downloaded to your device and run there, so the scan itself is never uploaded to us or to anyone else.
What is the difference between image upscaling and traditional photo resizing?
Traditional resizing stretches existing pixels using bicubic or bilinear interpolation, creating blurry, soft, or pixelated results when enlarged. The ImgVX AI Image Upscaler uses a neural super-resolution model that predicts sharp edges and plausible fine texture instead of stretching pixels, so small scans can be enlarged 2x or 4x. The added detail is a prediction, not recovered information, so keep the original scan.
Restore your family treasures today
Clean up, repair, colorize and enlarge old photos. Every tool is free and runs in your browser, with nothing uploaded.