
Free AI Image Editing: The Complete 2026 Guide
AI image editing is now free on ImgVX AI. Removing a background, enlarging a small photo, erasing a stranger from a holiday picture or colorizing a grandparent's portrait used to mean a subscription, a pack of credits or a watermark. This guide shows how to do all of it for free, in your browser, with no sign-up and without uploading your photos, and what AI editing can and cannot do.
Free AI image editing at a glance
- Free to use: 16 AI tools with no account, no daily limit and no watermark. HD tools download free at standard size; full resolution uses a credit.
- Private by design: the AI runs on your own device through WebGPU or WebAssembly, so your photo is never uploaded.
- One-time download: each AI model downloads once (5 MB to 220 MB) and is then kept by your browser.
- What it does well: background removal, upscaling, object and text removal, photo restoration, colorizing, enhancing, sky replacement and relighting.
- What it does not do: text-to-image generation, or changing a person's face, body or clothes.
Why AI image editing can now be free
For most of the last decade, "AI photo editor" meant a website that took your photo, sent it to a rack of expensive graphics cards in a data centre, and sent back the result. Every edit had a real cost: electricity, hardware and bandwidth. That is why nearly every online AI editor has the same business model. You get a handful of free edits, a small or watermarked download, and then a request for a subscription or a credit pack.
Two things changed. First, the models got small. Open-source research models for background removal, upscaling, inpainting and colorization now fit in a few megabytes to a couple of hundred, instead of several gigabytes. Second, browsers got access to the graphics card. WebGPU, now supported in Chrome and Edge and in recent versions of Safari and Firefox, lets a web page run the same kind of maths a desktop app runs on the GPU. Where WebGPU is missing, WebAssembly runs the model on the processor instead: slower, but it works.
Put those together and the expensive part of AI editing moves from the server to your device. Your laptop or phone already has a capable graphics chip that sits idle most of the time. When ImgVX AI sends the model to your browser and runs it there, an edit costs us nothing, so there is no daily cap on editing and previewing. The site is paid for by advertising, the same way a free news site is, and by optional Pro and credit packs for anyone who needs the full-resolution file from the HD tools.
There is a second benefit that matters as much as the price. Your photo never leaves your device. A passport photo, a picture of your children, a scanned letter or a product you have not launched yet stays in your browser's memory. Nothing is uploaded, so there is nothing to be stored, leaked or used to train someone else's model.
How on-device AI editing works
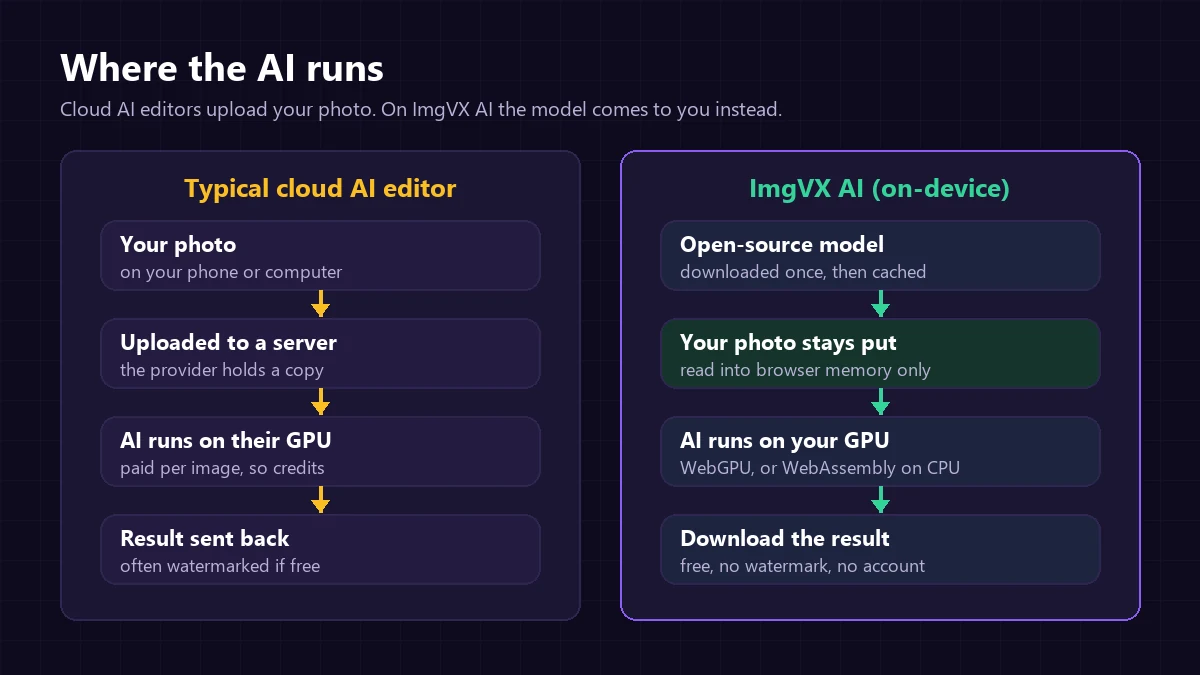
When you press a button such as Remove background on an ImgVX AI tool, four things happen:
- The model is fetched, if you do not already have it. Your browser downloads the open-source model file from a content delivery network: our own mirror at models.imgvx.com, Hugging Face, or this site. This is an ordinary file download. Your photo is not attached to it.
- The model is stored in your browser's cache. The next time you use that tool, even days later, there is nothing to download.
- Your photo is processed locally. The image is read into memory, prepared for the model, and run through it on your graphics card (WebGPU) or processor (WebAssembly) in a background worker, so the page stays responsive.
- The result is built at full resolution. Most models work at a fixed size, such as 1024 pixels. The tool uses the model's output (a cut-out mask, a colour map, a filled area) and applies it to your original photo, so you do not get a small, soft download.
You can check the privacy claim yourself. Open your browser's developer tools, switch to the Network tab and run any tool. You will see the model file arrive the first time, and no request that sends your image anywhere.
Which models does ImgVX AI use?
Every model is open source, published under a licence that allows this use, and pinned to an exact version so a tool behaves the same way every time:
| Job | Model | Licence |
|---|---|---|
| Background removal (Fast) | MODNet | Apache 2.0 |
| Background removal (Best edges) | BiRefNet lite | MIT |
| Upscaling, enhancing, restoring | Real-ESRGAN (general x4v3) | BSD 3-Clause |
| Object, text and edge fill | MI-GAN | MIT |
| Colorizing | DDColor (tiny) | Apache 2.0 |
| Depth for sky and relighting | Depth Anything V2 (small) | Apache 2.0 |
| Alt text and captions | Florence-2 (base) | MIT |
What you need: browser, device and downloads
Almost nothing. Any current browser on a computer, tablet or phone works: Chrome, Edge, Safari, Firefox, Samsung Internet or Opera. There is no app to install and no account to create.
- Fastest: Chrome or Edge on a laptop or desktop with a graphics card from the last five or six years. Most edits take a few seconds.
- Good: a recent phone. Background removal and upscaling run comfortably; the largest models take longer.
- Works, slowly: older computers without WebGPU. The same models run on the processor. Expect tens of seconds rather than a few.
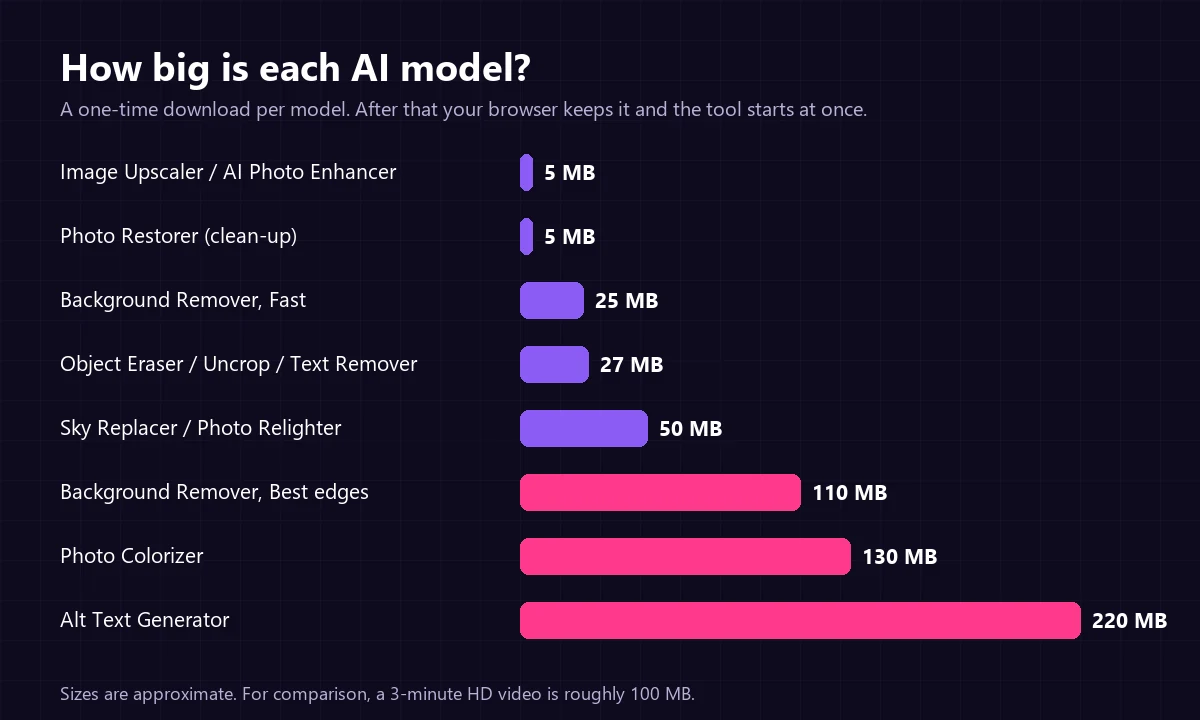
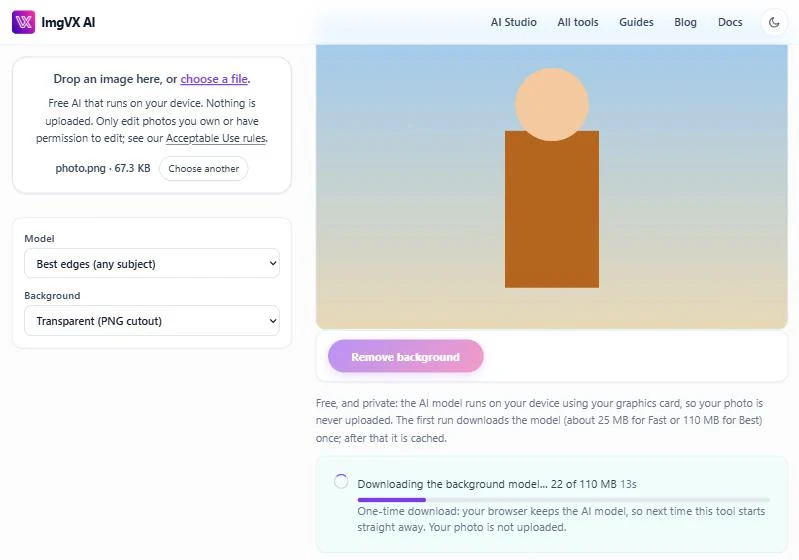
The only real cost is that first download. The Image Upscaler model is about 5 MB, less than a single phone photo. The Photo Colorizer is about 130 MB, and the Alt Text Generator, which understands whole scenes, is about 220 MB. On a metered mobile connection, run the large tools on Wi-Fi the first time. The tool tells you when it is downloading and that it is a one-time download:
Which free AI tool do you need?
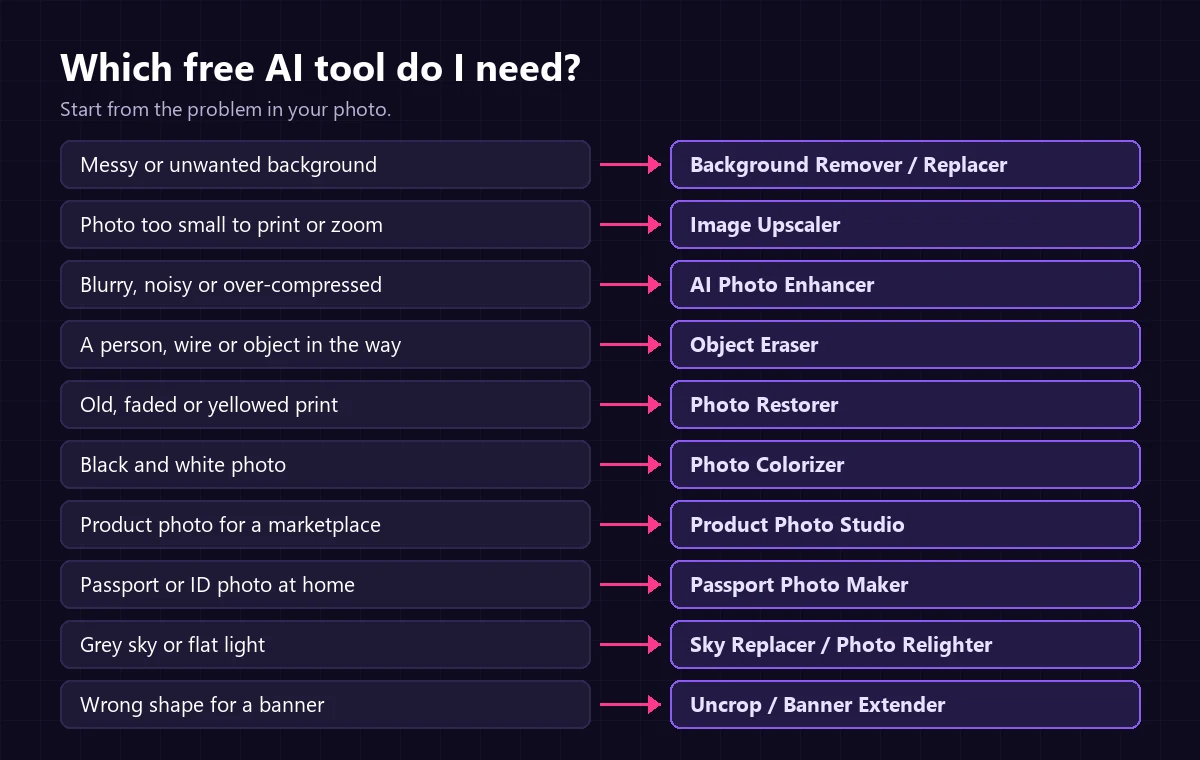
Start from the problem in the photo, not the name of the tool. This chart covers the ten most common jobs:
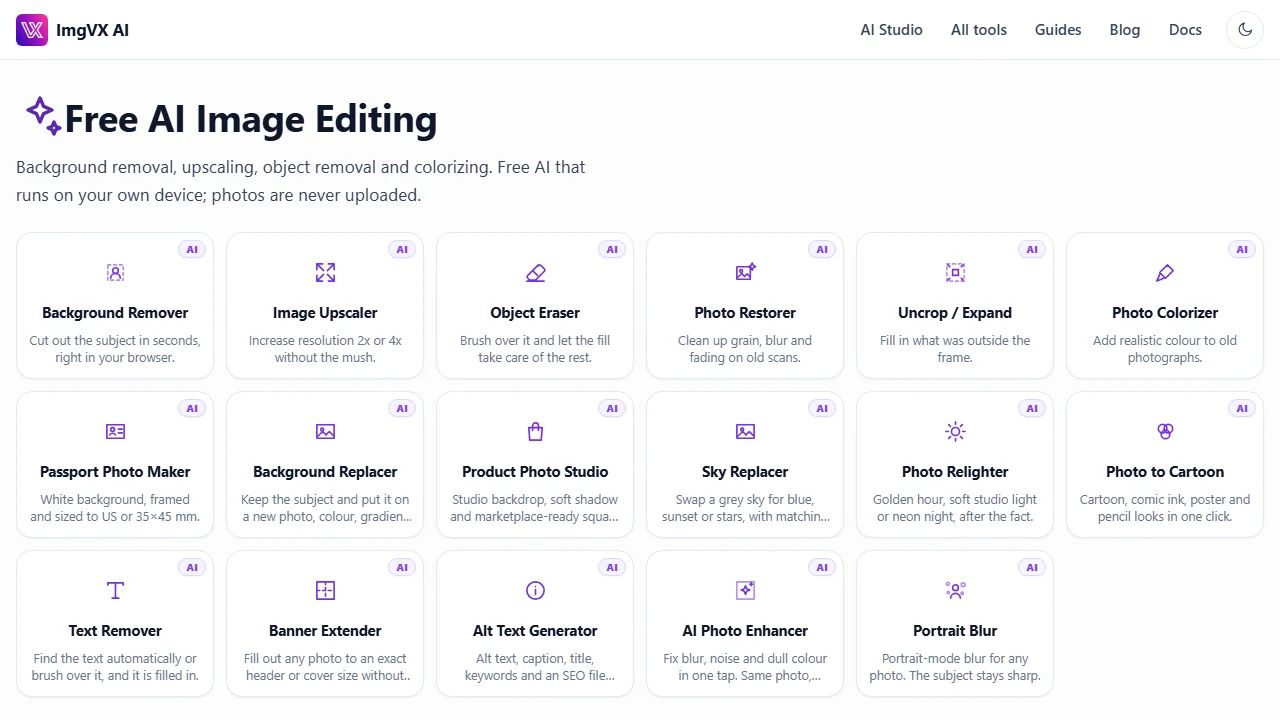
All 16 are listed together on the free AI image editing page:
Getting photos that edit well
AI editing multiplies whatever you give it. A sharp, well-lit photo becomes a great cut-out or a clean enlargement; a dark, shaky one becomes a slightly better dark, shaky one. Five habits make the biggest difference:
- Light from the front or side, not behind. A window beside you is the best free light there is. Strong light behind the subject turns edges into a glowing halo that confuses background removal.
- Separate the subject from the background. Stand a metre or two in front of a wall, not against it, and avoid backgrounds the same colour as your clothes or product. Separation by colour, brightness or distance gives every AI tool an easier job.
- Hold still and tap to focus. Most "blurry" phone photos are camera shake or missed focus, which no tool can truly undo. Lean on something, tap the subject on screen, and take two or three shots.
- Shoot bigger than you need. Use the camera's full resolution and crop later. Cropping throws pixels away; upscaling can only predict them.
- Keep the original. Every edit here downloads a new file and leaves your original untouched, but keep the camera original anyway. Re-saving a JPEG over and over slowly degrades it.
If a photo has already been sent through a messaging app, ask for the original: most apps compress photos heavily, and a clean original beats any amount of AI enhancement.
Remove or change a photo background
"Remove background from image" is one of the most searched image tasks on the web, and for good reason: a clean cut-out is the starting point for product listings, profile pictures, presentations, stickers and thumbnails.
How to remove the background from an image for free
- Open the Background Remover and add your photo.
- Choose a model: Fast (MODNet, about 25 MB) for quick portraits, or Best edges (BiRefNet, about 110 MB) for hair, fur, products and anything that is not a person.
- Choose the background: Transparent for a PNG cut-out, White, a colour, a background photo of your own, or a blurred version of the original.
- Press Remove background and download.
Make a transparent PNG. Keep the background transparent and save as PNG or WebP. JPEG has no transparency, so a JPEG cut-out always lands on a solid colour. If a transparent image shows up with a black or white box in another app, that app does not support transparency; our guide to transparent images explains which formats and apps keep it.
Get cleaner edges. The single biggest factor is the photo, not the tool. A subject that is sharp, well lit and clearly separated from the background (by colour, brightness or focus) cuts out cleanly. Fine hair against a busy background is the hardest case for any remover, AI or human. If an edge needs work, the Selection Tools and the eraser let you touch it up.
How to change the background of a photo
The Background Replacer does the cut-out and the new background in one step. Use your own photo as the new scene, a solid colour, a gradient, or a blurred copy of the original. The trick to a believable result is matching the light: a subject lit from the left, pasted onto a scene lit from the right, never looks real. Choose a background with similar light, or blur it slightly so it reads as out of focus. The Photo Relighter can warm or cool the subject to sit better in a new scene.
For green-screen photos, the non-AI Chroma Key Remover is faster and more exact: it removes one flat colour and cleans up the green spill on hair and skin.
Upscale an image and increase resolution
People search "increase image resolution" and "upscale image without losing quality" when a photo is too small: a logo pulled from an old website, a screenshot that needs printing, a product photo a marketplace rejects for being under 1000 pixels, or a crop from a larger photo.
Why ordinary resizing makes photos blurry
Enlarging with a normal resize has to invent the new pixels by averaging their neighbours. The result is soft, because averaging cannot create edges. An AI upscaler such as Real-ESRGAN has learned what sharp edges and textures look like, and predicts a plausible sharper version. It is still a prediction, not recovered detail, but on most photos it looks far better than stretching.
How to upscale an image for free
- Open the Image Upscaler and add the photo.
- Choose 2x or 4x. Start with 2x; for a very small image, 4x.
- Press Upscale, compare with the original at full size, and download.
The model is about 5 MB, so it is fast even on the first run. Upscaling works best on photos, illustrations, faces, text and logos with clean edges. It struggles with very fine texture such as grass or gravel, which can look painterly at 4x.
Upscaling for print. Work out how many pixels the print needs, then upscale until you reach it. At 300 DPI, a 4 by 6 inch print needs 1200 by 1800 pixels, an 8 by 10 needs 2400 by 3000, and an A4 page about 2480 by 3508. Set the DPI number afterwards with the DPI Converter; our DPI and print size guide explains why DPI alone never adds detail.
What upscaling cannot do. It cannot read a blurry number plate, sharpen a face that was a smear of pixels, or recover writing that is not legible in the original. Anything that claims otherwise is guessing, and a guess is not evidence.
Enhance a blurry or low-quality photo
An upscaler makes a photo bigger. The AI Photo Enhancer makes it cleaner at the same size. It runs the same Real-ESRGAN model to remove noise, JPEG blocks and softness, then brings the image back to its original size and corrects flat colour and brightness. It is the tool for a photo that looks muddy after being sent through three messaging apps, or a night shot full of coloured speckles.
- Noisy low-light photo: enhance first; if it is still grainy, the Noise Reducer gives finer control.
- Small and poor quality: enhance, then upscale.
- Slightly soft but clean: the Image Sharpener's unsharp mask may be all it needs.
- Heavily motion-blurred: no current tool can truly fix it. Enhancing will make it cleaner, not sharp.
The enhancer keeps the same picture. It does not redraw faces, so people keep looking like themselves, which is one of the reasons we chose it over "face restoration" models that invent new features.
Remove objects, people and text from photos
"How to remove a person from a photo" and "remove object from photo free" come up constantly, usually about a tourist in a landmark shot, a bin in a property photo, or a power line across a sunset. The Object Eraser handles all three.
How to remove an object from a photo
- Open the Object Eraser and add the photo.
- Paint over the object with the brush, a little wider than the object itself, and include its shadow.
- Press Erase painted area. The MI-GAN model fills the area from its surroundings. Only the painted pixels change.
- If a trace remains, paint over that part and erase again.
It works best when the background behind the object is simple or repetitive: sky, water, grass, sand, walls, roads. It is weakest where the missing area has a lot of structure, such as half a face, a patterned tile floor or a crowd. For large objects, erase in two or three smaller passes rather than one big one. For tiny blemishes and dust spots, the spot-healing brush in Retouch Tools changes even less of the photo.
How to remove text from an image
The Text Remover adds a step: press Find text and an OCR engine marks every word it can read, so you do not have to paint each letter. Add anything it missed with the brush, then remove it. It is ideal for the orange date stamps on photos from old film cameras, captions burned into a picture, and signs you want out of a travel shot.
A note on watermarks: removing a watermark or copyright notice from someone else's image is a breach of their rights and of our terms. The tools are for your own photos.
Restore and colorize old photos
Old family photos are where free AI editing feels most like magic, and where honesty matters most. AI can make a faded, grainy print look far better. It cannot know what was really there.
Step 1: Scan it properly
Scan prints at 600 DPI, and small wallet-size photos at 1200 DPI if you want to enlarge them. No scanner? Photograph the print flat, in soft daylight, with the phone held parallel to it and the flash off, then straighten it with the Perspective Corrector. A good scan matters more than any AI step, because nothing can bring back what the scan did not capture.
Step 2: Restore
The Photo Restorer cleans grain, blur and JPEG damage with Real-ESRGAN, then stretches faded contrast and removes the yellow or magenta cast of aged paper. It can also add colour in the same pass.
Step 3: Repair scratches and tears
Distinct scratches, creases and torn corners are best painted out with the Object Eraser, one at a time, or with the clone and healing brushes in Retouch Tools for small spots.
Step 4: Colorize
The Photo Colorizer runs DDColor, a model that has learned what colours things usually are. It recognises skin, hair, sky, foliage, brick and fabric and predicts natural colour for each. Only the colour comes from the model; the lightness and all of the detail come from your scan at full resolution, so the photo stays sharp.
Be clear about what colorization is. The colours are a believable reconstruction, not a record. The model cannot know that a coat was green or a car was red. If you know the real colour of something, change that area afterwards with the Colour Replacer, and when you share the result, say it was colorized.
Step 5: Enlarge and archive
Upscale for a larger reprint, then keep a PNG master and a JPEG copy for sharing. Add the date, place and names in the file itself with the Metadata Editor so the information travels with the photo. Our photo restoration guide goes deeper into scanning and archiving.
Product photos for Amazon, eBay, Etsy and Shopify
A clean white-background product photo is one of the most valuable things a small seller can make, and one of the most common reasons people pay for an AI editor. The Product Photo Studio does it for free.
- Photograph the product near a window on a sheet of white paper, from slightly above, with the flash off.
- Open the photo in the Product Photo Studio and choose a backdrop: pure white for marketplace main images, a soft studio gradient, or a pastel colour.
- Add a soft floor shadow or a reflection so the product looks placed rather than pasted.
- Download at 2000 by 2000 pixels.
Marketplace rules. Amazon's main image must have a pure white background (RGB 255, 255, 255) with the product filling about 85 percent of the frame. eBay and Etsy are less strict but reward clean, square, well-lit images. Always check your category's current rules: some ban props, text or even shadows on the main image.
Finish the job. Compress the images so your store loads fast (the Image Compressor can aim for an exact size such as 200 KB), and write alt text for each one with the Alt Text Generator. Our guide to marketplace product photo requirements covers the rules for Amazon, Etsy, eBay and Shopify, and shooting at home.
Passport and ID photos at home
"Passport photo maker free" and "how to take a passport photo at home" are searched every day by people who do not want to pay a photo booth. The Passport Photo Maker removes the background, replaces it with white, and frames the photo at US 2 by 2 inches or the 35 by 45 mm size used by the UK, the EU and many other countries.
- Stand about a metre in front of a plain, light wall, in even daylight, with no shadows on your face or behind you.
- Have someone take the photo at eye level. Look straight at the camera with a neutral expression and your eyes open. Remove glasses where they are not allowed.
- Open it in the Passport Photo Maker, choose the size, and download.
- Print it at a photo counter. Several copies fit on one 4 by 6 inch print; place them with the Photo Collage Maker.
Check the official rules. The tool fixes the background and the size. It does not measure the height of your head in the frame or judge your pose, and requirements differ by country and change over time. Compare your photo with the examples on your government's passport website before you submit it.
Replace the sky and relight a photo
A flat grey sky can ruin an otherwise good landscape or property photo. The Sky Replacer uses Depth Anything, a model that estimates how far away every part of the photo is, to find the sky: the most distant area touching the top of the frame. It then blends in a clear blue sky, a sunset, stars, or a sky photo of your own, and can tint the land so a sunset sky does not sit over midday light.
The Photo Relighter uses the same depth model differently. It works out which surfaces face left, right or up, then adds light from the side you choose, in the colour of the look you picked: golden hour, soft studio light or neon night. Because the light follows the shape of the scene, it looks far more natural than a flat colour filter.
If a photo is simply too dark, the everyday tools are better: Image Adjust for exposure and white balance, and Levels and Curves for precise control of shadows and highlights.
A word on honesty. A dramatic new sky on a holiday photo is fine. On a property listing, it can mislead buyers about the view, and some property portals forbid it. Use it where it does not misrepresent something someone is paying for.
Uncrop, expand and fit banners
Sometimes the problem is the shape. A vertical phone photo needs to be a 16:9 slide; a photo needs to become a YouTube banner, a LinkedIn cover or an X header without cutting off the subject.
- Uncrop / Expand adds space on any side and fills it by continuing what is at the edges, using MI-GAN.
- Banner Extender does the same to an exact banner or cover size, with your whole photo kept at full resolution in the middle.
Both work best when the edges are simple: sky, sea, grass, sand, walls or an out-of-focus background. They continue texture; they do not invent new objects, so a person cut off at the edge will not get the rest of their arm back. When the edges are busy, the non-AI No Crop tool, which puts the photo on a blurred copy of itself, often looks cleaner. For the right size for every platform, see our social media image sizes guide. A YouTube banner, for example, is 2560 by 1440 pixels, but only the middle 1546 by 423 shows on every device.
Portrait blur, cartoons and creative looks
Portrait blur. Phones fake a shallow depth of field with "portrait mode"; the Portrait Blur tool does the same for any photo, including ones taken without it. An AI model finds the subject and blurs everything behind it, with a choice of strength and the option to darken or desaturate the background so the subject stands out.
Photo to cartoon. The Photo to Cartoon tool is deliberately not a generative model. It flattens colour into bands and draws ink outlines along the edges, instantly, with no download. Your face is never redrawn by an AI, so the result still looks like you. For pencil, charcoal and ink drawings, try Photo to Sketch.
Finishing looks. Once the AI work is done, the everyday tools add style: Aesthetic Filters for one-tap looks such as 90s film and golden hour, grain and vignette, light leaks and frames.
AI alt text for SEO and accessibility
Alt text is the short description of an image that screen readers announce and search engines read. It helps people who cannot see the image, and it helps images appear in search. Most sites skip it because writing it for hundreds of images is tedious.
The Alt Text Generator runs Microsoft's open-source Florence-2 model in your browser. It writes a short description and a detailed one, reads any text in the image, and builds a caption, title, keywords and an SEO-friendly file name from them. Treat it as a first draft:
- Say what matters for the page the image is on. The same photo of a red dress needs different alt text on a product page and on a fashion history article.
- Keep it to one sentence, roughly 125 characters.
- Do not start with "image of" or "picture of"; screen readers already say it is an image.
- Never stuff keywords into alt text. It does not help rankings and makes the page worse for screen reader users.
Complete workflows, step by step
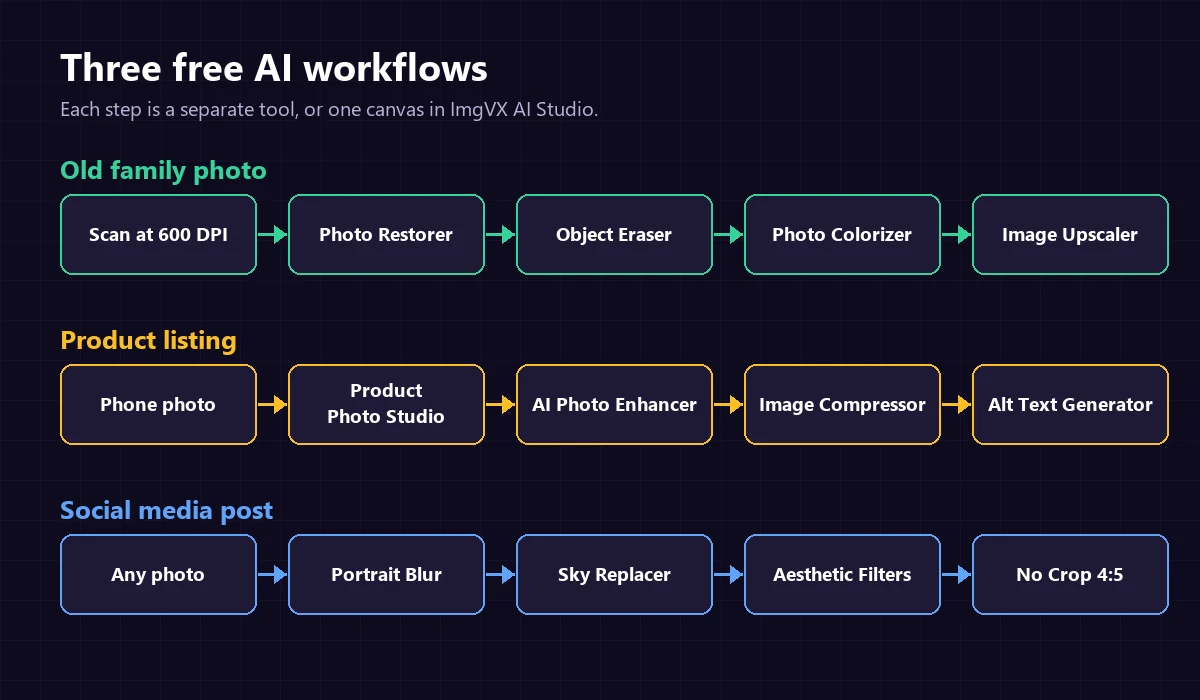
Old family photo, from shoebox to print
- Scan at 600 DPI (1200 for small prints), or photograph it flat in daylight and straighten it with the Perspective Corrector.
- Photo Restorer to clean grain and fading.
- Object Eraser for scratches, creases and torn corners.
- Photo Colorizer if it is black and white.
- Image Upscaler to reach the pixels your print size needs.
Product listing, from phone photo to store
- Photograph the product on white paper near a window.
- Product Photo Studio for the white backdrop, centring and shadow.
- AI Photo Enhancer if the photo was noisy.
- Image Compressor to a size your store loads quickly, such as 200 KB.
- Alt Text Generator for the description.
Social media post, from camera roll to feed
- Portrait Blur to separate the subject.
- Sky Replacer if the sky was grey.
- Aesthetic Filters for a consistent look across your feed.
- No Crop at 4:5 so nothing is cut off.
Do it all in one place
ImgVX AI Studio puts every tool around a single image. Apply a step, undo it, hold to compare with the original, and download once at the end. It is free, with no account, and works as a full-screen editor on phones. After an HD AI tool, the full-resolution save uses one credit; the standard size is free.
More real-world recipes
A LinkedIn or CV profile photo
Take a head-and-shoulders photo facing a window. Open it in the Background Replacer and choose a soft grey or blue gradient, which reads as a studio backdrop. Crop it square with the Image Cropper, leaving a little space above the head, and download at 800 by 800 pixels or more. For a round version for chat apps, use the Avatar Maker. Keep it honest: the tools change the background and framing, never your face.
A YouTube thumbnail
Cut yourself or the product out with the Background Remover (transparent PNG). Build the thumbnail at 1280 by 720 pixels: put a bright colour or a blurred frame from the video behind the cut-out with the Background Replacer, add three or four large words with Add Text to Image using a thick outline, and add a drop shadow to the cut-out so it lifts off the background. Keep the file under 2 MB with the Image Compressor.
Property and holiday-rental listings
Straighten leaning walls with the Perspective Corrector, brighten interiors with Image Adjust (lift exposure, then correct the yellow cast of indoor bulbs with the warmth slider), and remove clutter such as bins, cables and cars with the Object Eraser. Be careful with sky replacement and object removal on listings: removing a bin is tidying; removing a building site next door misleads the buyer, and most portals forbid it.
A clean, transparent logo
Many small businesses only have their logo as a JPEG on a white box. For a flat logo, the Chroma Key Remover set to white removes the box exactly. For a logo with soft edges or gradients, use the Background Remover with Best edges. Then either keep the transparent PNG, or trace it into a scalable SVG with the SVG Vectorizer and tidy the file with the SVG Optimizer. A too-small logo can be enlarged first with the Image Upscaler, which keeps edges crisp.
Stickers and cut-outs for chat and print
Cut out a pet, a friend (with their permission) or an object with the Background Remover, then give it a soft outline with a white, unshifted drop shadow so it stands out on any chat background. Save as PNG for messaging apps, or place several on one page for sticker paper with the Photo Collage Maker.
A scanned document you can read, search and send
Photograph the page flat, straighten it with the Perspective Corrector, whiten the paper with Levels and Curves, and combine pages with Image to PDF. If you need the words as text, Image to Text reads them on your device. Our phone scanning guide covers it step by step. None of this uploads the document, which matters for ID cards, contracts and medical letters.
School, club and small-business flyers
Remove the background from each photo, place them on a coloured canvas, add headings with Add Text to Image and arrows or boxes with the Shape Drawer. Before printing, check the pixels against the print size in our DPI guide and upscale any photo that is too small.
Free AI photo editing on your phone
Everything above works in a phone browser, on Android and iPhone, with nothing to install. A few tips make it smoother:
- Use Wi-Fi for the first run of the larger tools (colorizer, alt text, Best-edges background removal), since each model downloads once.
- Keep the tab open while a tool runs. Switching apps can pause the page on some phones.
- Close other tabs for very large photos. AI models use a lot of memory, and phones have less of it than laptops.
- iPhone photos are HEIC by default. Most tools read them, and the HEIC to JPG converter makes them open anywhere. Our HEIC guide explains the format.
- Downloads go to your Files app or gallery like any other download. On iPhone, tap and hold an image result to save it to Photos.
Free on-device AI vs paid cloud editors
Paid cloud editors are not bad products. They have real advantages, and it is worth knowing when you might want one.
| ImgVX AI (on-device) | Typical cloud AI editor | |
|---|---|---|
| Price | Free to edit; credits only for full-resolution HD downloads | A few free edits, then a subscription or credits |
| Watermark | Never | Often on free downloads |
| Account | None | Usually required |
| Your photo uploaded | No | Yes |
| Full-resolution download | Free on most tools; 1 credit on HD AI tools | Often paid only |
| Speed on an old device | Slower, uses your hardware | Same on any device |
| First use | One-time model download | Instant |
| Text-to-image generation | No | Often |
| Largest, newest models | Models small enough for a browser | Can run very large models |
Choose a cloud editor if you need generative features such as creating images from a text prompt, if you edit on a very old or low-memory device where speed matters more than privacy, or if you need a team workspace with shared assets. Choose on-device AI for everything else, especially anything private, anything you do often, and anything you want without a watermark.
The everyday tools that finish the job
AI does the hard part, but most photos still need an ordinary last step. These run instantly with no model download:
- Make the file smaller: Image Compressor, including exact targets such as 100 KB or 50 KB for online forms. See how to reduce image file size.
- Change the size: Image Resizer, Image Cropper and the Bulk Image Resizer for whole folders.
- Change the format: Image Converter for PNG, JPG, WebP and AVIF, HEIC to JPG, Image to PDF and PDF to Image. Our image formats guide explains which to use.
- Protect your privacy: the Metadata Remover strips GPS location and camera data before you post. See what EXIF data reveals.
- Add words: Add Text to Image, the Watermark Tool and the Meme Generator.
Every one of the 78 tools is free, and none uploads your files.
Quick answers to common searches
The questions people type most often about AI photo editing, answered in a few lines each, with the tool that does the job.
How do I make a picture background transparent?
Remove it with the Background Remover, keep the background set to Transparent and save as PNG. For a logo on plain white, Make Background Transparent is exact and keeps the white inside the design.
How do I remove a white background from a signature?
Photograph or scan the signature on plain white paper and open it in the Signature Extractor. It removes the paper even where the light is uneven, crops to the ink and gives you a transparent PNG. Raise Ink sensitivity if faint strokes are missing.
How do I make a blurry picture clear?
Use the AI Photo Enhancer for noise and softness, and the Image Sharpener for slightly soft edges. Heavy motion blur cannot be fully fixed by any tool.
How do I increase the resolution of a screenshot or a small logo?
Run it through the Image Upscaler at 2x or 4x. Text and flat graphics upscale particularly well. For a logo you will use at many sizes, trace it to SVG with the SVG Vectorizer instead.
How do I upscale an anime or cartoon image?
The Image Upscaler handles clean line art and flat colour well. Compare at full size, and if lines look too smooth, use 2x rather than 4x.
How do I remove a photobomber from a picture?
Paint over them, including their shadow, in the Object Eraser and erase. It works best when they are against a simple background such as sea, sky, grass or a wall.
How do I remove the date stamp from an old photo?
Brush over the date in the Text Remover (or press Find text) and remove it.
How do I blur a background like an iPhone portrait?
Open the photo in Portrait Blur, choose the strength and download. It works on photos taken without portrait mode.
How do I blur a face or a license plate?
Use Pixelate and Censor with large blocks on just that area. Pixelation with large blocks cannot be reversed; a light blur on text sometimes can be read.
How do I fix an overexposed or too-bright photo?
Lower exposure and highlights with Image Adjust or pull in the white point with Levels and Curves. Areas that are pure white with no detail (clipped) cannot be recovered; check with the Histogram Viewer.
How do I fix a yellow indoor photo?
Move the warmth (white balance) slider in Image Adjust towards blue until something white in the photo looks white again.
How do I make a photo look professional?
Straighten it, correct exposure and white balance, crop to a clean composition, remove distractions with the Object Eraser, and replace or blur a messy background. Small, honest corrections look more professional than heavy filters.
How do I colorize a photo on my phone?
Open the Photo Colorizer in your phone browser, preferably on Wi-Fi for the one-time 130 MB model download, and add the photo.
How do I restore a torn photo?
Scan it with the pieces laid together, run the Photo Restorer, then paint out the tear lines with the Object Eraser in small sections. Large missing areas of faces cannot be rebuilt accurately.
How do I make a photo bigger without it looking pixelated?
Use AI upscaling rather than a plain resize: the Image Upscaler predicts sharp edges instead of enlarging the pixel blocks. See also resizing without losing quality.
How do I reduce a photo to under 100 KB without it looking bad?
Resize it to about 1200 pixels wide, then set a 100 KB target in the Image Compressor. Reducing the pixel dimensions first is what keeps the quality high.
How do I change the colour of a shirt or car in a photo?
Use the Colour Replacer: pick the current colour, the new one, and adjust the tolerance. Shading is kept, so folds and reflections still look real.
How do I make a white background for Etsy or eBay?
Open the product photo in the Product Photo Studio, choose the white backdrop and download the square image.
How do I get the text out of a photo?
Image to Text reads printed text in screenshots, scans and photos of pages on your device, and you can copy it anywhere.
How do I write alt text for many product images?
Run each image through the Alt Text Generator, then edit each draft so it describes what matters to a shopper: colour, material, size and what makes that variant different.
Using AI edits responsibly
AI editing is powerful enough to deserve a few ground rules. They are also part of our terms of use:
- Edit only photos you own or have permission to edit, and respect the people in them.
- Do not remove watermarks or credits from other people's images.
- Do not create misleading images: fake documents, edited evidence, or photos that misrepresent a product, property or event to someone who relies on them.
- Label reconstructions. A colorized or heavily restored photo is an interpretation; say so when you share it, especially for historical images.
- No sexual content and nothing involving minors in any sexual context, ever.
This is also why ImgVX AI deliberately has no tools that generate images from text or change a person's face, body or clothing. Those are the features most often misused, and leaving them out keeps the site useful for the everyday jobs people actually need.
Troubleshooting
The tool is slow
Your browser may not have WebGPU, so the model runs on the processor. Use a current version of Chrome or Edge on a computer, close other heavy tabs, and try a smaller photo. The first run is always slower because of the model download.
"Your device ran short of memory"
Large photos multiplied by large models can exceed what a browser tab is allowed to use, especially on phones. Resize the photo to around 2000 to 3000 pixels on the long side with the Image Resizer, close other tabs and try again.
The download stopped or failed
Check your connection and press the button again; the download restarts. Some workplace and school networks block model downloads; try another network.
The result has rough edges or a smudge
Start from a sharper, better-lit photo, use the higher-quality model option where there is one, and fix small areas with a second pass or the Retouch Tools.
How do I free up the space the models use?
Clear this site's data in your browser's settings. The models are removed and will download again the next time you use a tool.
Glossary
- On-device AI
- An AI model that runs on your own computer or phone rather than on a remote server.
- WebGPU
- A browser feature that lets web pages use the graphics card for fast calculations, including AI models.
- WebAssembly
- A way for browsers to run compiled code at near-native speed on the processor; the fallback when WebGPU is not available.
- Model
- The trained file that holds what an AI has learned, such as what the edge of a person looks like.
- Upscaling
- Enlarging an image; AI upscaling predicts sharp detail instead of stretching pixels.
- Inpainting
- Filling a masked area of a photo from its surroundings, used to remove objects and text.
- Outpainting
- Extending a photo beyond its original edges, used to uncrop and fit banners.
- Segmentation / matting
- Separating the subject from the background; matting also handles soft edges such as hair.
- Colorization
- Predicting plausible colour for a black and white image.
- Alt text
- A short text description of an image for screen readers and search engines.
Frequently asked questions
What is the best free AI photo editor?
The best one is the one that does your job without a catch. Many "free" AI editors limit you to a few edits a day or add a watermark. ImgVX AI has no daily limit and no watermark because its AI runs on your own device; the HD tools download free at standard size, and the full-resolution file uses a credit (new accounts get a few free). For a specific task, start with the matching tool: the Background Remover, the Image Upscaler or the Object Eraser.
Is AI image editing really free on ImgVX AI?
Yes. All 16 AI tools can be used for free with no account, no daily limit and no watermark. The AI models run in your browser on your own graphics card. Eleven of them are HD tools: their free download is standard size (up to 550 px), and the full-resolution file uses one credit. The site is paid for by advertising and by optional Pro and credit packs.
Can I edit photos with AI without signing up?
Yes. Open any AI tool, add a photo and download the result. An account is only needed for credits, which buy full-resolution downloads from the HD tools.
Does free AI image editing upload my photos?
Not here. Cloud AI editors upload your photo to their servers; ImgVX AI runs the model inside your browser, so the photo stays on your device. Only the model file is downloaded, once.
Why is the first AI edit slow?
The first time you use a tool, your browser downloads its AI model: about 5 MB for the upscaler, 25 to 110 MB for background removal and about 130 MB for the colorizer. It is kept in your browser, so later edits start straight away.
Do I need a powerful computer for AI photo editing?
No, but it helps. Any recent laptop or phone works. A graphics card with WebGPU support, which current Chrome and Edge use, makes the AI several times faster than running on the processor alone.
Can I use free AI edited photos commercially?
Yes, if you own the original photo or have permission to use it and the people in it. ImgVX AI claims no rights over your images and adds no watermark. See the terms for what you may not create.
Can AI fix a very blurry photo?
Only partly. AI can remove noise, compression damage and mild softness, and an upscaler predicts clean edges, but detail that was never captured cannot be recovered. Try the AI Photo Enhancer and judge the result at full size.
Does ImgVX AI generate images from text?
No. ImgVX AI edits your own photos; it does not create images from a text prompt, and it has no tools that change a person's face, body or clothes. Browse: all free image tools.
Does it work on iPhone and Android?
Yes, in the phone browser with nothing to install. Newer phones run the AI on their graphics chip; older ones fall back to the processor, which is slower but works.
Try free AI image editing now
No sign-up, no watermark, and your photos stay on your device.