
Compress a Photo and Signature to 20 KB or 50 KB for Online Forms
Online forms check three things about every image you upload: the format (almost always JPG), the pixel dimensions, and a file size range in KB, with a minimum as well as a maximum. Get them in that order: crop to the right shape, resize to the right pixels, then compress to the right KB. Done that way, a photo for a 20–50 KB limit and a signature for 10–20 KB take a couple of minutes on a phone, and the form accepts them first time.
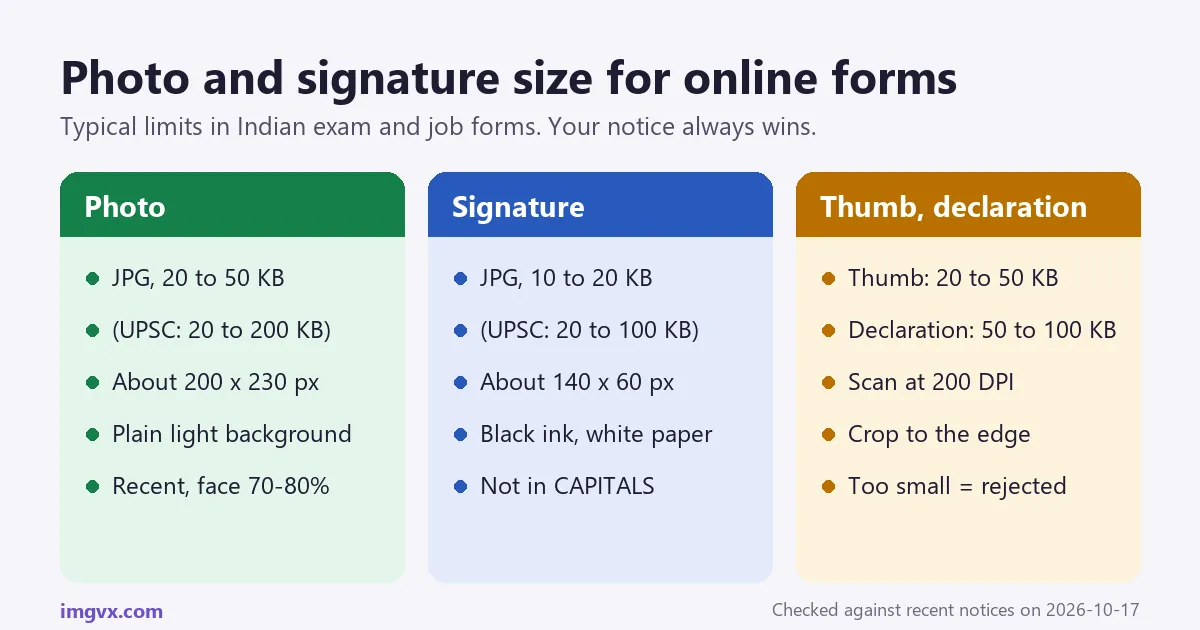
The short answer
- Photo: crop to the notice’s shape and pixels (often 200 × 230, which this cropper does in one step), then compress to under 50 KB as JPG. Aim for 25–45 KB.
- Signature: black ink on white paper, clean it with the Signature Extractor, crop close, resize (often 140 × 60), compress to under 20 KB. Aim for 12–18 KB.
- Too small? A file under the minimum is rejected too. Re-save at higher quality or slightly larger dimensions.
- Always JPG, really saved as JPG, not a PNG or HEIC renamed.
- The notice wins. Every number in this article is typical, not official. Read your form’s own notice first.
Typical limits in common forms
These are the limits listed in recent notices, as checked on October 17, 2026. They are here to show you what to look for; recruitment bodies change them between cycles, so the notice for your exam always overrides this table.
| Form | Photo | Signature | Other uploads |
|---|---|---|---|
| SSC (CGL, CHSL, MTS and others) | JPG, 20–50 KB, about 3.5 × 4.5 cm. Recent forms capture it live with your camera. | JPG, 10–20 KB, about 4.0 × 3.0 cm (some guides say 6.0 × 2.0 cm) | — |
| IBPS and bank exams (PO, Clerk, RRB, SBI) | JPG, 20–50 KB, 200 × 230 px | JPG, 10–20 KB, 140 × 60 px | Left thumb impression 20–50 KB; handwritten declaration 50–100 KB, about 800 × 400 px at 200 DPI |
| UPSC | JPG, 20–200 KB, plain white background, face filling most of the frame. A live camera photo is also taken and compared with it. | JPG, 20–100 KB; recent instructions ask for it signed three times, one below the other | Photo ID document as listed in the notice |
| State PSCs, universities, scholarships | Commonly 10–100 KB | Commonly 5–50 KB | Certificates as PDF, often under 200 KB to 1 MB |
Where a notice gives a size in centimetres rather than pixels, it is describing the shape and the size it will print at. At 200 DPI, 3.5 × 4.5 cm is about 276 × 354 pixels; at 150 DPI, about 207 × 266. Keep the shape (7:9 for 3.5 × 4.5 cm) and a size in that range, and the KB limit becomes easy. The DPI and print size guide explains the arithmetic.
Why the order matters: shape, pixels, then KB
A phone photo is about 4000 × 3000 pixels and 3 to 5 MB. Squeezing that into 50 KB by compression alone destroys it: the face turns to blocks. But a 200 × 230 pixel photo has 260 times fewer pixels, and at good JPG quality it is naturally around 15 to 40 KB. So:
- Crop to the shape the form wants, so nothing gets stretched.
- Resize to the pixel size in the notice. This does most of the work.
- Compress to the KB range, at the highest quality that fits.
Our guide to reducing image file size explains why this order beats any compression setting.
KB is not always the same KB
Some websites count 1 KB as 1,000 bytes, others as 1,024. The difference is small but can push a file just over a limit, or just under a minimum. Aim about 5 to 10 percent inside both ends: for 20–50 KB, a file of 25–45 KB is safe on any form. The ImgVX compressor counts 1 KB as 1,024 bytes.
The photo, step by step
Take it
- Stand facing a window in daylight, against a plain white or light wall, about an arm’s length from the wall to avoid shadows.
- Look straight at the camera, face fully visible, eyes open, neutral expression. No cap, no dark glasses, no filter. Ordinary clear spectacles are usually allowed if there is no glare; the notice will say.
- Have someone else take it from about 1.5 metres with the normal 1× camera. A selfie at arm’s length distorts the face.
- Use a recent photo. Most notices ask for one taken within the last few months, and an old photo is a common reason for rejection at the exam centre.
Edit it
- Background: if the wall is not plain, the Passport Photo Maker replaces it with white and frames the head and shoulders. Do not smooth skin or change your face: the photo must match you on exam day.
- Crop and resize in one step: for a 200 × 230 pixel photo, open Crop for IBPS photo. The frame is locked to that shape; drag it over the head and top of the shoulders, with the face taking up most of the height, and the result is saved at exactly 200 × 230. For another size, use the Image Cropper with Free ratio, then type the notice’s width and height in the Image Resizer; crop as close to that shape as you can, so the resize does not stretch the face.
- Compress: open Compress to 50 KB (or 20 KB, 100 KB) and add the resized photo. It saves a JPG at the highest quality that fits under the limit and shows the final size.
- Check that the size is inside the range, not only under the maximum. If it is under the minimum, see when the file is too small.
The signature, step by step
- Sign on plain white paper with a black ink pen (gel or ballpoint), in your normal running signature, not in capital letters. Most forms reject a signature in capitals. Sign slightly larger than usual; a tiny signature looks faint after resizing.
- Photograph it from straight above in daylight, filling most of the frame, without your hand’s shadow across it. Or scan it at 200 DPI.
- Clean it with the Signature Extractor. It removes the grey paper and uneven light, keeps the ink, and crops close around it. Set the ink colour to black.
- Crop and resize: the extractor gives a transparent PNG cropped to the ink. For 140 × 60 pixels, open Crop for IBPS signature, place the frame over the signature, and it is saved at exactly 140 × 60. For another size, crop close to the shape and set the width and height in the Image Resizer.
- Save as JPG within the KB range with Compress to 20 KB. Transparent areas become white when saved as JPG, which is what forms want.
A 140 × 60 pixel signature on white is a very small file, often under 10 KB even at high quality. If your form’s minimum is 10 KB, read the next-but-one section.
For UPSC-style instructions that ask for the signature three times, sign three times one below the other on the same sheet, photograph all three together and keep them in a single image.
Thumb impression and handwritten declaration
Bank and some other recruitment forms ask for two more uploads.
Left thumb impression
- Use a blue or black stamp pad and press the left thumb once on white paper, rolling it slightly. Do not smudge it.
- Photograph or scan it straight on, then flatten and clean it with the Document Scanner.
- Crop close, resize to the notice’s size, and compress to its range (typically 20–50 KB) with the 50 KB compressor.
Handwritten declaration
- Copy the declaration text given in the notice, word for word, in your own handwriting, in English, in black ink on white paper. Do not type it or write it in capitals.
- Scan it at 200 DPI or photograph it flat in daylight, and straighten it with the Document Scanner. The Perspective Corrector fixes a photo taken at an angle.
- Crop to the edge of the text, resize to the notice’s size (often about 800 × 400 pixels) and compress to its range (typically 50–100 KB) with the 100 KB compressor.
When the file is too small
A file under the minimum is rejected just like a file over the maximum. It is a common problem with signatures, because a small black-and-white image compresses to almost nothing. To make it larger, in this order:
- Raise the quality. Open the Image Compressor without a target and set quality to 95–100, then save as JPG. Higher quality keeps more detail, so the file is bigger.
- Use larger pixel dimensions, if the notice allows a range or only gives centimetres. Doubling the width and height roughly doubles to triples the file size. For a signature, 280 × 120 instead of 140 × 60 often lands in the 10–20 KB range at high quality.
- Start from the original, not from a copy you have already compressed. Every round of compression throws detail away for good.
- Scan at the DPI the notice names (often 200 DPI) and true colour, rather than black-and-white mode, which produces tiny files.
Do not pad the file by adding borders, text or noise. The image has to show only what the form asked for.
Doing it all on a phone
Every tool above works in Chrome on Android and Safari on iPhone, with nothing to install, and processes the images on the phone itself. You need a free account. A few phone-specific tips:
- iPhone photos are HEIC by default, and many forms reject them. The ImgVX tools read HEIC and save JPG, or convert first with HEIC to JPG. To take JPG photos from the start: Settings → Camera → Formats → Most Compatible.
- Find the downloaded file: on Android it is in the Downloads folder; on iPhone, in the Files app under Downloads.
- Check the size before uploading: on Android, touch and hold the file in Files and choose Details; on iPhone, touch and hold it in Files and choose Get Info.
- Upload from Files, not the gallery, on iPhone. Choosing from Photos can let the browser convert or resize the image again.
The free plan has a daily limit on tool runs, so do the photo and signature in one session. The cropping, resizing and compressing tools download at full size on the free plan.
Ten reasons forms reject an image
- Under the minimum KB. Just as common as over the maximum, especially for signatures.
- Not really a JPG. A PNG, WebP or HEIC renamed to .jpg. Re-save it as JPG with the Image Converter.
- Wrong pixel dimensions, even with the right KB size.
- Stretched photo, from resizing to a different shape without cropping first. Faces look wide or thin.
- Signature in capital letters, which most recruitment forms do not accept.
- Photo and signature swapped, uploaded in each other’s box. It happens more than you would think.
- Old photo, or one that no longer looks like you. Forms catch this at the exam centre, not at upload.
- Cap, dark glasses, a filter or a busy background.
- Blurred or dark scan, or a shadow over the signature.
- Faded signature from a blue ballpoint or a light pen. Use black ink and clean the paper to white.
Making a passport or visa photo rather than an exam photo? The passport photo guide covers the official sizes.
Frequently asked questions
How do I compress a photo to 20 KB or 50 KB?
Crop the photo to the shape the form asks for, resize it to the pixel size given in the notice (often about 200 x 230 pixels for a photo), then save it as JPG with a target size. The Image Compressor has ready pages for 20 KB, 50 KB and 100 KB that pick the highest quality that fits under the limit. At 200 x 230 pixels, most photos are already well under 50 KB.
How do I reduce my signature to between 10 KB and 20 KB?
Sign in black ink on plain white paper, photograph it in daylight, and clean the paper to pure white with the Signature Extractor. Crop close around the signature, resize it to the size in the notice (often 140 x 60 pixels), and save it as JPG with the Image Compressor set to 20 KB. If the file comes out under 10 KB, raise the quality or use slightly larger dimensions within what the form allows.
My photo is smaller than the minimum size. How do I increase it in KB?
Re-save it at higher quality: open the Image Compressor without a target and set quality to 95 or 100. If it is still too small, use larger pixel dimensions, as long as the form allows them, or start again from the original photo rather than an already compressed copy. Do not add borders or text to pad the file; the form may reject the photo.
What is the SSC photo and signature size?
Recent SSC notices list the photo as a JPG of 20 to 50 KB, about 3.5 x 4.5 cm, and the signature as a JPG of 10 to 20 KB, about 4.0 x 3.0 cm (some guides give 6.0 x 2.0 cm). Recent SSC forms capture the photograph live through your camera during the application. Always check the notice for your exam, because the numbers change between cycles.
What is the IBPS photo, signature, thumb and declaration size?
Recent IBPS and bank notices list: photo 20 to 50 KB at 200 x 230 pixels; signature 10 to 20 KB at 140 x 60 pixels; left thumb impression 20 to 50 KB; handwritten declaration 50 to 100 KB, about 800 x 400 pixels at 200 DPI. All as JPG or JPEG. A signature in capital letters is not accepted.
What is the UPSC photo and signature size?
Recent UPSC guidance lists the photo as a JPG of 20 to 200 KB and the signature as a JPG of 20 to 100 KB, with a plain white background for the photo and black ink for the signature. The form also takes a live photo with your camera and compares it with the uploaded one, so use a recent photo. Recent instructions have asked for the signature written three times, one below the other, in a single image. Check the current notice on upsc.gov.in before uploading.
Is 1 KB 1000 bytes or 1024 bytes on government forms?
Forms rarely say, and both are used. To be safe, aim about 5 to 10 percent inside both limits: for a 20 to 50 KB range, aim for 25 to 45 KB. The ImgVX compressor counts 1 KB as 1024 bytes, so a file it saves as "under 50 KB" is under 51,200 bytes. More help: ImgVX AI help docs.
Why is the form rejecting my JPG even though the size is right?
The usual causes are: the file is really a PNG or HEIC with its name changed to .jpg; the pixel dimensions are outside the range even though the KB size is right; the photo is old, blurred or has a cap or dark glasses; or the signature is in capital letters. Re-save the file as a real JPG with the Image Converter or Image Compressor, and check the dimensions.
How do I check the size of a photo in KB on my phone?
On Android, open the Files app, touch and hold the image and choose Details or Info. On iPhone, open the Files app, touch and hold the image and choose Get Info. On Windows, right-click the file and choose Properties; on a Mac, select it and press Command-I. The ImgVX tools also show the size of the result before you download it.
Can I make a form photo with a white background at home?
Yes. Take the photo facing a window in daylight, against a plain light wall, with your face straight to the camera. The Passport Photo Maker puts the face on white and frames it; then resize to the form's pixel size and compress to the KB range. Do not retouch your face: the photo must look like you on the day of the exam.
How do I scan a thumb impression and declaration with a phone?
Make the impression or write the declaration on white paper, photograph it from straight above in daylight without shadows, and use the Document Scanner to flatten and clean it. Crop to the edge of the impression or text, resize to the notice's dimensions, and compress to its KB range.
Get your form images ready
Crop, resize and compress to the exact KB range, in your browser. Nothing is uploaded.