
Real Estate Photo Editing: What’s Allowed (2026)
Real estate photo editing is allowed, and expected, as long as the photo still shows the property as a visitor would find it. Fix the light, the colour and the leaning walls freely. Label anything you added, removed or replaced, such as a blue sky or virtual furniture, and keep the original. Never edit away something a buyer or renter would want to know about: power lines, damp, a neighbouring building, the real size of a room. In California that line is now law, and New South Wales is next.
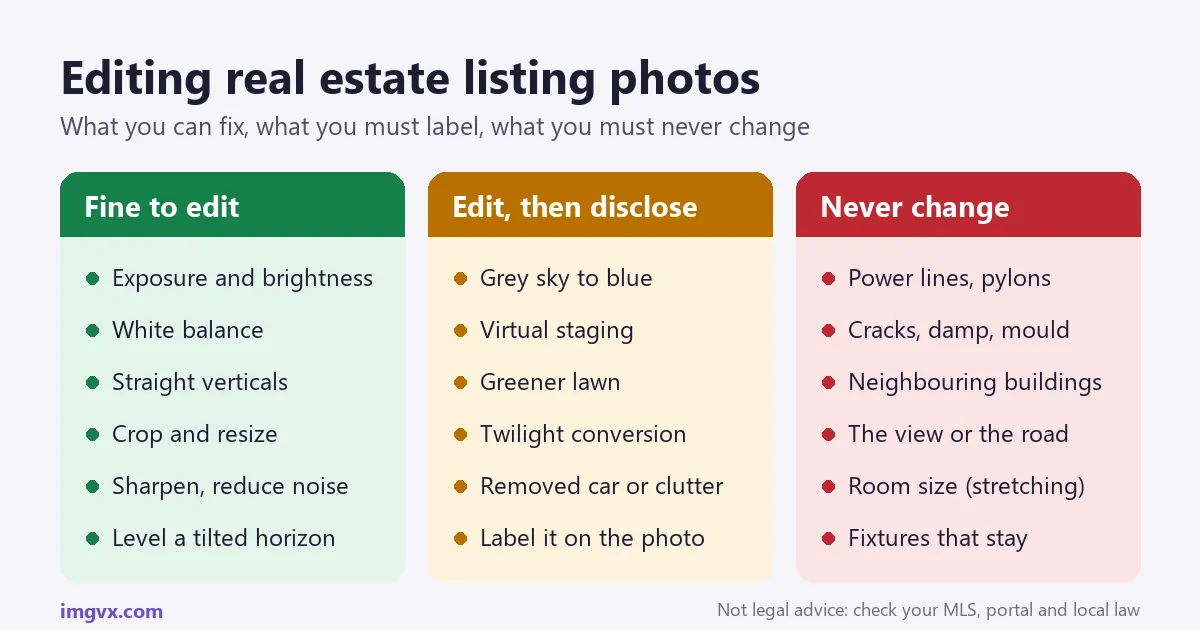
The short answer
- Always fine: exposure, white balance, contrast, straightening verticals, cropping, resizing, sharpening, noise reduction.
- Fine if labelled: sky replacement, virtual staging, removing a parked car or clutter, a greener lawn, a day-to-dusk conversion. Keep the unedited photo.
- Never: removing power lines, pylons, cracks, damp, mould or a neighbour’s building; changing the view; stretching a room.
- Export: landscape JPEG in sRGB, about 2048 px on the long side, under 5 MB, no watermark. 4:3 for Zillow-style MLS feeds and realestate.com.au, 3:2 works for Rightmove.
- Labels: required by law in California since January 1, 2026 (AB 723), with a link to the original; expected by many MLSs and portals everywhere else.
The three kinds of listing-photo edit
Every rule in every country covered here comes back to one test: would a buyer or renter who visits the property feel misled by the photo? Edits fall into three groups by that test.
| Kind of edit | Examples | What to do |
|---|---|---|
| Corrections: make the photo look like the room did to your eye | Brightness, exposure, contrast, white balance, straightening walls, levelling, cropping, resizing, sharpening, noise reduction, recovering a bright window | Edit freely. California’s law and MLS guidance treat these as routine. |
| Alterations: add, remove or replace something that was there on the day | New sky, virtual furniture, removing a parked car, bins, a hose or personal clutter, greening a lawn, a fire in the fireplace, a twilight conversion | Allowed in most places, but label the photo and keep the original. In California, a label and a link to the original are required. |
| Misrepresentation: hide or invent something a buyer would care about | Removing power lines, pylons, a phone mast or a neighbouring building; painting over cracks, damp, mould or water stains; changing the view; stretching a room; adding a pool or a deck that does not exist | Never, with or without a label. This is what trading standards, state regulators and portals act on. |
Two edits sit on the boundary and cause most arguments. Removing temporary objects (a car on the drive, the bins, a ladder) is standard practice in the UK and most US markets, but California’s law covers anything removed, so label it there. Ultra-wide lenses are not an edit at all, yet a 0.5× phone lens in a small bedroom can make it look half as big again; use the 1× lens in small rooms, or the ultra-wide only where the room really is large.
The rules by country: US, UK, Canada, Australia
This is a summary to help you ask the right question, not legal advice. Your MLS, your portal and your licensing regulator have the final word, and they change their rules more often than the law does.
United States
- NAR Code of Ethics, Article 12. REALTORS® must present a “true picture” in their advertising. This is the root of almost every MLS photo rule, and NAR has warned that virtual staging can raise Article 12 concerns when it is not obvious or disclosed.
- Your MLS. Each MLS publishes its own photo policy: minimum size, whether the first photo must show the exterior, whether branding or watermarks are banned (most ban them), and how altered photos must be marked. Read it before you edit, because a non-compliant photo is the one that gets the listing fined.
- California AB 723, in effect since January 1, 2026 (Business and Professions Code §10140.8). A broker or salesperson who advertises with a digitally altered image must place a reasonably conspicuous statement on or next to it saying it has been altered, and give access to the unaltered image through a link, URL or QR code. It applies across all advertising, not only the MLS: your website, social posts and flyers too. Lighting, white balance, cropping and sharpening are treated as routine; adding, removing or changing elements (a sky, furniture, wires, grass) is an alteration.
- For-sale-by-owner sellers are not bound by the Realtor code, but general false-advertising and misrepresentation law still applies to a private sale, and a buyer who feels misled has the photos as evidence.
United Kingdom
- Estate and letting agents must not publish misleading advertising. The rules on unfair commercial practices, long in the Consumer Protection from Unfair Trading Regulations 2008 and now in the Digital Markets, Competition and Consumers Act 2024, cover photos as much as words.
- Material information guidance from National Trading Standards expects listings to give a fair picture of the property; photos must not be used to hide what a buyer needs to know. Trading standards also advise that a photo showing only the back or side of a property should say so.
- In practice, removing a car from the drive is treated as normal; removing power lines or changing wall colours is not. In 2025 Rightmove asked an agent to take down AI-staged photos after complaints, even though the listing said some images were virtually staged. A label is necessary, but it does not make an unrealistic photo acceptable.
Canada
- Provincial regulators require advertising to be accurate and not misleading; in Ontario that is RECO under TRESA, which applies to websites and social media as much as print. The federal Competition Act’s misleading-advertising rules apply on top.
- There is no single national rule on altered photos yet, so the safe practice matches California’s: label staged or altered photos and keep the originals available. Check your local real estate board’s MLS® photo rules before uploading.
Australia and New Zealand
- Australian Consumer Law already prohibits misleading or deceptive conduct, and that includes listing photos.
- New South Wales has passed amendments to its residential tenancy law requiring landlords and agents to disclose rental photos altered in ways that could mislead, such as virtual furniture that hides damage or misrepresents room size, removed electricity towers, or edited-out water stains and mould. Officials have said basic edits like cropping and brightening are not the target. The rules are expected to start in early 2027, with penalties reported at up to $22,000 for businesses. Check NSW Fair Trading for the final wording and start date.
- In New Zealand, the Fair Trading Act and the Real Estate Authority’s rules for licensees prohibit misleading advertising. The same three-kinds test applies.
Photo sizes for Zillow, MLS, Rightmove and realestate.com.au
Portals resize every photo you upload, so the goal is to give them one that is large enough to stay sharp on a big screen and small enough to upload quickly. The minimums below get a photo accepted; the recommendations get it looking good.
| Where | Shape | Minimum | Recommended | File limit and notes |
|---|---|---|---|---|
| Zillow (US) | Landscape | 330 × 220 | 2048 × 1536 | 5 MB per photo in Zillow’s feed spec; no watermarks or branding |
| Your MLS (US, Canada) | Usually 4:3 landscape | Set by each MLS | 2048 × 1536 | Your MLS limits apply first and syndicate to Zillow, Realtor.com and Redfin |
| Rightmove (UK) | 3:2 landscape | Not published | 1024 × 683 or larger, e.g. 2048 × 1365 | Rightmove’s own advice is 1024 × 683; check your CRM’s upload limits |
| realestate.com.au (Australia) | 4:3 landscape | 800 × 600 | 2000 × 1500 | JPEG or PNG, RGB not CMYK, under 5 MB |
| Your own website, social posts | Any | – | 2048 px long side; 1080 × 1350 for Instagram | Convert to WebP for your site; it is a fraction of the size |
One export that works almost everywhere: landscape, 4:3, 2048 × 1536 pixels, JPEG at quality 80 to 85, sRGB colour, under 5 MB. Crop to 4:3 with the 4:3 cropper (or 3:2 for Rightmove), set the size in the Image Resizer, and if a file is still too big, bring it down with the compress to 1 MB preset, which keeps a 2048 px listing photo looking clean. Portrait photos are shown with bars or cropped by most portals, so turn the phone sideways for everything except a tall staircase or a narrow hallway. For why 300 DPI does not matter on screen, see DPI and print size; it only matters for the printed brochure.
Shoot it right: ten minutes that save an hour of editing
Editing fixes small problems quickly and big problems badly. These habits remove most of the work before it starts, whether you use a camera or a phone.
- Every light on, every blind open, and shoot in daylight. Mixed light still needs a white balance fix, but a lit room needs far less brightening, and brightening is what makes phone photos grainy.
- Camera at chest height, held level. Pointing the camera up or down makes walls lean. Keeping it level means straight verticals with no correction at all.
- Shoot from a corner or doorway to show the shape of the room, and include a window or a door for scale.
- Use the 1× lens in small rooms. The ultra-wide is tempting, but it distorts edges and exaggerates size, which is the misrepresentation you are trying to avoid.
- Declutter before, not after. Fridge magnets, toiletries, cables, pet bowls and family photos take a minute to move and are a nuisance to erase.
- Turn HDR on on a phone, or bracket exposures on a camera, so the window view and the room are both captured. A single exposure with a blown-out white window cannot be fully rescued afterwards.
- Exteriors in sun from behind you, on a clear day if you can wait for one. A real blue sky never needs a label.
The editing workflow, step by step
The order matters: geometry first, then light, then colour, then anything you add or remove, then size. Each step below links to a free ImgVX AI tool that runs in your browser, on your own computer or phone, so listing photos of someone’s home are never uploaded to a server. Or open the ImgVX AI Studio to do every step on one canvas with undo.
1. Keep the originals
Copy the untouched files into a folder named “originals” before you edit anything. California requires access to the unaltered image for every altered one, Rightmove complaints are settled by comparing the two, and the original is your record if a buyer ever disputes a photo.
2. Straighten the walls
Leaning walls are the clearest sign of an amateur listing. For converging verticals (walls that lean in towards the top), open the Perspective Corrector and drag the four corners onto lines that should be straight: a door frame, the edges of a window, a wall corner. For a photo that is simply tilted, use Straighten and line the grid up with the horizon or a worktop. Either way, crop off the empty edges afterwards.
3. Fix the light
- Dark room, fine window: raise the midtones in Levels & Curves. Moving the middle point lifts the room without washing out the whites.
- Room fine, window blown out: pull the highlights down and the shadows up with Highlights & Shadows.
- Everything too dark or hazy: Low Light & Dehaze lifts an underexposed photo and clears haze from a distant view, without the flat grey look of a brightness slider.
Stop when the room looks the way it did to your eye. Overbrightened interiors, with grey blacks and glowing walls, look fake and invite the question of what else was changed.
4. Correct the colour
Indoor bulbs turn photos yellow; a north-facing room on a cloudy day turns blue; a room with both does both. Use white balance until white walls and ceilings look white, then stop. Do it after the light, because brightening makes a colour cast stronger. Use the same setting for every photo from the same room so the listing looks consistent.
5. Remove temporary clutter (and label it)
The AI Object Eraser paints out a car on the drive, the bins, a hose, a sign, a stray cable or a personal photo on the wall: brush over it and the model fills the area from what is around it. It runs on your device, so the photo is not uploaded. Keep to small, temporary things on plain surroundings, and check the fill at full size; a patterned rug or a brick wall is where fills give themselves away. Never use it on anything permanent or anything that is a defect (see the third column of the table above). In California, a photo with something removed needs the altered-image label.
6. Replace a grey sky (and label it)
An overcast sky makes a house look gloomy. The AI Sky Replacer finds the sky, swaps in a blue or sunset sky, and adjusts the light on the rest of the photo to match. Use it only for weather: never to hide a pylon, a phone mast or a tower block on the skyline, and never on a photo where the view is a selling point. Label it “Sky digitally enhanced”. If you can wait for a clear day, a reshoot is better still.
7. Crop, resize and compress
Crop to the portal’s shape with the Image Cropper, resize to 2048 px wide with the Image Resizer, and compress with the Image Compressor if the portal has a file limit. For a sharper look on photos taken in low light, a light pass of the Image Sharpener after resizing (not before) brings back edges. The guide to resizing without losing quality explains why that order matters.
What ImgVX AI does not do
It does not merge bracketed HDR exposures, and it does not do virtual staging: there is no AI image generation here, so it cannot add furniture to an empty room. For bracketed HDR, use your camera’s built-in HDR or a desktop editor; for staging, use a dedicated staging service and label the result. Everything in the workflow above, from straightening to export, it does in the browser.
How to label an edited photo
A label should be short, visible and next to the photo, not buried in the description. Some wording that works:
- “Virtually staged. Furniture is digital and is not included.”
- “Sky digitally enhanced.”
- “Digitally altered: vehicle and bins removed.”
- For California: “This image has been digitally altered. See the unaltered image at [link or QR code].”
Many MLSs and portals have a caption field per photo; use it, and where the photo may be shared without its caption (social media, flyers, a property website), put the label on the image itself. The Add Text to Image tool writes it in a corner in a few seconds. Do not use the Watermark Tool on photos for Zillow or an MLS that bans branding; a plain disclosure line is not branding, a logo is. For virtual staging, upload the empty-room original alongside the staged one, so the buyer can see both.
Privacy: tenants, sellers and location data
Listing photos are public for months and are copied by aggregator sites, so treat them as permanent.
- Strip GPS data. Phone photos usually carry the exact location where they were taken, plus the phone model and time. Check with the EXIF Viewer, and remove it with the Metadata Remover, especially for photos taken in your own home or for a rental with tenants still living there. The guide what your photos reveal covers what else is in there.
- Blur what identifies people. Family photos on a shelf, children’s names on a bedroom door, mail on the table, a calendar, an alarm keypad, keys, a car number plate. The Blur Tool covers them; for anything sensitive, a solid block is safer than blur, as the guide to hiding information in images explains.
- Tenants have rights. Tenancy laws in many places require notice, and sometimes the tenant’s consent, before an occupied home is photographed for marketing, and identifying belongings should be kept out of shot. Check your local tenancy rules, ask first, and photograph between tenancies where you can.
Editing a whole listing at once
A typical listing has twenty to forty photos, and doing each by hand is where the evening goes. Do the per-photo work (straightening, light, removal) one photo at a time in the Studio, then do the repetitive part in one batch: the Bulk Image Resizer resizes and converts a folder of photos to the same size and format at once, and downloads them as a ZIP. Name the files in viewing order (01-front.jpg, 02-hall.jpg) before you upload so the portal’s order matches the walk-through.
A note on cost, so there are no surprises: every tool needs a free account, and free accounts get a set number of tool runs each day. The AI tools (Object Eraser, Sky Replacer) download free at a reduced size, which is too small for a listing; full-resolution downloads and unlimited daily use come with Pro. Bulk batches of more than five photos need Pro or a credit. Everything else in the workflow, from perspective to compression, downloads at full size.
Eight mistakes that get photos pulled
- Editing out something permanent. Power lines, a substation, the neighbour’s extension. It is the one edit every regulator names.
- No label on an altered photo, or a label only in the description where nobody reads it.
- Losing the originals. Without them you cannot meet California’s rule or answer a complaint.
- Over-processing. Neon-blue skies, glowing walls and halos around windows make every photo look fake, including the honest ones.
- Stretching a photo to fit a shape. Crop to 4:3 or 3:2; never resize a square photo into a wide one, which widens the room.
- Logos and watermarks on MLS or Zillow photos, which most of them reject.
- Old photos. A summer garden in a winter listing, or a kitchen before it was changed, misleads as much as an edit.
- Portrait photos for rooms, which portals show with black bars or crop badly.
Frequently asked questions
Is it illegal to edit real estate photos?
No. Correcting exposure, white balance, straightening verticals, cropping and sharpening are normal and allowed everywhere. What is not allowed is an edit that misleads a buyer or renter about the property: hiding damage, removing power lines or a neighbouring building, changing the view, or making a room look bigger than it is. Some places now require altered photos to be labelled, most notably California since January 1, 2026.
Do I have to disclose a sky replacement in a listing photo?
In California, almost certainly yes: AB 723 covers images changed to add, remove or change elements, and a new sky is a changed element. Elsewhere, many MLSs and portals expect it to be labelled, and labelling costs nothing. Write "Sky digitally enhanced" on or beside the photo and keep the original. Never use a sky replacement to hide something, such as a pylon on the skyline. More help: ImgVX AI help docs.
What is California AB 723?
A California law, in effect since January 1, 2026 (Business and Professions Code section 10140.8), that requires a real estate broker or salesperson who advertises with a digitally altered image to say so, with a reasonably conspicuous statement on or next to the image, and to give access to the unaltered original through a link, URL or QR code. Routine edits such as lighting, white balance, cropping and sharpening are generally treated as outside it; adding, removing or changing elements is inside it.
What size should real estate photos be for Zillow?
Zillow's own feed specification sets a minimum of 330 x 220 pixels and a maximum of 5 MB per photo, and does not allow watermarks or branding on listing photos. That minimum only gets a photo displayed. For sharp results, export landscape photos at about 2048 pixels on the long side as JPEG, under 5 MB. Your MLS may set its own limits, which the photos must meet first.
What size should photos be for Rightmove?
Rightmove has advised uploading photos at 1024 x 683 pixels, a 3:2 landscape shape, for the best look on desktop and phones. Larger 3:2 photos, such as 2048 x 1365, are also fine. Rightmove does not publish one current public specification, so check its agent help pages or your CRM provider for the latest limits.
What size should photos be for realestate.com.au?
Photos should be 4:3 landscape, in RGB colour (not CMYK), as JPEG or PNG, under 5 MB each. Guidance for private sellers recommends 2000 x 1500 pixels and treats 800 x 600 as the minimum; smaller images are shown with a border or rejected.
Can I remove power lines from real estate photos?
No. Power lines, pylons, phone masts, a busy road and a neighbouring building are permanent features a buyer would want to know about. Removing them is the clearest example of a misleading listing photo, and it is the exact case New South Wales officials gave when announcing their disclosure rules. Remove only temporary things such as a parked car, bins or a garden hose, and in California label even those.
How do I fix dark interior photos for a listing?
Turn every light on and shoot in daylight first. Then lift the midtones with Levels and Curves, recover a bright window with Highlights and Shadows, and use Low Light and Dehaze on a photo that is still too dark. Correct the yellow cast from indoor bulbs with white balance last, because brightening exaggerates a colour cast. Browse: all free image tools.
How do I straighten vertical lines in real estate photos?
Tilting the camera up or down makes walls lean in or out. Open the photo in the Perspective Corrector, drag the four corners onto a door frame, window or wall corner that should be vertical, and apply. Then crop off the empty edges. Shooting from about chest height with the camera level avoids most of the problem in the first place.
Is virtual staging allowed on Zillow, Rightmove or realestate.com.au?
Virtual staging is widely used, but it must be labelled as virtually staged, and it must only add furniture and decor, never change walls, floors, fixtures or the view. In 2025 Rightmove had an agent remove AI-staged photos after complaints, even though the listing said some images were virtually staged, so keep staged photos realistic and show the empty room too. More help: ImgVX AI help docs.
Can I edit listing photos on my phone?
Yes. The ImgVX AI tools open in Safari or Chrome on an iPhone or Android phone, with nothing to install, and the photos are processed on the phone itself rather than uploaded. Perspective, levels, white balance, crop and resize all work with a finger; for twenty or more photos a computer is quicker.
Should I remove location data from listing photos?
Photos taken on a phone usually carry the GPS position where they were taken. For a public listing of the property itself that matters little, but for a rental while tenants still live there, or photos taken at your own home, strip it with the Metadata Remover before posting. Also blur family photos, mail, keys and alarm panels visible in the shot.
Edit your listing photos
Straighten, brighten, correct and resize in your browser. Photos of the home stay on your device.