
How to Uncrop a Photo Online Free (AI, No Sign-Up)
To uncrop a photo, drop it into the Uncrop / Expand tool, choose the shape you need and press Expand image. The photo is placed in the centre of a bigger canvas and an AI model paints the missing strips so they continue the scene. It is 100% free, there is no sign-up, no limit and no watermark, and the model runs in your browser, so the photo stays on your device. This article gives the exact sizes the tool produces, the photos it works on, the ones it does not, and what to do instead.
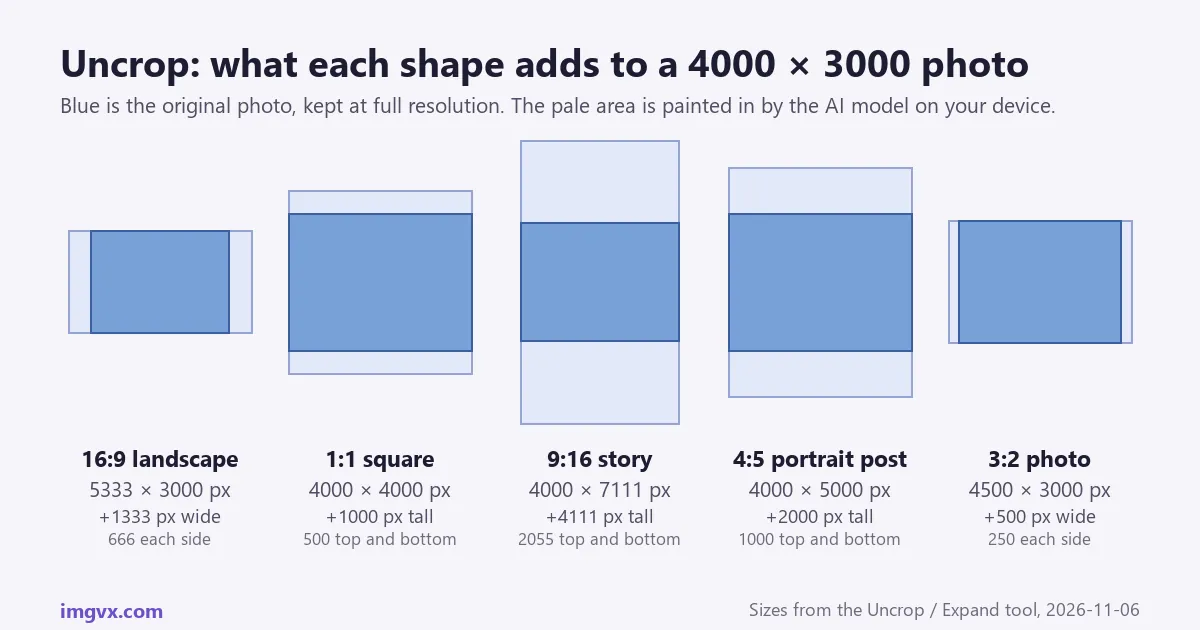
The short answer
- Pixels that were cut off are gone. Unless the crop is still undoable in your phone’s Photos app, uncropping means an AI model invents a continuation of the edges.
- Five shapes: 16:9, 1:1, 9:16, 4:5 and 3:2. The tool keeps the shorter side and grows the other, split between two opposite sides.
- Simple edges work: sky, water, sand, grass, walls, blurred backgrounds. Faces, text, cars and buildings cut by the edge do not.
- Your photo stays at full resolution. Only the new strips are generated, on your own device, and the output is a JPEG at quality 94.
First, check whether the crop can be undone
“Uncrop” means two different things, and the first one is better. If you cropped the photo in the Photos app on an iPhone or an Android phone and have not exported or shared the cropped copy, the original pixels are still in the file. Open the photo, tap Edit, then Revert (iPhone) or the reset or revert option in your gallery app, and the full frame comes back exactly as it was shot. Google Photos keeps the original the same way until you save a copy.
If the photo came from someone else, was downloaded from a website or messaging app, or was cropped in a tool that saved a new file, the cropped pixels no longer exist anywhere. Nothing can recover them. What an AI uncrop tool does instead is paint a plausible continuation of the edges, which is the second meaning of the word and the subject of the rest of this article.
Uncrop a photo in three steps
- Open Uncrop / Expand and drop in the photo. JPG, PNG, WebP and HEIC all open. The first time, the AI model (about 27 MB) downloads to your browser; after that it is cached and the tool works without the download.
- Choose the Target shape. 16:9 for a YouTube thumbnail, slideshow or TV; 1:1 for a square profile picture or product tile; 9:16 for a story or Reel; 4:5 for an Instagram portrait post; 3:2 for a classic photo print. If the photo is already that shape, it grows by 30% in every direction instead.
- Press Expand image, check the edges, download. Look at the new strips at full size, not as a thumbnail. If a strip looks smeared, try a different shape, or crop the photo so that the edge sits on something plain and run it again. The download is a JPEG at the full output size.
There is nothing to sign up for and no counter: the model runs on your device, so there is no cost per image and no daily cap.
How big the photo gets, shape by shape
The tool never shrinks or crops your photo. It keeps the shorter side as it is and grows the other side until the canvas has the shape you chose, with the photo centred, so the new area is split evenly between two opposite sides. The sizes below come from that rule for three common photos; the figure above shows the first row to scale.
| Your photo | 16:9 | 1:1 | 9:16 | 4:5 | 3:2 |
|---|---|---|---|---|---|
| 4000 × 3000 (4:3, most phone photos) | 5333 × 3000 667 px each side | 4000 × 4000 500 px top and bottom | 4000 × 7111 2056 px top and bottom | 4000 × 5000 1000 px top and bottom | 4500 × 3000 250 px each side |
| 3000 × 4000 (portrait phone photo) | 7111 × 4000 2056 px each side | 4000 × 4000 500 px each side | 3000 × 5333 667 px top and bottom | 3200 × 4000 100 px each side | 6000 × 4000 1500 px each side |
| 1920 × 1080 (16:9 screenshot or frame) | 2496 × 1404 30% larger all round | 1920 × 1920 420 px top and bottom | 1920 × 3413 1167 px top and bottom | 1920 × 2400 660 px top and bottom | 1920 × 1280 100 px top and bottom |
Two things follow from the table. The further the target shape is from the photo’s own shape, the more the model has to invent: turning a portrait phone photo into 16:9 adds more than two thousand pixels on each side, which is a lot of guessed picture. And a small change, such as 4:3 to 3:2, adds only a thin strip that almost any edge can carry convincingly. When you have a choice, pick the nearest shape.
If you need an exact pixel size rather than a shape, such as a 1500 × 500 X header or a 2560 × 1440 YouTube banner, use the Banner Extender, which does the same fill to a fixed width and height.
What the AI actually does
Uncropping is inpainting with the hole on the outside. The tool makes a working copy of the enlarged canvas no wider than 1024 px, marks everything outside the photo as the area to fill, and hands it to MI-GAN, an open-source inpainting model released under the MIT licence. The model looks at the pixels along the edges and continues their colour, texture and gradient outward. The filled copy is then scaled up to the final size, and your original photo is drawn back on top at full resolution. A few pixels at the very edge of the photo are feathered into the fill so there is no visible line.
That explains the two things people notice. The photo itself is untouched, pixel for pixel, apart from that thin blended edge. The new strips, on the other hand, were painted at about 1024 px and enlarged, so on a 4000-pixel photo they are smoother than the real picture. On sky, sea or a wall that is invisible; on a textured surface such as gravel or foliage you can see it at 100% zoom.
Everything happens in your browser. The model downloads once (about 27 MB) and runs on your graphics chip when the browser supports WebGPU, or on the processor when it does not. The photo is never sent to a server, which is the main difference from the online uncrop tools that upload it, and the reason there is no per-image price or daily cap.
Photos it works on, and photos it does not
The model continues what touches the edge. So the question is always: what is at the edge of the photo?
| At the edge | Result | Why |
|---|---|---|
| Sky, clouds, sea, lake, snow | Good | Smooth gradients continue naturally. |
| Sand, grass, a field, a road | Good | Fine, repeating texture with no structure to break. |
| A plain or softly lit wall, a studio backdrop, a blurred background | Good | The commonest case for portraits and product photos. |
| Floor or tabletop under a product | Usually good | Watch for a shadow that stops abruptly at the old edge. |
| Leaves, gravel, brickwork, fabric with a pattern | Fair | Texture continues but the pattern can repeat or soften. |
| A person, face or hand cut by the edge | Poor | The model does not know anatomy; it smears or repeats skin. |
| Text, logos, signs | Poor | Letters are not a texture; the fill is unreadable. |
| Cars, buildings, furniture, strong straight lines | Poor | Lines bend or stop; windows and wheels are not continued. |
A tightly framed portrait against a wall is the best case: more wall appears on both sides and nobody can tell. A group photo where someone is half out of the frame is the worst case: the tool will not give them their other half, and the result draws attention to the edge instead of hiding it.
When to use something else
- You need the whole photo in a new shape and the edges are busy. No Crop places the full photo on a blurred, enlarged copy of itself in 1:1, 4:5 or 9:16. Nothing is invented, and it is the standard look for posting a landscape photo as a portrait story.
- You want a plain colour or transparent border, not a continuation. The Canvas Resizer adds a border of any size and colour around the photo without AI.
- You need an exact banner or cover size. The Banner Extender fills to fixed dimensions such as 1500 × 500 or 2560 × 1440.
- The photo is also small or soft. Run the Image Upscaler first, then uncrop; enlarging after uncropping also enlarges the painted strips.
- The crop was made in your phone’s Photos app. Use Revert, as described at the top. Real pixels beat generated ones every time.
For the sizes each platform wants before you choose a shape, the social media image sizes guide lists them, and the aspect ratios guide explains what 16:9, 4:5 and the rest mean.