
How to Brighten a Dark Photo Without Washing It Out
To brighten a dark photo without washing it out, open the free Low Light & Dehaze tool, drop in the photo, keep Fix on “A dark, low-light photo” and start at Strength 75. It lifts the shadows far more than the bright parts, so blacks stay black and lamps do not blow out. Raise noise smoothing if grain appears. No sign-up, nothing uploaded. Below are measured results on a test photo, why a plain brightness slider makes things worse, and when manual controls are the better choice.
The short answer
- Tool: Low Light & Dehaze. Free, full resolution, runs in your browser.
- Defaults: Fix “A dark, low-light photo”, Strength 75, noise smoothing 30, Keep colours natural ticked, saved as JPG.
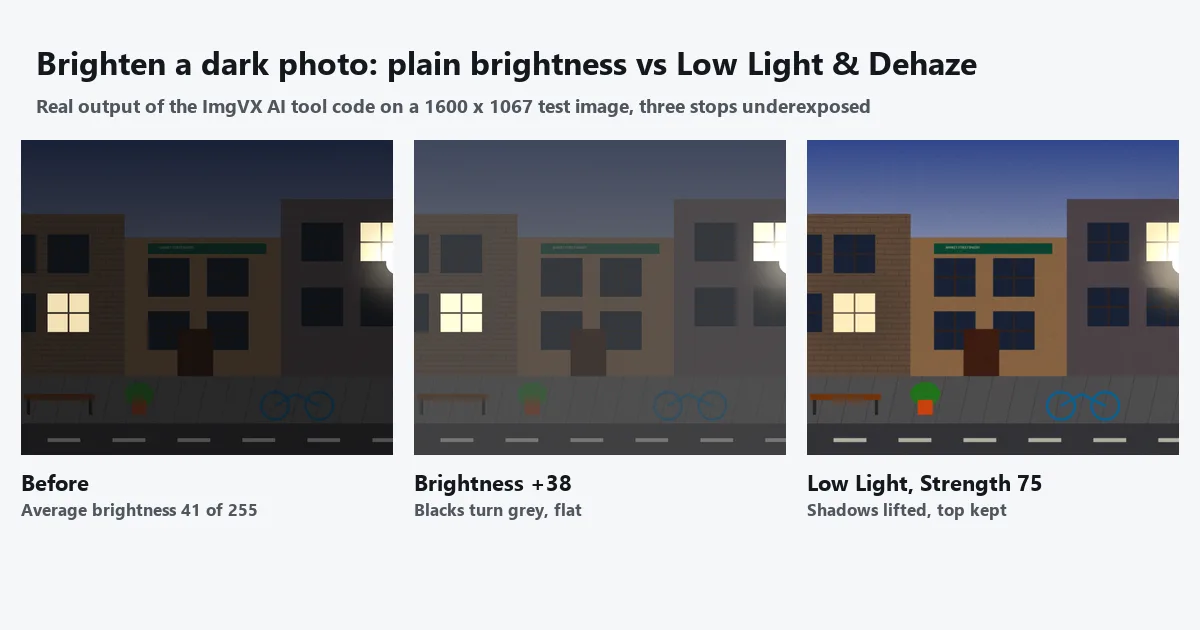
- Measured: on a photo about three stops too dark, Strength 75 took the average brightness from 41 to 80 (of 255) while the brightest 1 % stayed below white.
- Avoid: the plain Brightness slider on a very dark photo. It turns black into grey.
How to brighten a dark photo in four steps
- Open Low Light & Dehaze and drop in the photo. It is processed by your browser, so a photo from a party, a concert or your home stays on your device.
- Choose what to fix. “A dark, low-light photo” for underexposed pictures, “Haze, fog or smog” for washed-out ones, or “Both” for a dark, misty evening.
- Set Strength and noise smoothing. Start at the default 75. If grain shows in the shadows, raise “Smooth the noise it reveals” from 30 towards 60. Leave Keep colours natural ticked for people and indoor scenes.
- Choose the format and download. JPG suits photos; our 1600 × 1067 result was 429 KB. PNG keeps every pixel exact but is several times larger. The download is full size with no watermark.
Why the brightness slider makes a dark photo grey
Most free brighteners give you a Brightness or Exposure slider. Both treat every pixel the same way, and that is the problem with a dark photo: the parts you want to lift are the shadows, and the parts you must not touch are the lamps, windows and sky that are already bright.
To see the difference, we made a test photo of an evening street, about three stops too dark, with two lit windows and a street lamp, and brightened it three ways to roughly the same average brightness. The numbers are brightness on the usual 0–255 scale.
| Method | Average | Darkest 1 % | Brightest 1 % | Contrast in the shadowed wall |
|---|---|---|---|---|
| Original | 41 | 14 | 239 | 8 |
| Brightness +38 (added to every pixel) | 79 | 53 | 253 | 8 |
| Every pixel × 1.92 (like an exposure slider) | 75 | 28 | 255 (clipped) | 16 |
| Low Light & Dehaze, Strength 75 | 80 | 27 | 246 | 17 |
Adding brightness lifted the darkest pixels from 14 to 53, so nothing in the photo is black any more, and the bricks in the shadowed wall kept exactly the contrast they had in the dark original. That is the grey, foggy look. Multiplying every pixel, which is roughly what an exposure slider does, keeps the blacks but pushes the bright end into pure white: every pixel of the lit window hit the top of the scale and lost its colour.
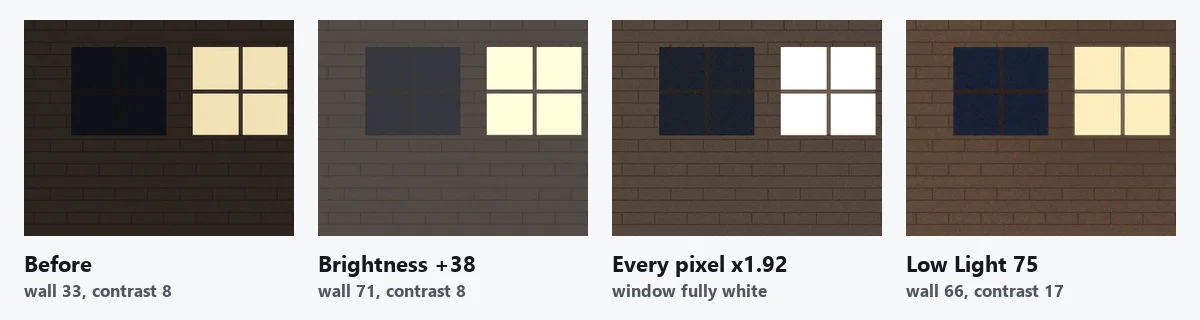
Low Light & Dehaze gets a similar overall brightness a different way. It inverts the photo, which makes a dark scene look like a hazy one, removes the “haze” with the dark channel prior, a published method by He, Sun and Tang, and turns the photo back. The effect is a large lift in the shadows and almost none in the highlights, followed by a stretch to the full range. The lit window kept its cream colour and the brightest 1 % stayed at 246, below white.
How much strength to use
Strength sets how far the shadows are lifted. On the test photo:
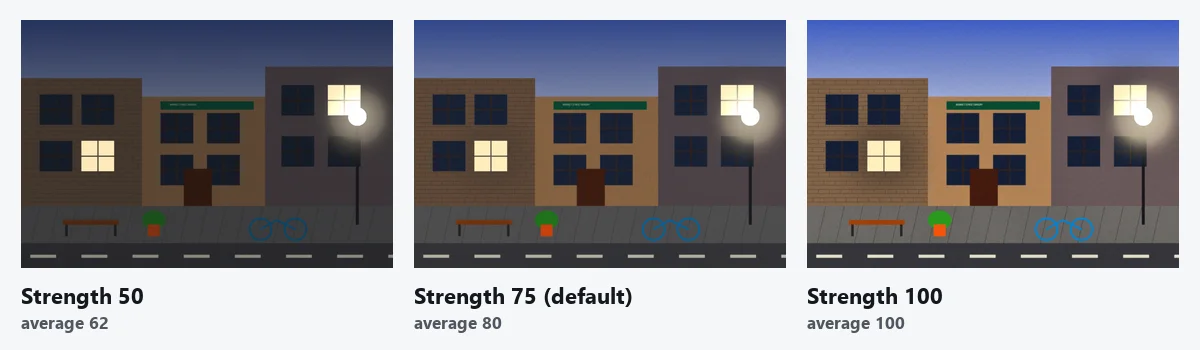
- Strength 50: average 62. A gentle fix that keeps an evening looking like an evening.
- Strength 75 (default): average 80. Faces and details are clear; good for most indoor and party photos.
- Strength 100: average 100. Close to daylight. Useful for reading a dark document or seeing what is in a photo, less so for a natural look.
For night shots where the darkness is part of the picture, such as city lights or a campfire, stay around 50 to 60. For photos where you just need to see what is there, go higher.
Dealing with the grain
A phone in low light records a weak signal and lots of random speckle. In a dark photo you cannot see the speckle; brightening makes it visible. On the test photo, the noise in a flat dark window pane rose from 2.3 to 5.1 brightness levels with smoothing turned off. With the default smoothing of 30 it was 4.2, and because the smoothing is weighted towards the parts that were darkest, the bright, sharp parts of the photo are barely touched.
- Visible grain on a wall or sky: raise “Smooth the noise it reveals” to 50–70.
- Coloured speckles that remain: run the result through the Noise Reducer, which clears specks without smearing edges.
- Soft as well as grainy: try the AI Photo Enhancer afterwards, or read how to unblur a photo for what can and cannot be sharpened.
Save as JPG last, after the noise work: JPEG compression treats grain as detail and spends file size on it.
When to use manual controls instead
Low Light & Dehaze is the quick fix for a photo that is clearly too dark. For a photo that is only a little dull, or where you want exact control, use the manual tools:
| Your photo | Tool | What to do |
|---|---|---|
| Very dark, from a party, a gig or a dim room | Low Light & Dehaze | Strength 60–80, smoothing 30–60 |
| A little dark, with a bright sky or window | Image Adjustments | Exposure first, then lower Highlights and raise Shadows |
| Flat and dull rather than dark | Levels & Curves | Move the black and white points in to the ends of the histogram, then lift the midtones |
| Dark and yellow from indoor bulbs | Image Adjustments | Brighten first, then lower Temperature until white walls look white |
| Misty or hazy landscape | Low Light & Dehaze | Fix “Haze, fog or smog” |
Brighten before you fix colour: brightening makes a colour cast stronger, so a correction done first has to be done again. The real estate photo editing guide shows the same order for dark interiors.
On an iPhone, the Photos app’s Edit, Adjust panel has Exposure, Brilliance, Shadows and Black Point, which can do a gentle version of the same thing; the tool above goes further on a very dark photo and works the same on any phone or computer.
What brightening cannot fix
- A nearly black photo. Detail that was never recorded cannot be brought back; a photo with almost no light becomes a grainy, soft one.
- Blown highlights. A lamp or a window that is pure white in the original stays white. Brightening cannot recover it, and darkening it only makes it grey.
- Motion blur. Dark photos are often blurred too, because the phone used a slow shutter. Brightening shows the blur more clearly.
- Heavy compression. A dark photo sent through a chat app has lost shadow detail to compression; brightening reveals blocky patches. Use the original from the phone that took it when you can.
Once it looks right, crop and resize with the Image Cropper and Image Resizer, or compress it for sharing with the Image Compressor. The free AI image editing guide lists every other free tool on the site.
Questions
How do I brighten a dark photo for free?
Open the free Low Light & Dehaze tool, drop in the photo, leave Fix on "A dark, low-light photo" and download. The default Strength of 75 doubled the average brightness of our test photo, from 41 to 80 out of 255. There is no sign-up and no watermark, and the photo is processed in your browser, never uploaded.
Why does my photo look grey and flat when I raise the brightness?
A brightness slider adds the same amount to every pixel, so black turns grey and the difference between light and dark parts stays the same. On our test photo, +38 brightness lifted the darkest 1 % of pixels from 14 to 53 and left the contrast in a shadowed brick wall unchanged at 8. Low Light & Dehaze lifted the same wall to a similar level and doubled its contrast to 17.
Why is my brightened photo grainy?
The grain was in the dark photo already; brightening makes it visible. On our test photo the noise in a flat dark area went from 2.3 to 5.1 brightness levels with no smoothing, and to 4.2 with the tool's default smoothing of 30. Raise "Smooth the noise it reveals" for more, or run the Noise Reducer afterwards.
Can a photo that is almost black be saved?
Only partly. Brightening can only show detail the camera recorded, and in a nearly black photo most of it is lost in noise and in the file's compression. Expect a grainy, soft result, and use it as a record rather than a print. Next time, add light or hold the phone steady for a longer exposure.
Is Low Light & Dehaze an AI tool?
No. It uses the dark channel prior, a published image processing method (He, Sun and Tang, 2009), applied to the inverted photo, so it needs no model download and gives the same result every time. For a photo that is also blurry, the AI Photo Enhancer runs an AI model in your browser.