
How to Straighten a Photo Online (Free, No Sign-Up)
To straighten a photo, open the free Rotate & Flip tool, drop in the photo and move Fine angle until the horizon is level: a positive angle turns it clockwise, in steps of 0.1°. Then trim the empty corners in the Image Cropper. If walls lean or a page was shot at an angle, use the Perspective Corrector instead. No sign-up, nothing uploaded. Below: how much the crop costs per degree, measured, and how to tell a tilt from a perspective problem.
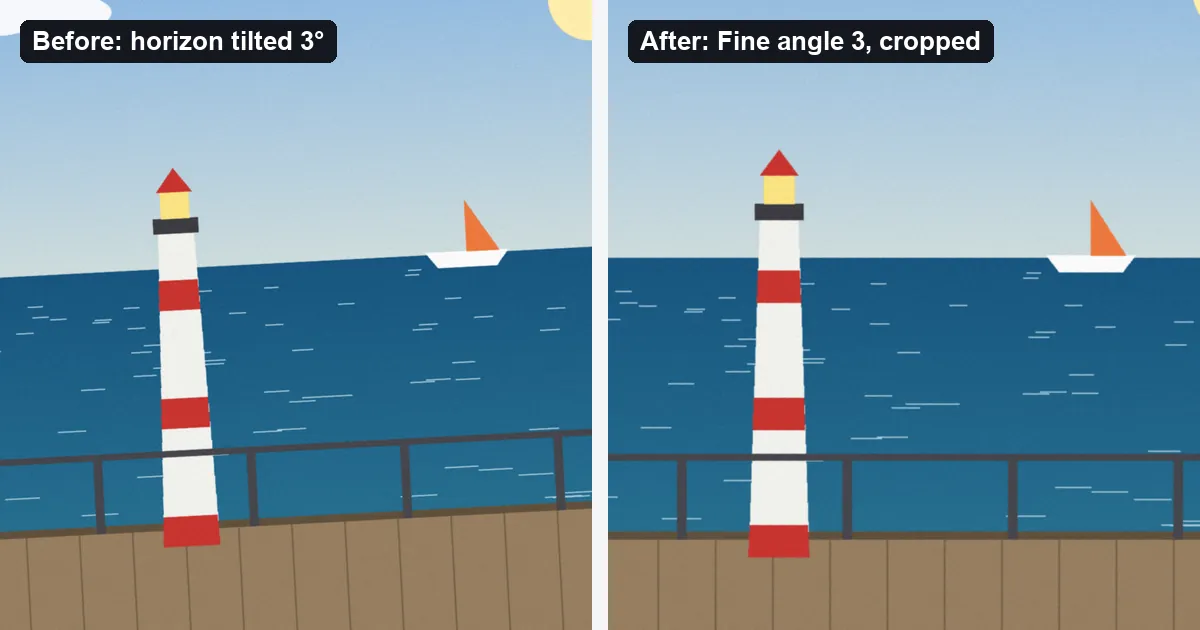
The short answer
- Tilted horizon: Rotate & Flip, Fine angle (−45 to 45, steps of 0.1), then crop.
- Leaning walls, or a page shot at an angle: Perspective Corrector, four handles, Straighten.
- Measured: a 3° turn on a 1600 × 1067 photo left a 1485 × 990 crop, 86 % of the pixels.
- Cost: free, full resolution, no watermark. The photo stays in your browser.
Tilt or perspective: which problem do you have?
“Crooked” covers two different faults, and each needs its own tool.
| What you see | Cause | Tool |
|---|---|---|
| The sea, a table or a floor line slopes; everything leans the same way | The camera was rolled to one side | Rotate & Flip, Fine angle |
| The two sides of a building lean towards each other | The camera was pointed up | Perspective Corrector |
| A page, whiteboard or painting is wider at one end | It was photographed at an angle | Perspective Corrector |
| The photo is on its side or upside down | Wrong orientation | Rotate & Flip, Turn 90 or 180 |
A quick test: look at two lines that should both be vertical, such as the left and right edge of a door. If they lean the same way by the same amount, it is a tilt. If they lean in different directions, it is perspective, and turning the photo can only fix one of them.
How to straighten a tilted photo in four steps
- Open Rotate & Flip and drop in the photo. It is processed by your browser, so the photo stays on your device.
- Move Fine angle. Find a long line that should be level, such as the horizon, a shelf or a kerb. If it is higher on the right, use a positive angle, which turns the photo clockwise; if it is higher on the left, use a negative one. Most hand-held photos need between 1 and 5 degrees.
- Choose the corners and download. Turning a photo leaves four empty corners. Transparent corners is ticked by default and the tool saves a PNG; untick it to fill the corners with white or another colour.
- Trim the corners. Open the result in the Image Cropper, set Aspect ratio to the shape you want (3:2, 4:3, 16:9, 1:1 and others) and drag the frame inside the empty corners. Save as JPG for a photo.
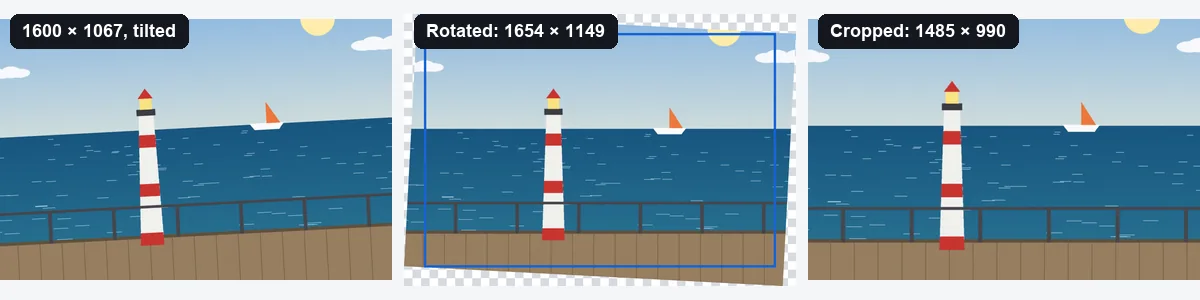
On the test photo, a seaside scene with the horizon 3° off, a Fine angle of 3 levelled the sea and stood the lighthouse upright. The canvas grew from 1600 × 1067 to 1654 × 1149 to hold the turned photo, and the largest crop of the same shape inside it was 1485 × 990. Saved as a JPG, that was 241 KB.
How much the crop costs
Most straighteners crop for you and do not say how much went. The loss is plain geometry: the more you turn, the smaller the upright rectangle that fits inside the turned photo. For a 3:2 photo, keeping the 3:2 shape:
| Angle | Width and height kept | Pixels kept | A 1600 × 1067 photo becomes about |
|---|---|---|---|
| 1° | 97.5 % | 95 % | 1559 × 1040 |
| 2° | 95.1 % | 90 % | 1521 × 1014 |
| 3° | 92.8 % | 86 % | 1485 × 990 (measured) |
| 5° | 88.7 % | 79 % | 1420 × 947 |
| 10° | 80.3 % | 64 % | 1285 × 857 |
Two things follow. First, the crop comes off all four edges, so a head or a boat near the border of a tilted photo may not survive a 5° correction; check the edges before you commit. Second, if you can still retake the photo, leave some room around the subject, or switch on the camera’s grid and level the horizon while you shoot.
When losing the edges is not acceptable, keep the full turned photo instead: leave Transparent corners ticked for a design with a transparent background, or fill the corners with the page colour. On an ordinary photo the empty corners show, so the crop is usually the better choice. The aspect ratio guide explains which shape to crop to for prints and social posts.
How to fix leaning walls and angled pages
Point a camera up at a building and its walls lean in towards the top. Photograph a page from one side and it comes out wider at the near end. Rotation cannot fix either, because the two sides lean in different directions. The Perspective Corrector can.
- Open the Perspective Corrector and drop in the photo. Four handles appear, a little way in from the corners.
- Drag the handles onto a shape that should be a rectangle. For a page, a whiteboard or a painting, use its four corners. For a building, put the two left handles on one line that should be vertical and the two right handles on another. Snap to edges gives a starting guess; Reset handles starts again.
- Press Straighten and download the PNG. The area inside the handles is stretched into a true rectangle. Everything outside the handles is cut off, so place them wide if you want to keep the surroundings.
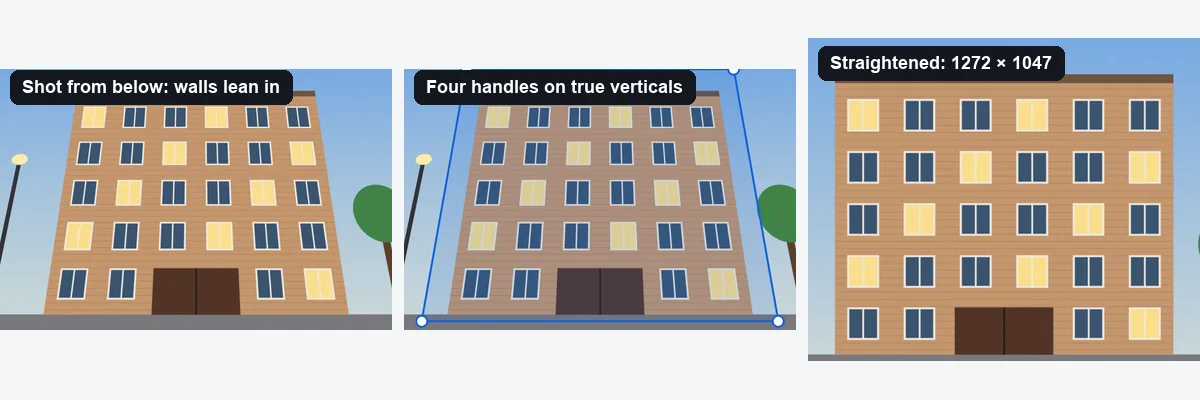
On a test photo of a building shot from below, handles on two true verticals near the frame edges gave a 1272 × 1047 result with upright walls and square windows.
Check the proportions afterwards. The tool sets the output size from the average of the opposite sides you marked, which cannot know how tall the subject really is. In our test, a facade that is really 1.11 times as wide as it is tall came out 1.20 times as wide, about 8 % too wide. For a building that rarely matters. For a painting, a document or a product box of known size, open the result in the Image Resizer, untick Keep aspect ratio and type the right proportions, for example 2480 × 3508 for an A4 page at 300 DPI.
For documents, straightening is the first step of three: square the page, whiten the paper with the Document Scanner, then combine pages with Image to PDF. The phone scanning guide has the details. For property listings, the real estate photo editing guide covers how much correction looks natural.
On an iPhone or Android phone
The built-in editors can level a photo too. In the iPhone Photos app, Edit and then the crop tool has Straighten, Vertical and Horizontal dials; Google Photos has a straighten dial under Edit, Crop. Both crop automatically as you turn. The tools above do the same job in any phone or desktop browser, show the size you end up with, and let you keep the full frame with empty corners when you need it.
What straightening cannot fix
- Curved lines. A wide-angle lens bends straight lines near the edges into curves. Rotation and perspective correction both keep straight lines straight and curved lines curved; a bent horizon stays bent.
- A subject too close to the edge. The crop takes a strip from every side. If the subject touches the border, use a smaller angle, or keep the corners and fill them.
- A very steep angle. Squaring up a page photographed from far to one side stretches the far end, which comes out soft. Retake it from above if you can.
- Repeated corrections. Each fine turn redraws every pixel. Go back to the original and turn once, by the final angle.
Once the photo is level, resize it with the Image Resizer or shrink the file with the Image Compressor. The free AI image editing guide lists every other free tool on the site.
Questions
How do I straighten a crooked photo for free?
Open the free Rotate & Flip tool, drop in the photo and move Fine angle until the horizon is level; it goes from -45 to 45 degrees in steps of 0.1. Then trim the empty corners in the Image Cropper. There is no sign-up and no watermark, and the photo is processed in your browser, never uploaded.
How much of the photo do I lose when I straighten it?
It depends on the angle. For a 3:2 photo, a 1 degree turn keeps 95 % of the pixels after cropping, 3 degrees keeps 86 % and 5 degrees keeps 79 %. On our 1600 × 1067 test photo, a 3 degree turn left a 1485 × 990 crop.
Can I straighten a photo without cropping it?
Yes, if empty corners are acceptable. Rotate & Flip keeps the whole photo on a slightly larger canvas and leaves the four corners transparent, or fills them with a colour you choose. That works on a white page or a plain background; for a normal photo, cropping the corners looks better.
Why do the walls still lean after I levelled the photo?
Because leaning walls are a perspective problem, not a tilt. When the camera points up, vertical lines lean towards each other, and no rotation makes both sides upright. Use the Perspective Corrector: put its four handles on lines that should be vertical and press Straighten.
Does straightening reduce the quality of a photo?
Slightly. A quarter turn or a flip moves pixels without changing them, but a fine angle has to redraw every pixel, which softens fine detail a little, and the crop removes pixels. Turn the photo once, to the final angle, and start from the original file, not a copy that was already straightened.
How do I straighten a photo of a document?
Open the photo in the Perspective Corrector, drag the four handles onto the corners of the page and press Straighten. The page becomes a flat rectangle. Our guide to scanning with your phone covers lighting and whitening the paper.