
Free Form Selection Tool Online: Cut Out Any Shape
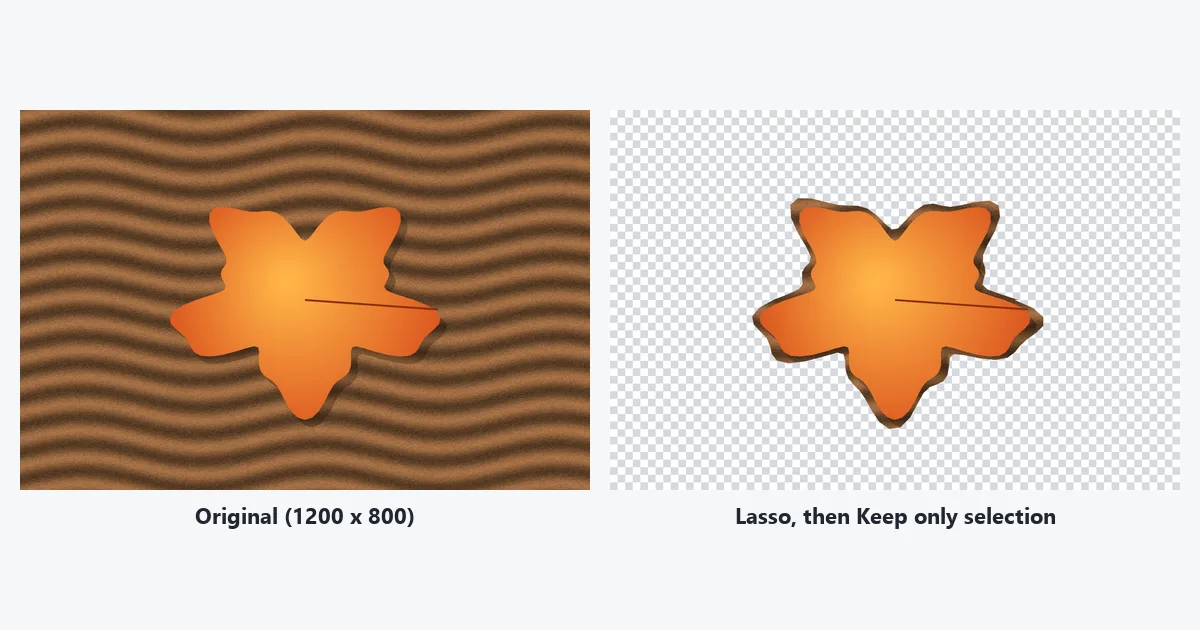
A free form selection tool, also called a lasso, lets you draw round any shape in a picture instead of a box. Open the free Selection Tools, choose Lasso, draw round the part you want, then press Keep only selection to download it as a transparent PNG, or Delete selection to cut it out of the picture. No sign-up, and nothing is uploaded. Below: what each button gives you, how Feather changes the edge, and when the magic wand is quicker.
The short answer
- Tool: Selection Tools, Lasso. Draw with a mouse, finger or pen; the ends join when you let go.
- For the shape alone: Keep only selection. It saves a PNG at full size with everything outside your line transparent.
- Measured: a lasso round a leaf took 17.5 % of a 1200 × 800 picture. Feather 10 made the edge fade over the outline instead of ending sharp.
- Cost: free, full resolution, no watermark. The picture stays in your browser.
How to make a free-form selection in four steps
- Open Selection Tools and drop in the picture. JPG, PNG and WebP all work. The picture is processed by your browser and stays on your device.
- Set Feather first. 0 gives a hard edge, which suits logos, screenshots and drawings. For a photo, try 4 to 10. Feather is applied when you make the selection, so moving it afterwards changes nothing until you draw again.
- Choose Lasso and draw round the part you want. Keep a small margin outside the edge. When you let go, a straight line joins the end of your line to the start, so finish close to where you began. A tinted area with a white outline shows what is selected, and the line under the picture gives the pixel count.
- Press Keep only selection, Delete selection or Crop to selection, then download. All three save a PNG.
On a phone, draw with one finger in one stroke. Lifting your finger closes the shape, so a second stroke starts a new selection rather than adding to the first. Zooming the page in first gives you more room for a detailed edge.
Crop, Keep only or Delete: what you get
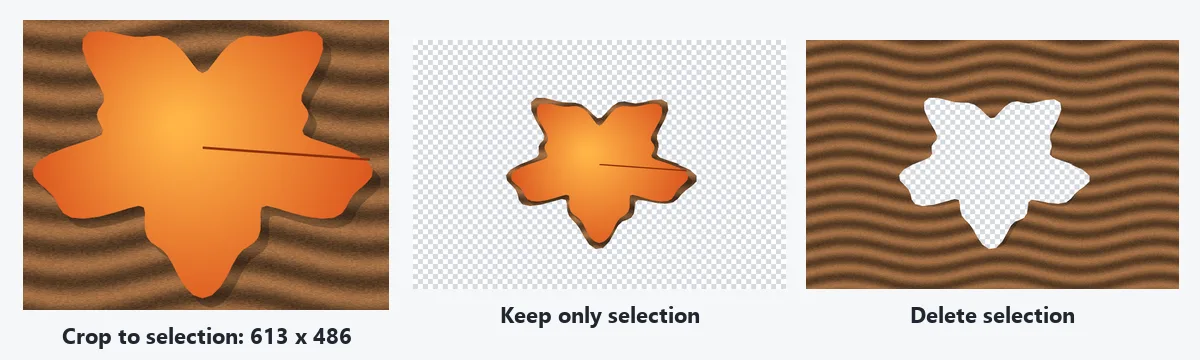
The three buttons use the same selection in different ways. We drew one lasso round a leaf on a wooden table, a 1200 × 800 test picture, and saved each result:
| Button | What the PNG contains | Size on the test | Use it for |
|---|---|---|---|
| Keep only selection | Your shape; everything outside it is transparent | 1200 × 800, 235 KB | A cut-out to place on something else |
| Delete selection | The picture with a transparent hole in your shape | 1200 × 800, 664 KB | Removing one thing, or making a frame |
| Crop to selection | The smallest rectangle round your shape, background included | 613 × 486, 306 KB | Trimming the picture to the area you marked |
| Invert | Nothing saved; it swaps what is selected | – | Selecting everything except your shape |
Two things surprise people. Keep only selection does not trim the picture: the shape sits in a full-size transparent canvas, so its position is kept. And Crop to selection is not a shape crop: it gives a rectangle. To get the shape alone and tightly trimmed, press Keep only selection, then open the PNG again, draw a lasso just round the shape and press Crop to selection.
Feather: hard or soft edge
A cut-out with a perfectly hard edge can look pasted on when you put it on a new background. Feather blurs the edge of the selection, so the cut-out fades out over a few pixels. The slider runs from 0 to 40.
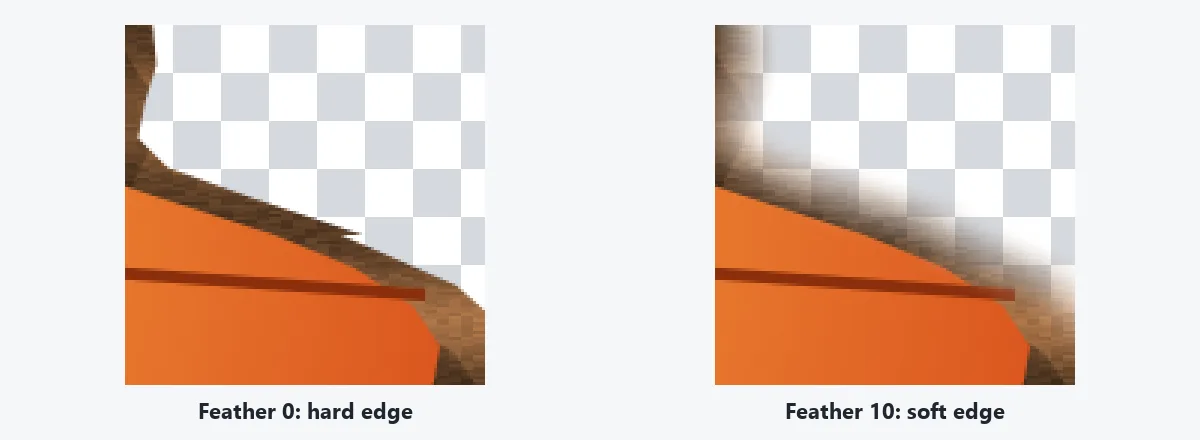
- Feather 0: on the test, only 2,289 pixels along the outline were part-transparent: the smoothing of the drawn line itself. The edge is sharp.
- Feather 10: the selection was the same size (168,141 pixels against 168,282), but 50,918 pixels along the outline became part-transparent. The PNG grew from 235 KB to 333 KB, because soft edges hold more detail.
Use 0 for logos, icons, screenshots and pixel art, where a soft edge looks blurry. Use 4 to 10 for photos you will put on a new background. If the cut-out will carry a shadow, add it afterwards with Drop Shadow; how to add a drop shadow to an image gives settings by picture size.
When the magic wand is quicker
If the background is one flat colour, such as a white wall or a studio sweep, you do not need to draw at all. Choose Magic wand and click the background. It selects every connected pixel within the Tolerance of the colour you clicked (0 to 120, it starts at 32). Then press Delete selection, and the object is left on a transparent background.
We tried it on a blue bottle on a light grey background with a soft floor shadow, clicking the same corner each time:
| Tolerance | Selected | What happened |
|---|---|---|
| 0 | 1 pixel | Real backgrounds are never one exact colour, so only the clicked pixel matched |
| 10 | 87.1 % | Most of the background |
| 32 (default) | 87.9 % | All of the background; the soft shadow stayed with the bottle |
| 60 | 88.5 % | The shadow went too |
| 120 | 88.5 % | No change: the blue bottle is too far from grey to be taken |
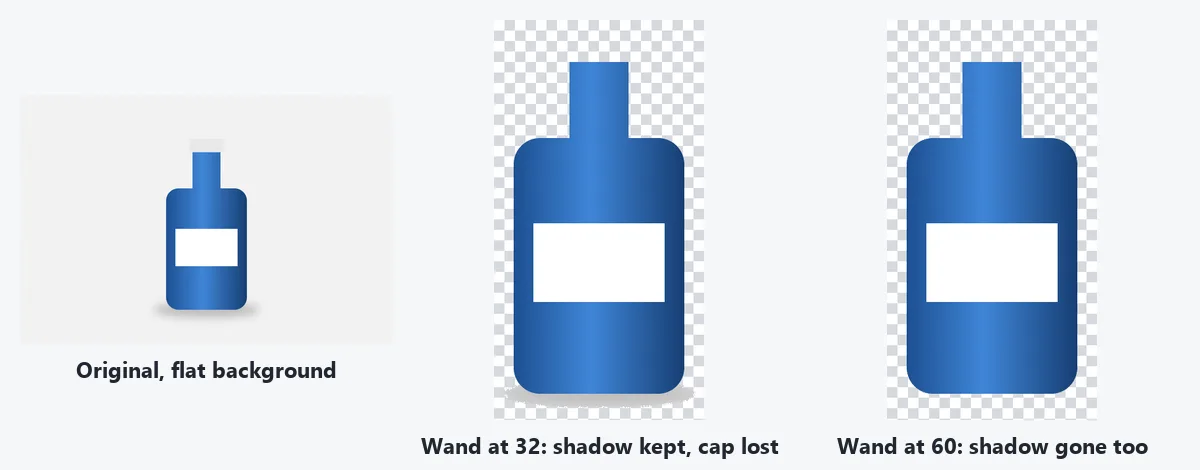
The test also shows the wand’s weak point: the bottle’s pale grey cap was close to the background colour and touched it, so it went with the background at every tolerance. The white label stayed, because it is surrounded by blue and the wand takes only connected pixels. When part of the object matches the background, use the lasso instead.
Which tool for which picture
| Picture | Best tool | Why |
|---|---|---|
| Object on a plain, flat background | Magic wand, then Delete selection | One click, no drawing |
| Object on a busy background | Lasso, then Keep only selection | The wand cannot tell the object from the clutter |
| Person, pet or product in a real photo | Background Remover | An AI model finds the edge, including hair |
| Logo or signature on white paper | Make Background Transparent or the Signature Extractor | Clear the paper automatically and clean the light fringe off the edges |
| Hiding one area, such as a name | Pixelate & Censor | Covers it without leaving a hole |
| A straight rectangle | Image Cropper | Exact sizes and ratios |
Hand selection is the right tool when you know exactly which part you want and no automatic tool picks it: one item from a group, part of a drawing, a shape for a collage. How to make a background transparent compares the automatic options in more detail.
Limits to know
- One selection at a time. A new lasso or wand click replaces the last one; there is no add or subtract. Build a cut-out in steps by downloading and opening the PNG again.
- The lasso is as precise as your hand. Draw slowly round detailed edges, and accept a small rim of background, as in the leaf above, rather than cutting into the object.
- Downloads are PNG. PNG keeps the transparency; a JPG would put white behind it. To make the file smaller, convert it to WebP with the Image Converter; the transparent images guide lists which formats and apps keep the clear areas.
- No layers. The tool makes the cut-out file; it does not place it on another picture. Combine Images joins pictures side by side.
The free AI image editing guide lists every other free tool on the site, and the free Photoshop alternative post maps Photoshop features, including the Lasso and Magic Wand, to them.
Questions
Is there a free form selection tool online?
Yes. The free Selection Tools page has a Lasso that you draw round any shape with a mouse, finger or pen. Then keep only that shape as a transparent PNG, delete it, or crop to it. No sign-up, no watermark, and the image stays in your browser.
How do I cut out a free-form shape from a picture?
Choose Lasso, draw round the part you want and let go; the ends join with a straight line. Press Keep only selection and download the PNG. Everything outside your line becomes transparent and the picture keeps its original width and height.
Why does Crop to selection still show the background?
Crop to selection cuts the picture to the smallest rectangle that holds your shape, so the corners round the shape stay. On our test the lasso shape became a 613 × 486 rectangle with the table still in it. Use Keep only selection to get the shape on its own.
What does Feather do?
It softens the edge of the selection so the cut-out fades out over a few pixels instead of ending in a hard line. Set it before you draw, because it is applied when the selection is made. Feather 10 suits most photos; leave it at 0 for logos and screenshots.
Lasso or magic wand: which should I use?
Use the magic wand when the background is one flat colour: click it, then Delete selection. Use the lasso when the background is busy or the same colour as the object. For people, pets and products, the Background Remover finds the edge for you.
Can I add to a selection or combine two?
No. Each new lasso or wand click replaces the selection before it. To build a cut-out in two steps, download after the first step, open that PNG again and make the second selection on it.