
How to Change the Lighting in a Photo (Free, Online)
To change the lighting in a photo, open the free Photo Relighter, drop in the photo, pick a light (golden hour, studio spotlight, blue hour, neon night or soft daylight), choose the side it comes from and a strength, and press Relight photo. The result downloads at full resolution. It runs in your browser, so the photo is never uploaded, and there is no sign-up. Below are measured results from 27 real runs, what each setting changes, and the photos it does not help.
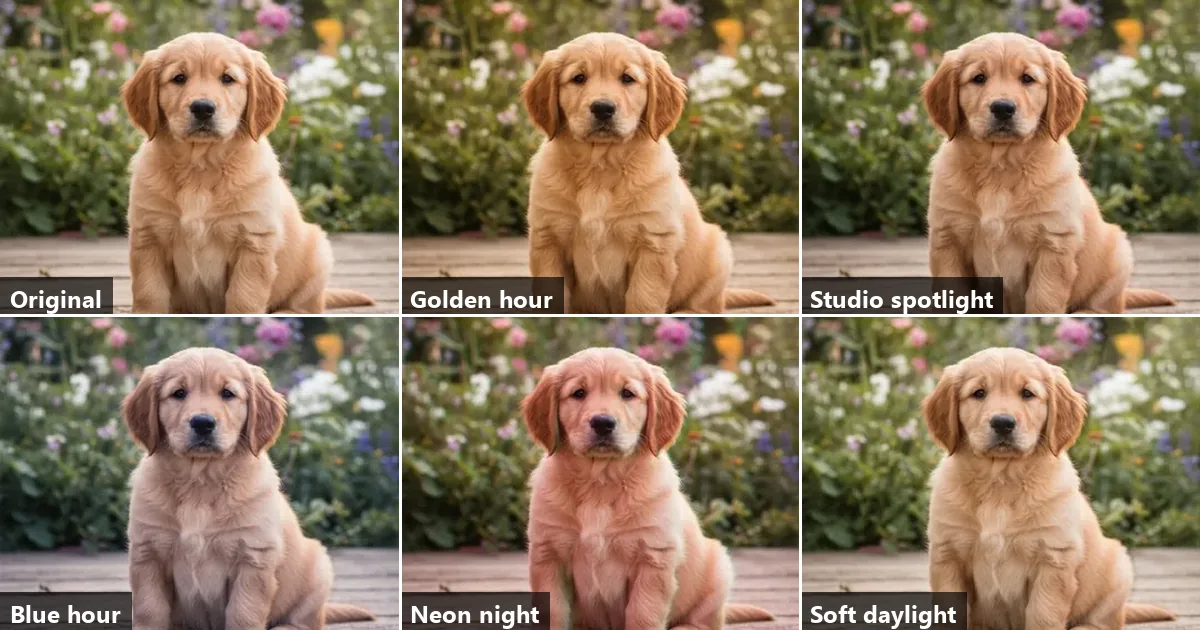
The short answer
- Tool: Photo Relighter. Free, no account, no watermark, no daily limit.
- Settings: five lights, four directions (left, right, above, front) and three strengths (Subtle, Medium, Strong).
- What it does: adds soft, coloured light and shade that follow the shape of the scene. It changes the mood, not the exposure.
- Speed: 10 to 12 seconds for the first run on a page in our test, under 1 second for each further try on the same photo.
- Not the right tool for a photo that is simply too dark, for removing a hard shadow, or for a flat subject such as a wall or a document.
How do you change the lighting in a photo?
- Open the Photo Relighter in a current browser on a computer or a phone.
- Drop in the photo, or click to choose it. JPG, PNG, WebP and HEIC all open.
- Choose three settings. Light: Golden hour, Studio spotlight, Blue hour, Neon night or Soft daylight. Light comes from: the left, the right, above or the front. Strength: Medium is the default; Subtle and Strong are the other two.
- Press Relight photo, compare, then Download JPG. A slider shows before and after. Change a setting and press the button again to try another light; each further try took less than a second in our test.
The first run downloads the AI model once (the tool says about 50 MB). Nothing else leaves or enters your device: the photo is processed in the browser.
How does relighting a photo work?
A photo is flat, so a tool that changes its lighting first needs to know the shape of the scene. The Photo Relighter gets it from a depth model, Depth Anything V2 (small), which estimates how far away each part of the picture is. It is the same model that draws the map in how to make a depth map from a photo. The tool then does four things:
- From how the depth changes between neighbouring points, it works out which way each surface faces.
- It compares that with the direction you chose. Surfaces facing the light get the light’s colour; surfaces facing away fall into shade.
- For every light except Soft daylight, things near the camera catch more of the light than the background, which is what separates a subject from what is behind it.
- It blends this light-and-shade layer softly over the photo, at 40, 70 or 100 percent for Subtle, Medium and Strong. Golden hour and Blue hour also add a thin wash of their colour over the whole picture, and Neon night adds a cyan light from the opposite side.
Because the layer is blended over the original pixels, fur, brick and leaves keep their texture and nothing in the photo is redrawn. That is also the limit of the method: it can add soft light and shade, but it cannot take away a shadow that is already in the photo. The model is listed with its size on the ImgVX AI docs page.
What do the five lights do to a photo?
We ran the live tool on 17 November 2026 in Microsoft Edge 157 on a Windows PC with no graphics card, on the 360 × 492 pixel photos from our own home page. To put a number on each light, we measured the average brightness of the photo before and after, on the usual 0 to 255 scale. The table is the puppy photo, lit from the left at Medium strength.
| Light | Average brightness | Colour | What it looks like | Use it for |
|---|---|---|---|---|
| Golden hour | 8.6 levels darker | Warmer: red rose 17.8 levels against blue | Low, warm evening sun | Pets, gardens, travel and outdoor photos |
| Studio spotlight | 11.8 levels darker | Unchanged | Background drops back, subject keeps its light | Products and single subjects |
| Blue hour | 10.6 levels darker | Cooler: blue rose 30.0 levels against red | Dusk, just after sunset | Streets, city and winter scenes |
| Neon night | 9.8 levels darker | Pink from the light side, cyan from the other | A deliberate, stylised night look | Posters, covers, thumbnails |
| Soft daylight | 5.1 levels brighter | Unchanged | A gentle lift, evenly across the scene | Flat, slightly dull photos |
The surprise is in the second column. Four of the five lights made the photo a little darker on average, because a light from one side also means shade on the other, and the background falls off behind the subject. Only Soft daylight brightened it: on the hummingbird photo, Soft daylight from the front raised the average by 16.7 levels, while Studio spotlight from the left lowered it by 16.2. So treat the Photo Relighter as a mood tool. If the real problem is a photo that is too dark, fix the exposure first (see the table below).
Which light direction should you choose?
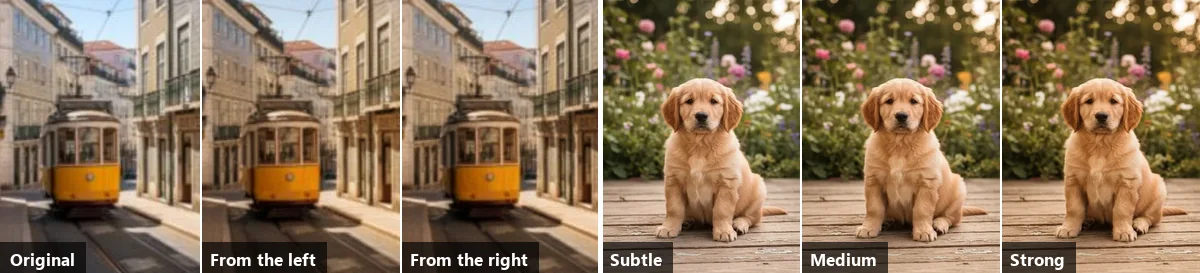
The direction decides which parts of the scene go into shade. On the tram photo, a street with buildings on both sides, the two halves swapped when we moved the light:
| Golden hour, Medium | Left half of the photo | Right half of the photo |
|---|---|---|
| Light from the left | 8.6 levels darker | 2.6 levels darker |
| Light from the right | 4.9 levels darker | 11.1 levels darker |
That looks backwards until you picture the street: the wall on the left faces right, away from a light on the left, so it goes into shade while the wall on the right catches the light. On the puppy photo, light from above left the deck almost unchanged (the lower half of the photo moved by 0.1 levels) and darkened the upright background by 10.4, because a floor faces up and a hedge does not. From the front gave the smallest change of the four, 4.9 levels.
How to choose:
- Match the light that is already there. Find the brighter side of the subject and the side the shadows fall away from, and pick that side. getimg.ai’s relighting guide gives the same advice: work with the photo’s existing light direction where possible.
- The left or the right gives the most shape, because one side of everything turns away from the light.
- Above suits outdoor scenes, where the real light comes from the sky.
- The front is the gentlest and the safest when you cannot tell where the original light came from.
On a single subject in the open, such as the puppy, left and right looked nearly the same (8.6 against 7.5 levels). Direction matters most when the scene has large surfaces at different angles.
Should you use Subtle, Medium or Strong?
Strength is how much of the light-and-shade layer is blended in. On the puppy photo with Golden hour from the left:
| Strength | Average pixel change | Average brightness | Verdict |
|---|---|---|---|
| Subtle | 6.7 levels | 4.9 levels darker | Hard to spot without the slider; the most natural |
| Medium | 11.5 levels | 8.6 levels darker | Clearly warmer, still believable |
| Strong | 16.0 levels | 12.1 levels darker | A visible effect; for a stylised look |
Start with Subtle or Medium for anything that should still look like a photograph, and keep Strong for Neon night and other looks that are meant to be noticed. Because a further try on the same photo took under a second, the quickest way to decide is to run all three and compare.
When does relighting not help?
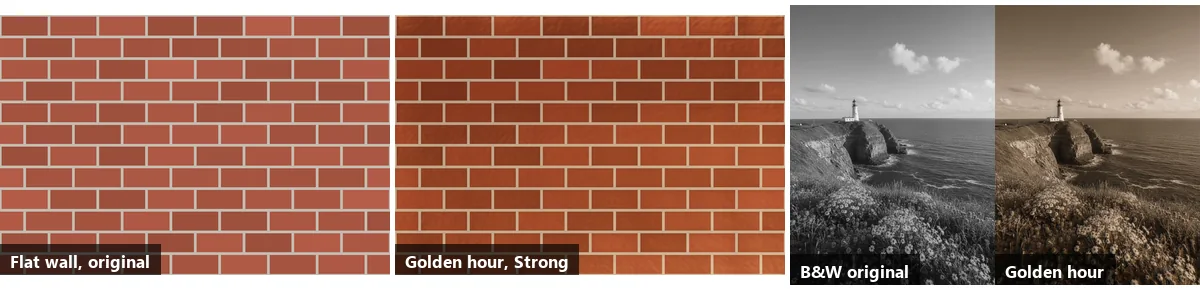
The method depends on depth, so it fails where there is no depth to find, and it only adds soft light, so it cannot undo hard light. These are the cases we hit or that follow from how the tool works:
- Flat subjects. On a drawn brick wall seen straight on, Golden hour at Strong made the picture 17.0 levels darker and more orange, with uneven patches (the left half darkened by 21.0, the right by 12.9). There was no shape for the light to follow. The same applies to documents, screenshots, posters and flat artwork.
- Hard shadows already in the photo. A shadow across a face or a wall stays exactly where it is. Relighting from the other side gives two lights that disagree.
- Dark, underexposed photos. Four of the five lights darken the average, so a dark photo gets darker. Brighten it first.
- Black-and-white photos with a coloured light. Golden hour turned our black-and-white lighthouse photo brown, like a sepia print. Use Studio spotlight or Soft daylight, which leave the colour alone, unless a tint is what you want.
- Transparent PNGs. The result is always saved as a JPG, so transparency is lost.
We tested on animals, a street, a landscape and a flat wall. We did not test portraits of people, so we give no numbers for faces.
Which tool fixes which lighting problem?
“Bad lighting” covers several different problems, and relighting solves only one of them.
| The problem | Use | Why |
|---|---|---|
| The photo looks flat and has no mood | Photo Relighter | Adds directional light and shade that follow the scene |
| The whole photo is too dark | Low Light & Dehaze, with the steps in how to brighten a dark photo | Lifts exposure; relighting mostly adds shade |
| The colours are too orange or too blue | Image Adjustments | White balance, exposure and contrast on one panel |
| One area is too dark or too bright | Dodge, Burn & Sponge | Lighten or darken by brushing over just that area |
| The sky is grey and dull | Sky Replacer, explained in how to replace the sky in a photo | Swaps the sky and matches the light of the rest |
| You want a film or cinema colour look | Colour Grading & LUTs | Changes colour everywhere, with no direction |
| The subject does not stand out | Portrait Blur | Blurs the background, using the same kind of depth |
The tools combine well. A common order is exposure first, then the relight, then any crop or resize, so the new light is applied to a photo that is already correctly bright.
Which relighting tool should you use?
We read each tool’s own page on 17 November 2026. The limits below are what those pages state.
| Tool | Where the photo goes | How you set the light | Stated on its page |
|---|---|---|---|
| ImgVX AI Photo Relighter | Stays in your browser | Five lights, four directions, three strengths | Free, no account, no limit; output at the photo’s own size |
| Evoto AI Relight | Uploaded | Two presets: Natural Light and Golden Hour | Built mainly for portraits; JPG, PNG or WebP in, JPG out; batch mode; no free quota is stated |
| Upsampler photo relight | Uploaded to shared GPUs | Five presets, including dramatic side light and strong backlight | No sign-up; a daily allowance (no number given); results come back at about one megapixel |
| getimg.ai Relight | Uploaded, account | A direction globe or six presets, any colour, intensity 1 to 10 | 1K or 2K output; paid credit plans |
| Dreamina relight | Uploaded, sign-in | A text description of the light | Daily free credits (no number given); returns several variations |
| Cloudinary Photo Lighting Editor | Uploaded | Brightness, contrast, midtone and warmth sliders | Its page says it is not AI relighting; it is an exposure editor |
The generative tools can do things a depth-based relight cannot, such as backlight or a light of any colour from any angle, because they produce a new picture. That is also their cost: the photo goes to a server, free use is rationed, and the output may be smaller than your original. Check small details such as lettering and patterns after a generative relight. The ImgVX tool is the more modest one: it only lays light and shade over your own pixels, at full size, on your own device. It is one of the on-device tools listed in the free AI image editing guide.
Troubleshooting
| What you see | Cause | Fix |
|---|---|---|
| The photo came out darker | Every light except Soft daylight adds shade | Use Soft daylight, a lower strength, or brighten first with Low Light & Dehaze |
| Hardly any change | Subtle strength, light from the front, or a flat scene | Try Medium and light from the left or right |
| It looks edited or fake | The new light fights the light already in the photo | Match the existing direction and drop to Subtle |
| Uneven patches on a wall or a page | No real depth for the model to measure | Use Image Adjustments for flat subjects |
| A black-and-white photo turned brown or blue | Golden hour and Blue hour add a colour wash | Use Studio spotlight or Soft daylight |
| The transparent background is gone | The result is saved as a JPG | Relight first, then cut out the subject |
| The first run is slow | The model downloads once, then loads from the cache on each visit | Wait once; further tries on the same photo took under a second in our test |
| You need more pixels afterwards | Relighting keeps the size; it does not enlarge | Enlarge with the Image Upscaler |
Questions
How do I change the lighting in a photo after it has been taken?
Open the free Photo Relighter, drop in the photo, choose the Light (golden hour, studio spotlight, blue hour, neon night or soft daylight), where the light comes from and the Strength, then press Relight photo. The tool estimates the depth of the scene and shades it as if lit from that side. Nothing is uploaded and there is no sign-up.
Can I relight a photo for free without uploading it?
Yes. The ImgVX AI Photo Relighter is free, has no account, daily limit or watermark, and runs in your browser, so the photo stays on your device. The first run downloads the depth model once (about 50 MB); after that it is cached.
Does relighting make a dark photo brighter?
Mostly not. In our tests four of the five lights made the photo slightly darker on average, by 9 to 12 brightness levels out of 255 at Medium strength, because they add shade as well as light. Only Soft daylight brightened it. To lift a dark photo, use Low Light & Dehaze and the steps in how to brighten a dark photo.
Can I remove or move a shadow by relighting a photo?
No. The Photo Relighter adds soft light and shade on top of the photo; it cannot remove a hard shadow that is already there or draw a sharp new one. A shadow from the original light stays where it is, so choose a light direction that agrees with it.
Which direction should the new light come from?
Choose the side the existing light already comes from: look at which side of the subject is brighter and where the shadows fall, and pick that side. A new light that agrees with the old one looks natural; one that fights it looks edited. From the front gave the smallest change in our tests and is the safest choice when you cannot tell. Browse: all free image tools.
Does relighting lower the quality or size of my photo?
No. The result has the same pixel size as the photo you put in: a 2880 × 3936 test photo came back at 2880 × 3936 as a 1.14 MB JPG. The download is always a JPG, so a transparent background does not survive; relight first and cut out afterwards if you need transparency.
How long does it take to relight a photo?
In our test on a Windows PC without a graphics card, the very first run took 23.1 seconds including the model download. After that, the first run on a newly opened page took 10 to 12 seconds, and trying another light or direction on the same photo took under one second.