
How to Replace the Sky in a Photo Online, Free
To replace the sky in a photo for free, open the Sky Replacer, drop in a photo with sky along the top, choose a blue, sunset, blue-hour, starry or overcast sky (or upload your own sky photo) and click Replace sky. The AI finds the sky in your browser in a few seconds, the photo is never uploaded, and the result downloads at full size. Below is what it did to three real test photos, including the two flaws to check before you post the result.
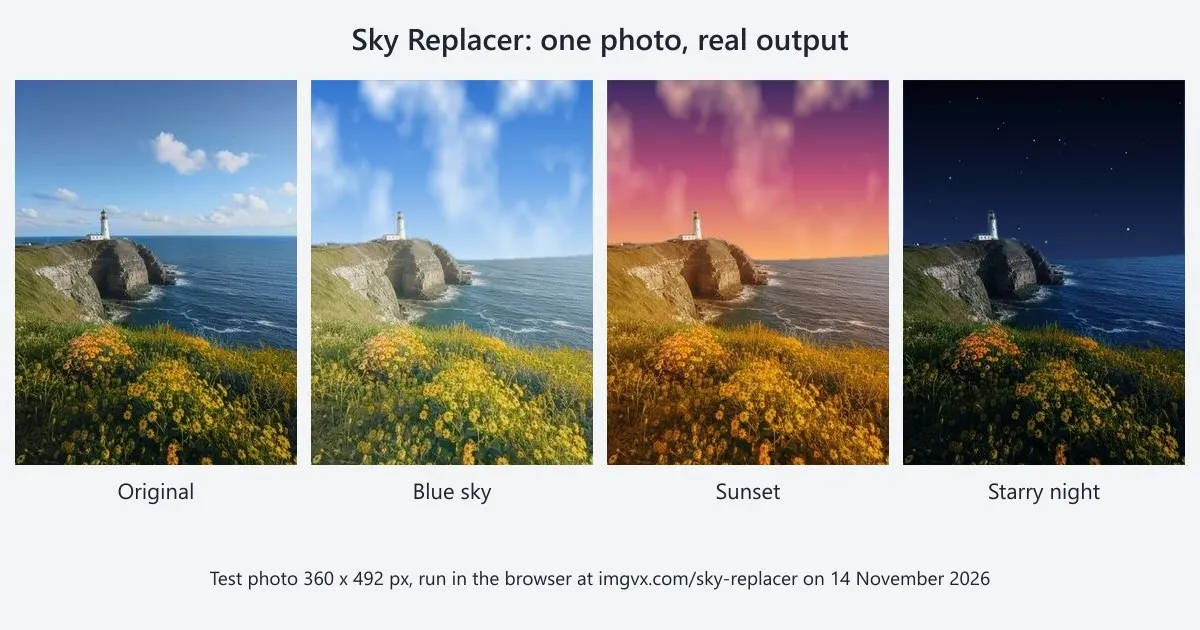
The short answer
- Tool: Sky Replacer. Free, no sign-up, no watermark, no daily limit; the photo stays on your device.
- Speed, measured: 21 seconds the first time (the AI model downloads once), then under 6 seconds per sky on our test PC.
- Works best on: landscapes, buildings and streets with open sky along the top of the frame.
- Check two things: a thin band of far sea or haze at the horizon can be swapped for sky, and wires or roof edges can keep a pale outline.
- Not the right tool when you need to drag the sky edge by hand, for skies seen only through a window, or to hide something in a property photo.
How do you replace the sky in a photo online?
- Open the Sky Replacer and drop in your photo. JPEG, PNG, WebP and iPhone HEIC files all open. Pick a photo where the sky reaches the top edge of the frame.
- Choose the new sky. Blue sky with clouds, Sunset, Blue hour, Starry night, Soft overcast, or A sky photo of my own.
- Leave “Match the light on the land” on Yes for the built-in skies. It lays a gentle wash of the new sky’s colour over the rest of the photo, so a sunset sky does not sit above grey noon light.
- Click Replace sky. The first run downloads the depth model once (about 50 MB, or about 27 MB on devices without WebGPU) and keeps it in the browser’s cache; later runs start straight away.
- Check the result at full size, then download. Look along the horizon and around wires, branches and roof lines (see the edge problems). If it is close but not right, try a different sky: a paler one hides small mistakes better. “Keep editing this result” sends it on to another tool.
The download is a JPEG with the same width and height as your photo. Your original file is not changed.
Which new sky should you choose?
The five built-in skies are painted fresh for each photo at its own size, so they are never blurry from being stretched, and each one comes with its own colour for the “Match the light” wash.
| Sky | What it looks like | Wash on the land | Good for | Avoid when |
|---|---|---|---|---|
| Blue sky with clouds | Deep blue at the top fading to pale near the horizon, soft white clouds | Faint warm cream | Houses, travel photos, any dull grey day | The scene has no shadows at all and looks flat; add contrast with Image Adjust too |
| Sunset | Purple to pink to orange, with tinted clouds | Orange | Landscapes and sea views | Strong midday shadows point straight down; it will look pasted on |
| Blue hour | Dark navy to blue to a warm glow at the horizon | Cool blue | Buildings with lights on, city streets | The land is in bright sun |
| Starry night | Near black to navy with scattered white stars | Dark navy | Creative edits, posters | You want the result to look like a real night photo; the land stays day-bright under it |
| Soft overcast | Even grey-white with faint cloud | Grey | Toning down a blown-out white sky, a calmer look | You want colour |
| Your own sky photo | Whatever you upload | None | Matching a real sky from the same trip | The sky photo is a different time of day or lit from the other side |
The simple rule photographers use applies here: the light in the sky should agree with the light on the land. If shadows in the photo fall to the left, a sunset glowing on the left looks wrong. If the photo was taken on a grey day with no shadows, a bright blue sky looks a little odd too; brightening the land afterwards with Image Adjust or giving it directional light with the Photo Relighter closes the gap.
How does the tool decide what is sky?
Knowing the rule tells you which photos will work before you try. The Sky Replacer runs Depth Anything V2, an AI model that estimates how far away each part of a photo is (the model and the method are described in the Depth Anything V2 paper; the small model the tool uses is published under the Apache-2.0 licence on Hugging Face). A pixel counts as sky only when all three of these are true:
- It is the farthest thing in the photo. Depth is relative, so the tool takes the pixels the model rates as the most distant: within 2.5% of the far end of the photo’s depth range.
- It is bright or blue. Its brightness is above a low threshold, or it is clearly bluer than it is red. This stops a distant dark hill from being taken for sky.
- It is connected to the top edge. The tool starts from the top row and spreads to every touching pixel that passed the first two tests.
If the area found is less than 3% of the photo, the tool stops with the message “No sky was found along the top of this photo.” Otherwise the area becomes a mask, softened by about one pixel for every 700 pixels of photo width so that leaves and branches blend in, and the new sky is painted into it. You can see the same depth estimate as a picture with the AI Depth Map tool; how to make a depth map from a photo explains how to read one. Where the depth map shows the sky as the darkest, flattest region, the sky replacement will be clean.
Two things follow from the rule. Sky seen through a window, an arch or a gap that does not reach the top edge is left alone. And anything that the model also rates as very far away, bright and joined to the sky, such as a hazy horizon or distant sea, can be replaced along with it.
What happened when we replaced the sky in three real photos?
We ran the live tool on 14 November 2026 in Microsoft Edge on a Windows PC, with three 360 × 492 pixel photos: a lighthouse on a sea cliff, a black and white copy of the same photo, and a narrow street with a tram. We added a fourth file with no sky on purpose.
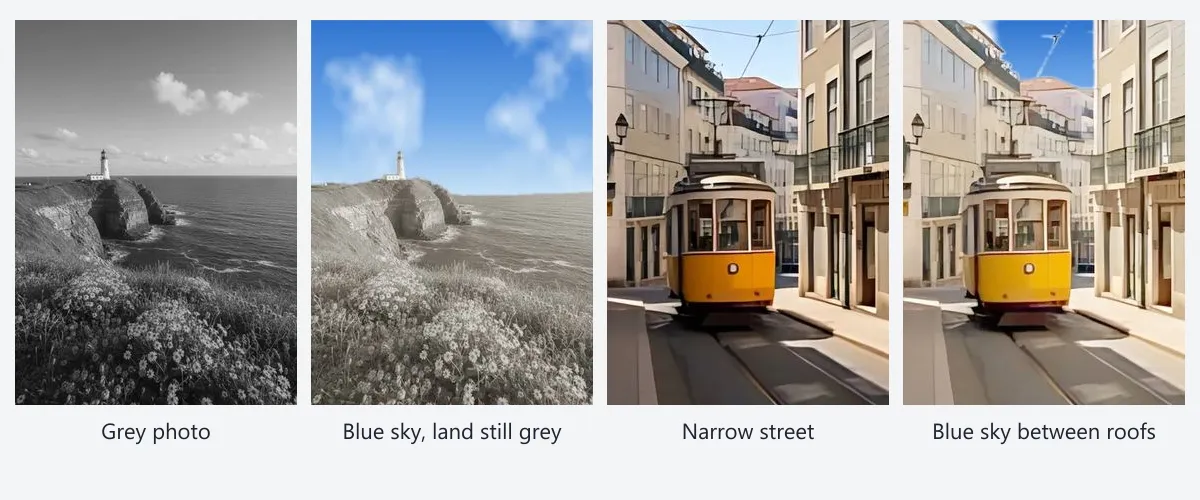
| Photo | New sky | Time | Output | What we saw |
|---|---|---|---|---|
| Lighthouse, colour | Blue sky with clouds | 22.2 s (first run, model download included) | 360 × 492 JPEG, 68.3 KB | Clean around the lighthouse and cliff; a band of far sea at the horizon became sky |
| Lighthouse, colour | Sunset | 5.7 s | 66.8 KB | Land warmed to match; same horizon band |
| Lighthouse, colour | Starry night | 5.7 s | 57.9 KB | Convincing sky, but the land stays daylit |
| Lighthouse, colour | Soft overcast | 5.8 s | 62.3 KB | Flat white-grey sky; the photo looks duller, as expected |
| Lighthouse, black and white | Blue sky with clouds | 21.0 s (new browser profile) | 61.4 KB | Blue sky above grey land; the tool does not add colour to the land |
| Street with tram | Blue sky with clouds | 22.0 s (new browser profile) | 57.9 KB | Sky between the roofs replaced; pale halo along the tram wires and roof edges |
| Puppy cut-out, transparent background | Blue sky with clouds | Stopped | None | “No sky was found along the top of this photo.” |
The pattern is clear. On an open landscape the sky is found cleanly and the tool is quick once the model is cached; the time a run takes depends on your device and the photo’s size, so treat our seconds as an example rather than a promise. A black and white photo needs colour first: run it through the Photo Colorizer, then replace the sky. And the busier the edge between sky and land, the more there is to check.
Why does the horizon move, and where do the haloes come from?
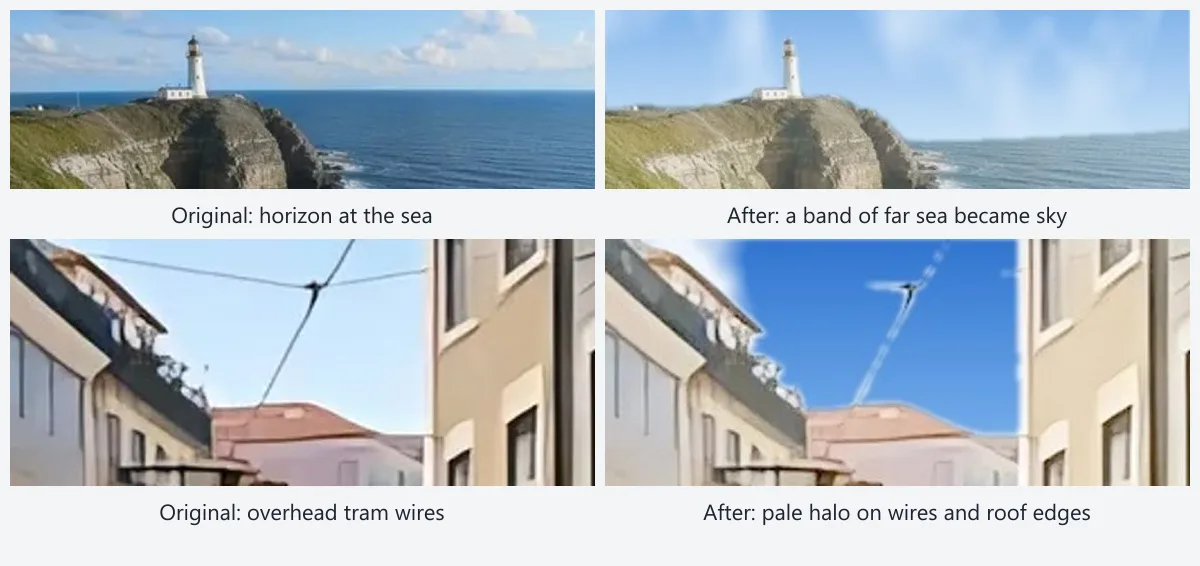
A band of far sea or haze becomes sky
On the lighthouse photo the sea horizon sat about 200 pixels from the top. After every replacement, the new sky reached about 25 pixels lower on the right-hand side, roughly 5% of the photo’s height, so the far strip of sea was painted over and the horizon now slopes slightly. The depth model rates that distant water as just as far away as the sky, and it is bright and blue, so it passes all three tests.
What to do about it:
- Choose a sky that is pale at the bottom. Blue sky and overcast fade to a light colour at the horizon, which makes the change hard to spot at normal viewing size. Sunset and blue hour end in a strong orange glow that shows it clearly.
- Crop after replacing if the horizon line is near an edge of the frame you do not need, with the Image Cropper.
- Use an editor with an edge slider when a dead-straight sea horizon is the point of the photo. Photoshop’s Edit > Sky Replacement has Shift Edge and Fade Edge sliders for exactly this, as Shotkit’s walkthrough shows. The Sky Replacer has no edge control.
A pale outline around wires, twigs and roof lines
On the street photo the tram wires kept a white outline and the roof edges a pale rim. The depth model estimates distance in soft patches rather than to the exact pixel, so the sky right next to a roof, or around a wire one or two pixels wide, is rated slightly nearer than open sky and fails the “farthest” test; those pixels keep the old sky. Photos longer than 1,024 pixels are measured on a smaller copy, and the mask is then scaled up and softened. The softening is deliberate: a hard edge would look cut out with scissors.
- The halo is the colour of the old sky. It nearly disappears when the new sky is similar in brightness: replacing a pale blue sky with Blue sky with clouds hides it; replacing it with Starry night shows it most.
- Photos with only a few wires can be cleaned first: remove the wires with the Object Eraser, then replace the sky.
- Bare winter trees against the sky are the hardest case for every sky tool, not only this one. Expect the gaps between fine branches to keep some of the old sky.
How do you use your own sky photo?
- Choose A sky photo of my own under New sky. A Sky photo box appears.
- Add a photo of sky only, taken in landscape shape. The tool crops it from the centre to cover the top of your photo down to the lowest point the old sky reached, and at least the top 30% of the frame.
- Click Replace sky and check the light. “Match the light on the land” has no colour to add for an uploaded sky, so the land keeps its own colour; warm or cool it afterwards with Image Adjust if it does not match.
The best sky photos are your own from the same place and the same time of day: the sun is on the same side and the haze at the horizon matches. A sky with the sun in it does not work well unless the land in your photo is lit from that side. Use a sky picture you took or are allowed to use; a sky downloaded from a search engine is usually someone else’s photo.
Should you use a browser tool, another online tool or Photoshop?
| Need | Best choice | Why |
|---|---|---|
| A quick new sky on a landscape, house or travel photo | Sky Replacer | One click, free, no account, the photo stays on your device |
| A private or work photo you cannot upload | Sky Replacer | The AI runs in the browser; nothing is sent to a server |
| A perfectly straight sea horizon, fine control of the edge | Photoshop Sky Replacement | Shift Edge and Fade Edge sliders, layer masks you can paint |
| A large print from a small sky-replaced file | Replace first, then the Image Upscaler | The upscaler adds pixels after the sky is in place |
| A whole new background behind a person or product | Background Replacer | It cuts out the subject, not just the sky |
| A dark or underexposed photo with a dull sky | Low Light & Dehaze first, then the Sky Replacer | Fix the land’s exposure before matching a sky to it; see how to brighten a dark photo |
Other free online sky tools usually work on a server. That is not wrong, but read their limits: Upsampler, for example, states on its page that output is about one megapixel and that free use has a daily allowance, and Magic Eraser says its free use is limited per day and that you cannot pick the sky. The Sky Replacer has none of these limits, and the trade-off is that the first run downloads the model to your device.
When is replacing a sky not honest?
A new sky is a creative edit, and most of the time nobody minds. It becomes a problem when the photo is presented as a record of something:
- Property listings. In California, AB 723 has required since January 1, 2026 that an altered advertising image carry a statement saying so, with access to the original, and a replaced sky is an altered element. Label it “Sky digitally enhanced” and never use it to hide a pylon, a mast or a building. The real estate photo editing guide covers the rules and wording in detail.
- News, evidence and contests. Many photo competitions and every newsroom forbid replacing parts of the scene. Read the rules first.
- Travel and hotel reviews. A blue sky over a rainy-season photo misleads the next visitor.
Keep the original file in every case, so you can show what the camera recorded.
Troubleshooting
| What you see | Cause | Fix |
|---|---|---|
| “No sky was found along the top of this photo.” | Less than 3% of the photo is far, bright sky touching the top edge | Use a wider shot with sky along the top; for a person or object, use the Background Replacer |
| The far sea or haze at the horizon was replaced too | The model rates them as far away as the sky, and they are bright | Pick Blue sky or Soft overcast, crop, or use an editor with an edge slider |
| Pale outline around wires, twigs or roofs | The sky right next to thin or near objects is rated slightly nearer and keeps the old colour | Pick a sky close in brightness to the old one; erase wires first with the Object Eraser |
| Sky through a window or arch was not changed | Only sky connected to the top edge is replaced | Expected; there is no way to add a second sky area |
| Land is grey under a blue sky | The photo is black and white | Colour it first with the Photo Colorizer |
| The new sky looks pasted on | The light on the land does not match the sky | Keep Match the light on Yes, try Blue hour or Overcast, or relight with the Photo Relighter |
| The first run is slow | The depth model downloads once (about 50 MB) | Wait for it; later runs use the cached copy |
The free AI image editing guide lists every other AI tool on the site that runs on your device the same way.
Questions
How do I replace the sky in a photo for free?
Open the free Sky Replacer, drop in a photo with sky along the top, pick a new sky (blue with clouds, sunset, blue hour, starry night, soft overcast or a sky photo of your own) and click Replace sky. The AI runs in your browser, so the photo is not uploaded, and the result downloads as a JPEG at the same size as the original.
Can I replace the sky without Photoshop?
Yes. A browser tool such as the ImgVX AI Sky Replacer (imgvx.com) finds the sky and swaps it in one click, with no install and no account. Photoshop gives more control, such as sliders to move and soften the sky edge, which matters for a sea horizon or fine wires; for a quick blue sky on a house or landscape a browser tool is enough.
Why does it say no sky was found?
The Sky Replacer only replaces sky that touches the top edge of the photo and covers at least 3% of it. A close-up, a portrait against a wall, a cut-out with a transparent background or sky seen only through a window gives the message "No sky was found along the top of this photo." Use a wider shot, or the Background Replacer if you want to swap a whole background instead.
Can I use my own sky photo?
Yes. Choose "A sky photo of my own" and add the picture in the box that appears. It is cropped from the centre to fill the sky area, so use a landscape-shaped sky photo taken at a similar time of day. The "Match the light on the land" option has no colour to add for your own photo, so adjust the land afterwards with Image Adjust if it looks too bright or too cool.
Does replacing the sky lower the quality of the photo?
The output has the same width and height as the original and is saved as a high-quality JPEG. The land is copied from your photo, with a gentle colour wash if "Match the light" is on. The new sky is soft, so it can look smooth next to a sharp foreground at large sizes.
Is it OK to replace the sky in a real estate photo?
Usually yes, if you label it and do not hide anything. In California, AB 723 requires a statement that an advertised image was altered and access to the original; elsewhere, many listing sites expect a label. Write "Sky digitally enhanced" and never use a new sky to hide a pylon, a mast or a building. Browse: all free image tools.
Why is there a pale outline around trees, wires or roofs?
The depth model estimates distance in soft patches rather than to the exact pixel, so the sky right next to a roof or around a thin wire is rated slightly nearer than open sky and is not replaced. Those pixels keep a trace of the old sky. It is least visible when the old sky was pale and the new one is similar, so blue sky or soft overcast hides it better than night.